
The GUIDE index is here !
The wormwrithings is not a place, but a gigantic region of the underdark. It’s home and preying ground of purple worms; as such, it is a series of interconnected, perfectly round tunnels, left by the worms after they pass. In the worms’ way of life, they never travel through their own tunnels, choosing to dig new ones all the time. Because of this, it’s relatively safe to travel the tunnels, as the chances of a worm passing through it are very small. It’s important to note that the wormwrithings is not a horizontal plane, worms can travel in any direction. If seen from outside, the wormwrithings region is a spherical region where the worms dwell. From the PC’s perspective, they could have to travel to slanting or even vertical tunnels, adding to the verticality of the battles and descriptions.
Because worms are always re-digging the tunnels, a map of the area is completely impossible. Tunnels appear and disappear all the time, revealing unknown areas or hiding them again for years. The PC’s will visit this place first because it’s located near Araj Tower; two ingredients of the Dark Heart can be found here, the purple worm egg and the beholder eye. The chapter is divided in different areas or events that happen in the wormwrithings; while traveling from one place to the next, wilderness encounters occur.
There is a table of random encounters in page 167. As I have suggested previously, it’s best if the “random” encounters are not rolled but rather decided by the DM when prepping for the game. The book also assumes that the DM will use this random encounter table for the rest of the campaign. The table has only ten different options, which is not enough for the rest of the campaign. DMs should prepare more variated encounters to avoid getting repetitive and boring. My Extra Encounters article has great ideas for inspiration.
1.- The Troglodyte Lair (page 168)
The first stop in the worm tunnels is a cave where to factions of troglodytes are having a feud over a magic sword. The troglodyte chieftain has the sword, other loyal troglodytes, and some cavalry troglodytes hidden in a cave. His former war marshal is on the other side of a stream with some allies, and the chieftain’s mate, who he is threatening to kill to get the sword.
All this is great except for one thing, challenge rating. In my opinion this part of the adventure looks like it was meant for the first part of the campaign, and was later moved to the wormwrithings. The problem is, a level 10-ish party with the expeditionary force is going to wreck and walk over the troglodytes, even if they all attack at once. So it comes down to the question, do you want to present a good challenge? if so, then the troglodyte stats have to be bumped. Maybe use the veteran stats for the chieftains and for the rest of them a bump in attack bonus and HP.
The other option is to leave the encounter as is. The PC’s will sweep it, but it also makes sense that they encounter threats severely underpowered. Not all encounters have to “grow” as they level up. There is just one thing left to note, before or after resolving the troglodyte stand-off, the PC’s might decide to check out the cave in area 8 (page 170) which is a roper lair. Now this place is a serious threat. Ropers are some of those monsters whose CR doesn’t really describe how deadly they are, they are listed as CR 5. In the first turn the two ropers can grapple the entire party, restraining them and reeling in one at a time to bite them. The attack has reach of 50 ft. These are really scary monsters.
2.- Voice in the Dark
The PC’s aren’t the only ones hunting for purple worm eggs. These eggs are priced very high in Menzoberranzan, sold to only well-connected wizards. A few days ago, a group of egg-snatchers was on its way to the purple worm nursery, to get some eggs. The group consisted of Zhora Hallen (leader and guide), Hanne Hallen (Zhora’s daughter and wizard apprentice) and 10 drow. The group was surprised by a worm who bursted through the tunnel they were traveling. Hanne Hallen was separated from the rest of the drow expedition. Zhora Hallen thinks her daughter is dead and continued toward the nursery.
Hanne Hallen thinks her mother and the rest are dead so she decided to go back to Menzoberranzan on her own. She is alone and afraid, she has been making do with the few spells she knows. In this encounter, she uses minor illusion spells to try to make the PC’s change course. They probably won’t and will eventually find her. She can’t possibly match them but will try to fight anyway. If offered a place, she will travel with the party. This is a great role-playing opportunity, if the PC’s treat her well and let her follow. She will be reunited with her mother in the worm nursery. Zhora Hallen will be eternally grateful with the PC’s. This will be important later on when the PC’s visit Menzoberranzan, Zhora will help them.
3.- The worm Nursery and the Dark Hunters
Ok, this is the bee’s knees of all this wormwrithings thing. This encounter is AWESOME and it’s one of the best built set pieces in the book. It requires special care when prepping it. Look at the map in page 173. The tunnels T1, T2 and T3 do not exist when the PC’s arrive, they are dug by worms after they get there. When the PC’s arrive to the area due to a cave-in, they find themselves in a cul-de-sac of four chambers. It’s only after 15 minutes that a worm goes through those chambers, possibly scaring the shit out of the PC’s, and digs a tunnel directly to the nursery.
Page 172’s sidebar specifies when other worms arrive and dig tunnels number 2 and 3. Apart from that, after 20 minutes of the PC’s arrival. Zhora Hallen and her group arrive to the nursery to steal two purple worm eggs. This part is explained in page 175 for some reason, but it actually happens at the same time the PC’s are getting their own egg. If Hanne Hallen is not around, the drow party is hostile unless convinced to work together with a Persuasion check (DC 20). If Hanne is with the PC’s and was treated well then the PC’s will have the drow’s allegiance. How this part plays out is up to the DM and depending on many factors. The drow party wants to steal two eggs. The PC’s need one, but might decide to get more to sell them. Page 173 has instructions on how the eggs can be removed from the clusters. They take 2d4 min. to be detached from their clusters, and break if they fall. The drow member who climbs to get the eggs has a spider silk net they use to grab the egg and slowly reel it down to other drow members ready to catch it.
The PC’s have to come up with a way to do the same, as the drow will not help them. They could use a web spell to catch the egg or a levitate spell to make it descend safely. The PC who detaches the egg can try to do a complicated knot that replicates the drow’s strategy (DEX check, DC 14). However they choose to do it, detaching the egg(s) and bringing it down takes time. During this time, giant spiders could attack the PC’s, or even a purple worm could pass by coincidence. If the spiders attack and a fight erupts, there is a chance that Stronk will hear it and wake up to fight (page 172). He is tough, but if he is reduced to half HP, he will run to the echo chamber and shout, to attract a purple worm.
If a purple worm arrives to the nursery when the two parties are still working their way around the eggs, the drow are trained to react. As experienced poachers, they know about the worms’ blindness and tremorsense. Any drow up in the clusters, cover themselves with their capes and stay motionless. The rest of the drow stick themselves to the wall and stop breathing, they know they are invisible to the worm if they do it. Zhora Hallen, the most experienced one, doesn’t even flinch and stays where she is, even in the middle of the room, quiet and immovable like a statue, she’s done this scores of times and has advantage in the Stealth check (tough life). The PC’s will probably do the same to avoid attracting the worm’s attention, it isn’t hard to hide from the worm this way (Stealth check, DC 10).
However this plays out, the PC’s will probably have to fight and kill the fomorian Stronk, but might choose to avoid the worms altogether and escape. Although this is possible, for dramatic and story telling purposes, I advice to have a confrontation with a purple worm, it’s one of the most iconic D&D monsters and this is the perfect moment to face it. It’s a tough fight, specially if the party just fought the fomorian. If the party has the help of their expeditionary force, then it’s an almost fair fight. If there is no expeditionary force, you can have the drow party help them, but only if Zhora and Hanne were reunited, otherwise, the drow hide and flee, leaving the PC’s to fend for themselves. Be careful, a PC swallowed by the worm is in dire danger if it cannot deal 30+ damage in a single round; it might well mean the PC will die. The party might have access to Raise Dead, but if the dead character is inside the worm for too long, the acid will eventually make the spell useless. Now needing a Resurrection spell, which the party still doesn’t have yet (probably). Just some facts to take into account when prepping for such an amazing encounter.
After exiting the nursery, the drow will go back to Menzoberranzan with their two eggs (if they got them). The PC’s will have gotten their purple worm egg; transporting it is complicated as it is quite big, but it can be done. If you took my advise in Chapter 9, then teleportation spells are not impeded by the underdark. The PC’s could use teleportation to instantly bring the egg to Vizeran DeVir, who will promptly start the construction of the dark heart. After this, the PC’s can continue their way through the wormwrithings to a place called the Vast Oblivion.
4.- The Vast Oblivion
This encounter with the beholder Karazikar has the potential to be one of the best in Out of the Abyss. Unfortunately it’s hastily written and lacks maps of the beholder’s lair. But we can fix it with some prepping. First of all, this is a fight with a legendary creature in its lair. It’s important to remember the lair actions and legendary actions, which occur every round. Because this will be a solo fight (unless Shedrak is still around), I recommend to give Karazikar legendary resistances too.
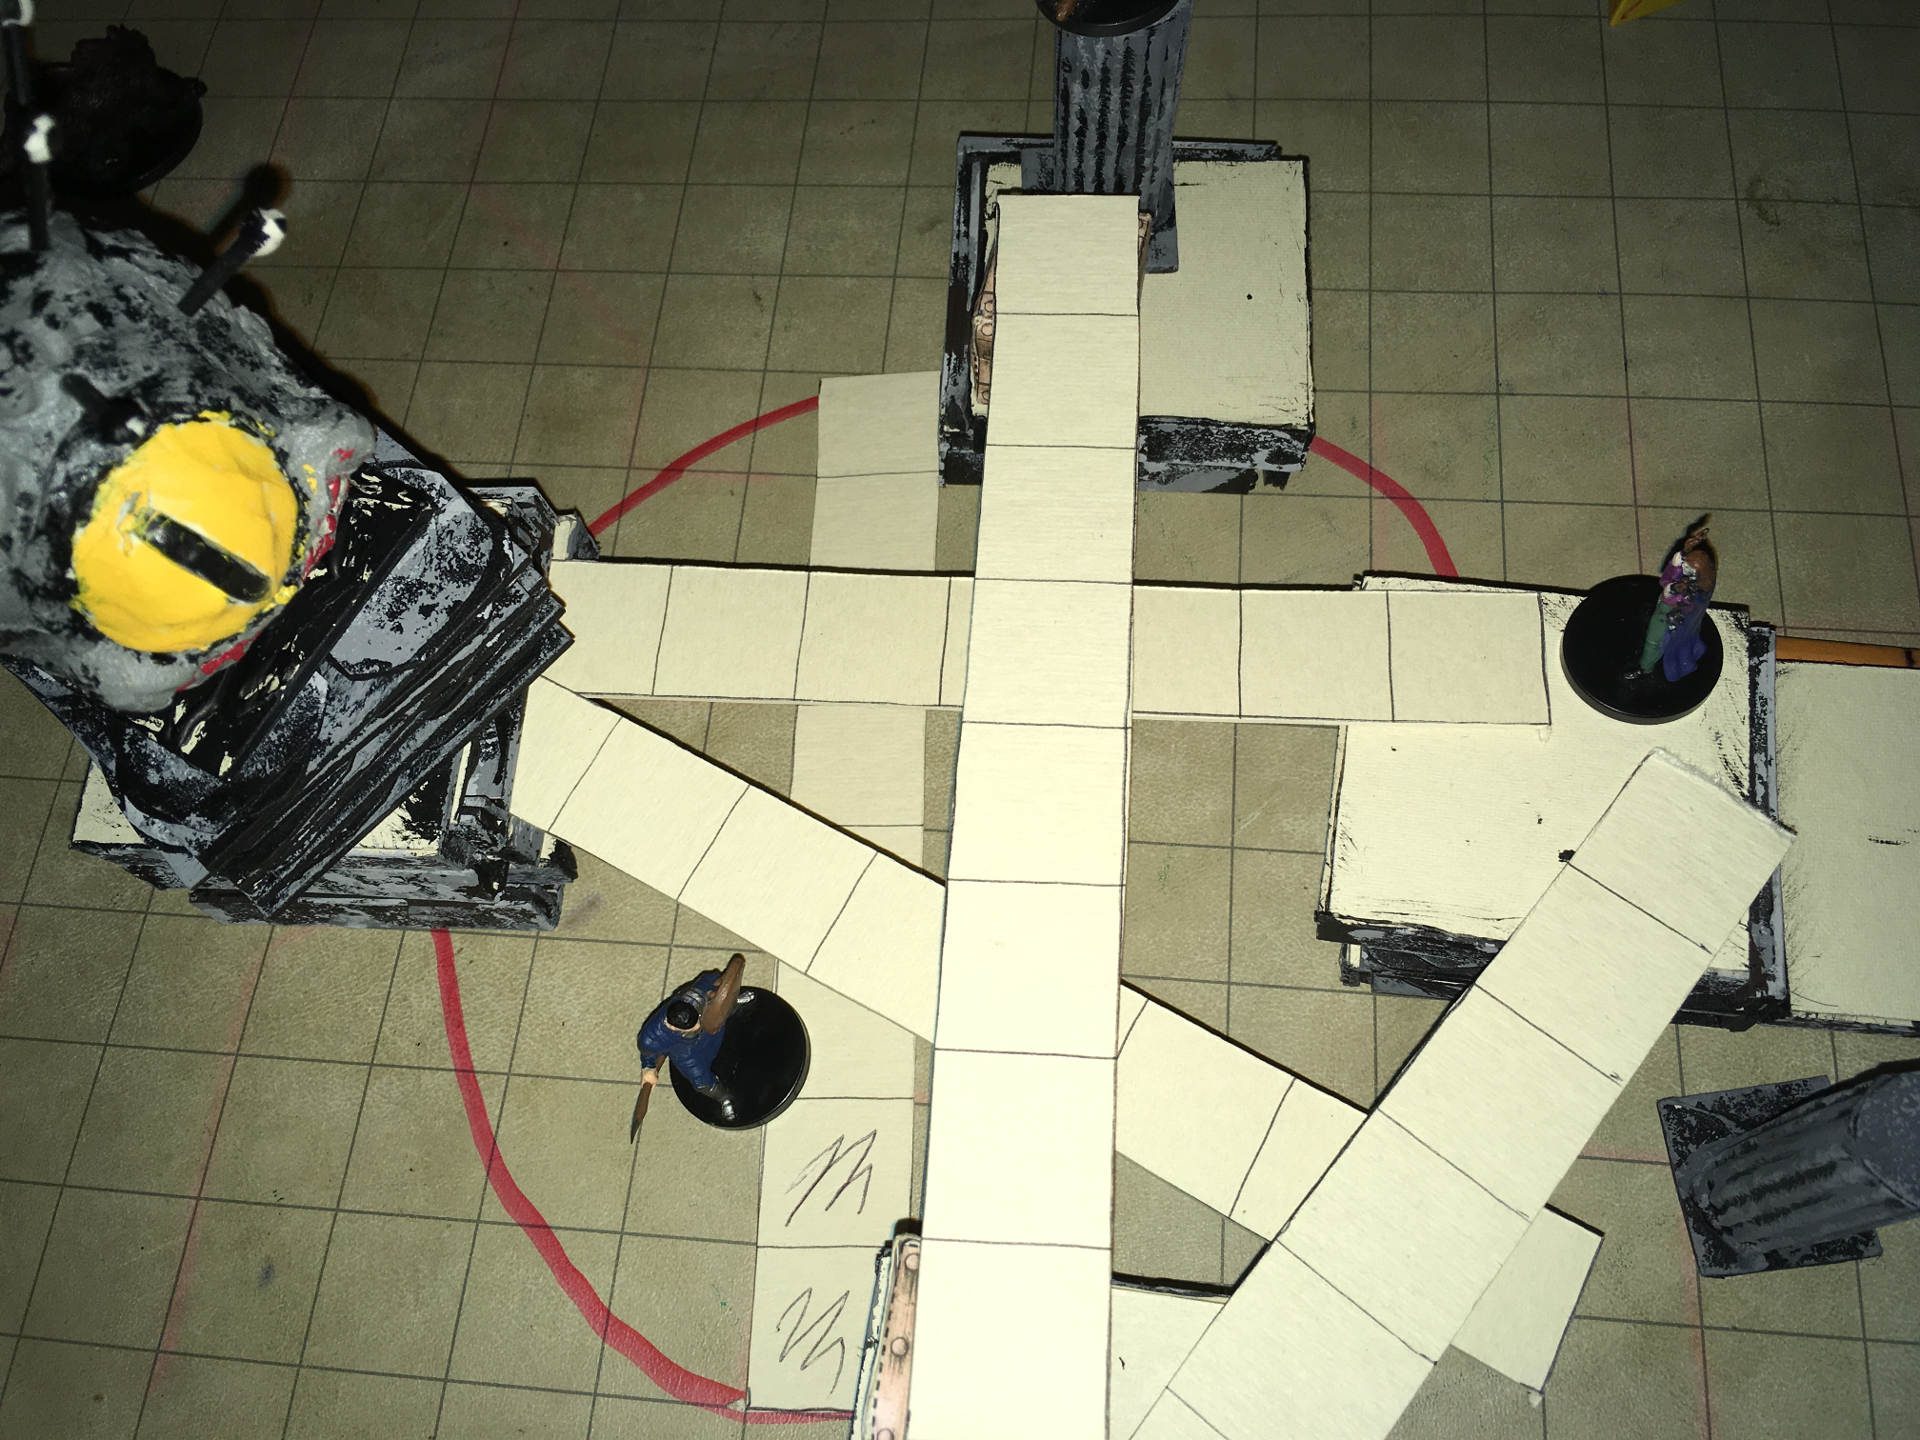
The book explains the dimensions of Karazikar’s Maw (the lair), but there’s no map or picture, that’s why I drew this one. But you should know that I changed the dimensions. I did it because the main shaft, where the battle happens is supposed to be 100ft across, but this is seriously difficult to portray in a table map with minis (if you use them), so I changed the diameter of the chasm to 40ft. As you can see in the pictures below, We could do perfectly with 40ft bridges for our beholder fight.

The PC’s notice something is not ok when they are 1 km away from the Vast Oblivion, as it is explained in the monster manual, the evil presence of the beholder causes people to feel observed and hallucinate eyes opening and closing on the corner of their eyes. The PC’s will find the top of one of the perimeter shafts, and start descending through it. They might encounter the other denizens of the Maw, the different slaves that live here. Some of them might be able to communicate with the PC’s, but all of them revere and fear Karazikar. Some of them were born here and know no other reality. They might lead the characters to Shedrak, who is the ambassador and favorite human of Karazikar.
Shedrak of the Eyes receives them in one of the passages leading to the Maw, and will only let 10 people approach to meet his lord. If attacked, he casts globe of invulnerability (the book says that he casts fly after, but it’s a mistake as both spells require concentration). Whether he lives or dies, the PC’s will encounter Karazikar in the Maw and can speak to him. Karazikar is actually interested in hearing from the PC’s any piece of information that could be valuable to him. He is particularly interested in the Maze Engine. The PC’ have not heard of it yet, but a smart player could connect this fact with the vision in Gravenhollow of Baphomet walking to find a weapon that can change reality (the same thing).
Karazikar like all beholders is extremely arrogant and believes that he is the pinnacle of evolution and life. He won’t accept an insult or any kind of disrespect. He is used to everyone to bow before him and serve him, such has been his life. In combat, Karazikar is extremely tactical and intelligent, he WILL use the shaft of the maw to its advantage. Keeping itself well away from melee PC’s, forcing them to use their weak ranged weapons or spend their turns running and climbing from one bridge to the next, only to move away when they get closer. He will also focus his anti-magic cone to the spellcasters to negate them or make them get out of the cone, getting closer to him. Remember that any conjured creature, elemental is banished in the cone, and active spells like flying or spider climb are suppressed while in the cone. Karazikar’s bite is strong, but he will only use it if he has advantage (when the victim is paralyzed or sleeping) and if doing it doesn’t let melee attackers approach him. The monster manual says the eye rays are rolled at random, this is supposed to simulate the unpredictability of a creature like a beholder, however, you as the DM have full control of it, and if at a certain moment, Karazikar wants to charm, disintegrate, kill or petrify any PC, he can choose to shoot that ray. Particularly after being dealt a fair amount of damage, Karazikar can identify who is more threatening to him and try to kill or neutralize him. Another good option is to use telekinesis to throw a PC down the shaft, it’s a 20d6 fall if they can’t avoid it. So what I’m saying is that this should be the fight of their lives, the hardest so far. Some PC’s will probably die and that is the epicness of it.
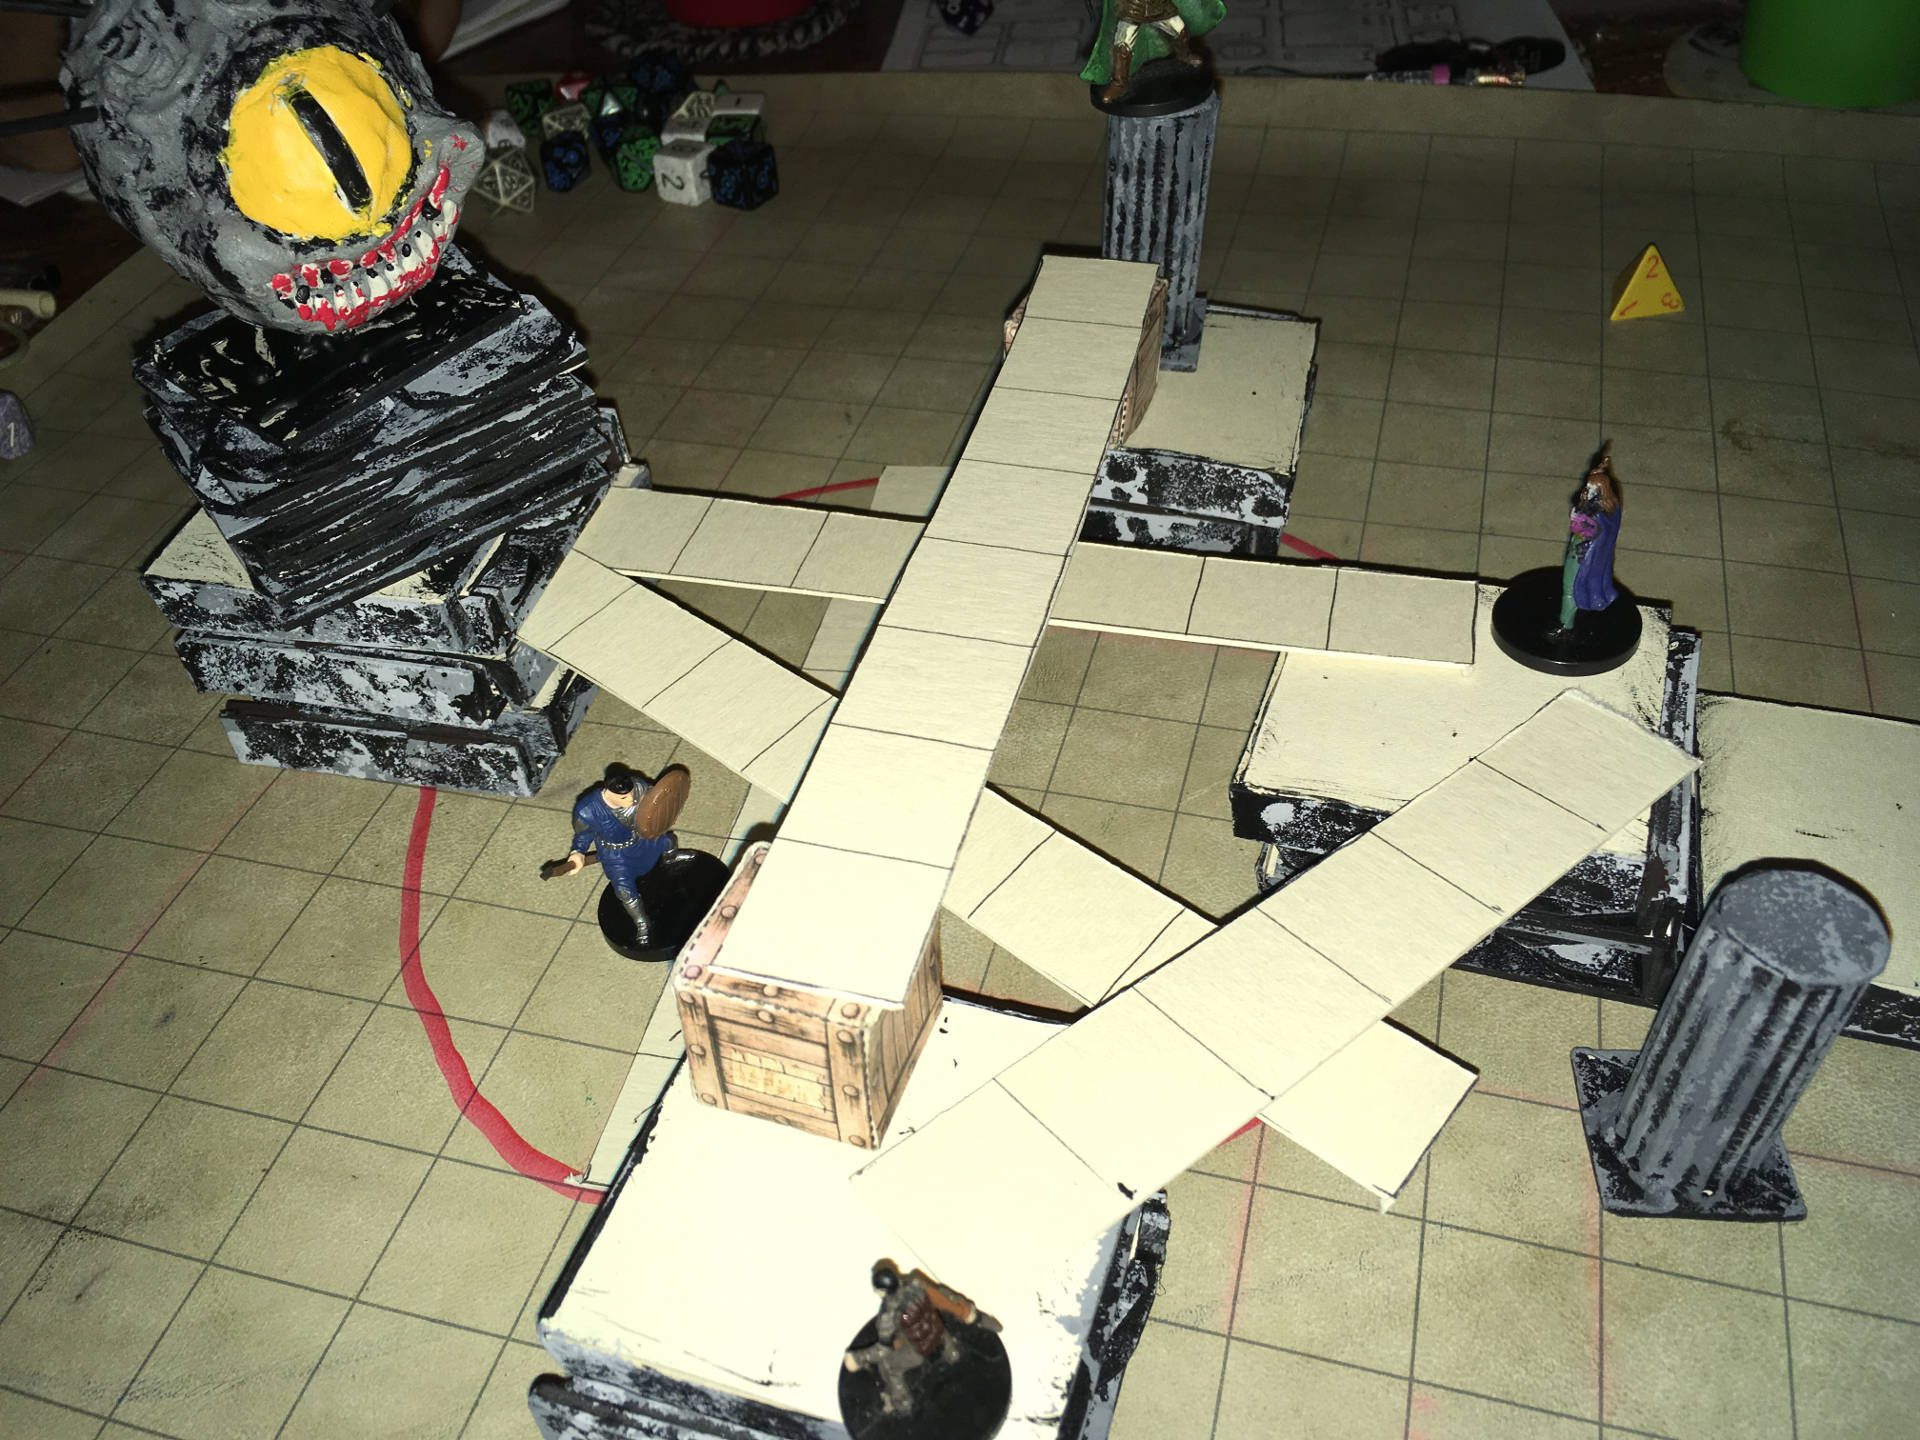
Here you can see how we handled the Maw, with 40ft long bridges, we used assorted stuff to give them different heights, the party had to split and everybody was on their own, trying to get close to Karazikar.

This top view shows my beholder figure and the height difference of the bridges.
After defeating Karazikar, the central eye can be retrieved for the Dark Heart ritual. The top of the Maw holds the treasure, but it’s only accessible flying, it’s one of the biggest hoards the PC’s will get in this campaign. Below the maw there is a cell which holds a broken modron, it’s almost dead and mad; if helped with a Great Restoration spell, it regains its sanity but can’t remember much, after so much abuse from Karazikar, however, he can detect the presence of an Orderer (the maze engine) 289 miles south. If the characters have access to a map, they can deduce that it is located in the Labyrinth, and confirm suspicions about Baphomet’s vision in Gravenhollow. The demon lord is after the Maze Engine, a weapon that can be used to reshape reality.
After defeating Karazikar, all his slaves (100 of them) will kneel and revere them as saviors. Some of them, the ones captured in the recent years, will want to return to their homes. But the prisoners that were born in the Maw, or that have been there for a long time, have been abused by Karazikar’s charm/fear rays so much, that they are not functional anymore in a normal society. They consider the PC’s their new masters and worship and fear them as they worshiped Karazikar. What the PC’s do with them is up to them and very dependent on party alignment. Some of them could be fit for battle (after resting a few days) and join the expeditionary force, they would fight fearlessly and for their masters. Or if the PC’s have built settlements in the underdark the slaves could be left there as general workers or guards. They will follow any order to the best of their abilities.
This is the end of the Wormwrithings adventures, if the PC’s have access to teleportation as suggested in chapter 9, they can go back to Araj Tower to give the ingredients to Vizeran DeVir. Afterwards, they can teleport to Gracklstugh and start their trip to the Labyrinth.
Previous Chapter —– Next Chapter
Make sure you follow the rest of this GUIDE for Out of the Abyss !
You can now buy the full guide at DM’s guild. It’s formatted in a single PDF document for ease of use.
Thank you for your contribution because it makes my work more rewarding, and you’re not paying only for the content here, but also, you are supporting a freelance author and illustrator in the hobby.
I thank you and I hope this guide was useful to you and proved a factor in making your OoTA game a better experience for you as a DM and also for your players. You can buy it here
Writing these DM guides is time consuming, my website is funded through Patreon, It is thanks to people who like my work that I am able to continue mapping and providing RPG original experiences to people all over the world. If you like what I do, consider getting involved and backing me. What you get is impressive hi-def versions of my maps to be used in your RPG games (these have lower resolution), and the satisfaction of helping the rpg community grow bigger and stronger. Help me get funding and enjoy hi resolution version of all my work.

If this option is not the best for you, you can also directly make a donation through PayPal. It helps me fund this project and I will be just as grateful. Thanks a lot !!
[paypal_donation_button]
Did you like this guide? Consider liking our Facebook page.

All the maps in this website are registered under the Creative Commons License Attribution-NonCommercial CC BY-NC. What this means is that anyone can use them, share them or modify them. They cannot be used commercially. And finally, credit must be given to me (Derek Ruiz) as the author, and a link to this web page must be included if it is shared or redistributed.

June 5, 2023 at 5:17 am
I love the Maw battle map, looks super cool, creative and fun, I’m just wondering what you used for the elevation of the different levels, looks a bit like blocks of sticky notes to me. I’m looking to achieve the same thing for next session when my party is going into the Vast Oblinium.
July 4, 2023 at 7:40 pm
We made some craftable dungeon tiles based on videos by Wyloch’s Armory. What you see there are those dungeon tiles turned upside down and used for elevation. Have fun on your game, sorry for the late reply, I’d love to know how it turned out.
December 4, 2023 at 11:38 pm
I took the instructions in the book and crafted a 3D model of Karazikar’s Maw showing the interlinking of chambers and bridges.
I included the proper length for passages, the 100 foot width of the chasm, and made sure that each side column is 100 feet high and has two passages into the central chasm with bridges between levels and a ten foot drop between bridges from adjacent levels.
I hope this gives everyone a sense of how geometric the space can be.
https://drive.google.com/file/d/1_W1RoMu62W0Z5C26ZiONvjYM1HjGzVP6/view?usp=sharing
December 4, 2023 at 11:40 pm
You should be able to download the file as a .3mf model and load the file in MS Paint3D
December 5, 2023 at 10:29 am
Thanks for the awesome addition.