Honestly, I cannot figure my daughter out. I know she would be happier at the king’s court. You must find a way to make Anna come to her senses…
Lord Alastor Bouldings
Delve Level 5 (5,350 XP)
3 ghasts
6 shadows
8 specters
1 wraith
Setup
Each individual has their poison of preference. For some, alcohol and mind-numbing herbs are preferred. Others indulge in milder options like coffee and smoking leaves. Some are hooked on the thrill of adrenaline in challenging situations. They have in common the resilience that continued exposure incurs. Requiring ever-increasing quantities of it. When people cannot control their urges, they inevitably take part in a vicious cycle that often spells their doom and that of their close ones.
Anna Bouldings, the Brave
The only daughter of a wealthy, well-positioned family, Anna Bouldings always felt a void inside of her. In her teenage years, she found solace in swordplay, climbing, and acrobatics. In her youth, and to her parents’ dismay, she became a daring infiltrator and tomb-robber. Her father, Lord Alastor Bouldings exhausted resources trying to bring her back into the family’s fold. He agreed with her individuality but begged her not to risk her life.
For over a decade, Lord Bouldings’s relationship with his daughter has been difficult at best. She always returns to the manor to research and rest and then sets back out into the wild. But now, for once, she has not returned. Against his father’s wishes, Anna left to explore the Mausoleum of Stars, a well-known, ancient elvish tomb near the city’s outskirts. It is known to be well guarded by traps and perilous guardians. None have managed to plunder the mausoleum’s contents as of yet.
Adventure Hook
Lord Bouldings offers a 2,500 gp reward for finding her daughter and bringing her back home. He claims Anna went into the dangerous dungeon by herself. She had the nerve to boast about this to him and her mother before parting. The Lord’s concern is strong and genuine.
Features of the Dungeon
Light. The sconces in the mausoleum feature continual flame spells. The magic fades in 1 minute if removed.
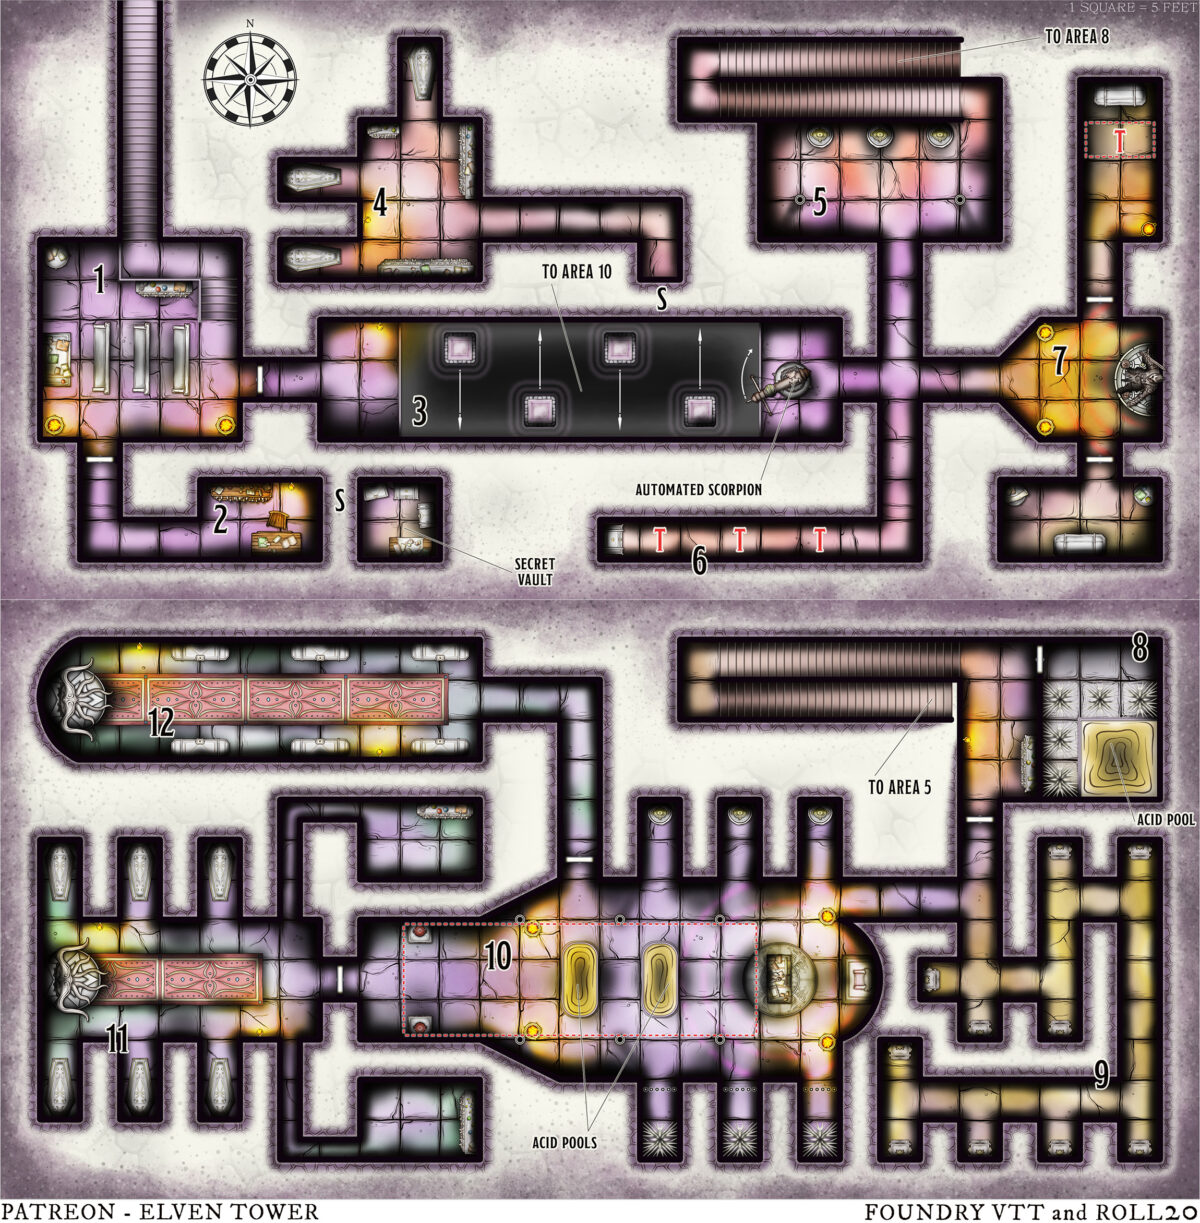
Locks. All doors are made of soapstone slabs with medium-quality locking devices (DC 16 Thieves’ Tools). A master-key is located in the south chamber of area 7.
Chamber Ceilings. All areas have 25-foot-tall, domed ceilings decorated with intricate bas-reliefs and eroded frescoes depicting landscapes with fine, elvish artistry.
Secret Doors. An observant character finds hidden, fake-brick buttons (DC 17 Investigation). Upon closer inspection, narrow passages to hidden areas are revealed.
Arcane Negation. A weak anti-magic field negates the casting of spells within the mausoleum (DC 13 Wisdom save per spell). Successfully cast spells are cast as if one lever lower and have their ranges halved.
1. Entrance Chapel
A 50-foot-long flight of stairs leads down to a humble chapel. It is customary for elvish tombs to have a chapel where visitors can pray for their loved ones and receive the blessing of the elvish god (DC 16 Religion).
2. Archive and Records
The room contains journals and logs of elves interred in the mausoleum as well as a visitor log. The latest entry reads: ‘Anna Bouldings, archaeologist’, dated a few days ago. The archive includes a dire warning: “Delve not into our tomb lest you learn the cost of your life”.
Treasure. The vault contains 23 pp, 2,500 gp, 14,325 sp, a +1 dagger, and a potion of superior healing.
3. The Great Gap
Floating platforms are the only way across a bottomless gap. The platforms move from side to side with a droning hum and an eerie, supernatural brilliance.
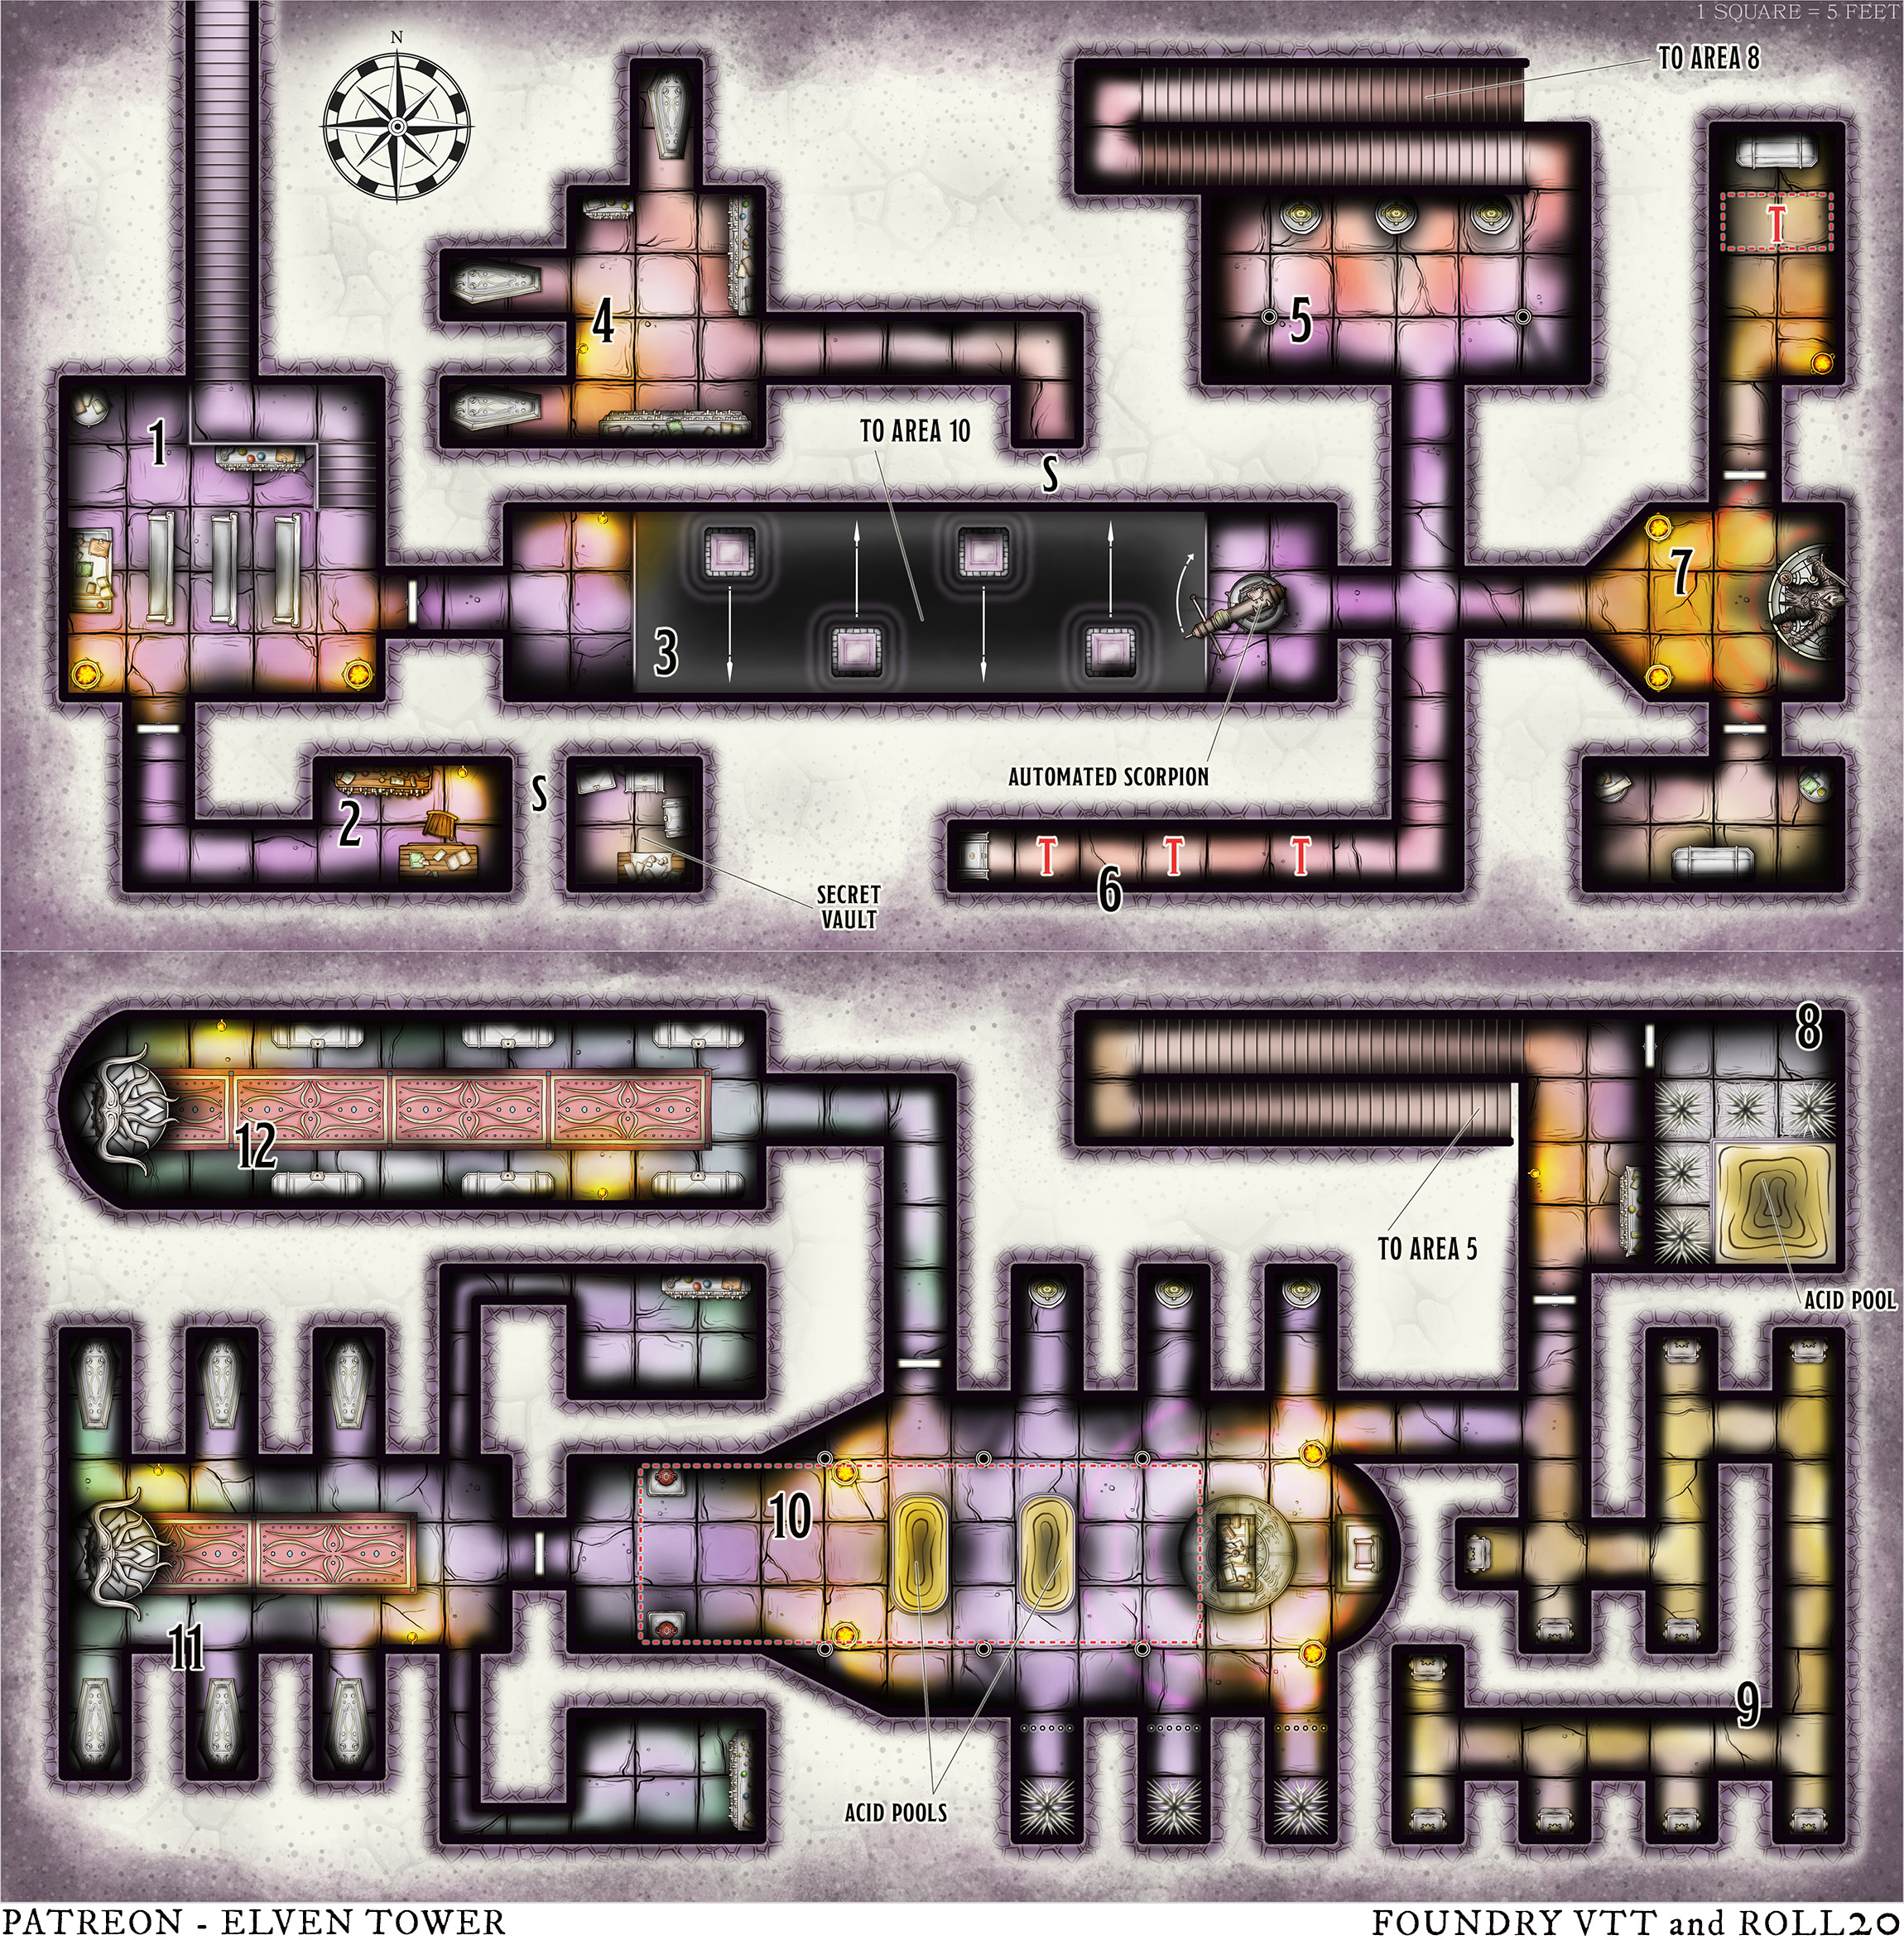
Creatures that fall into the gap drop 60 feet into area 10, potentially falling into one of the acid ponds. The automated scorpion on the east side is not visible from the entrance. It fires large bolts at creatures once they jump on the second platform (DC 15 Dexterity save, 2d6 damage and 3-in-6 chance of falling). The secret path to area 4 was left open by Anna. It is perceived automatically.
4. Tomb of Traitors
Three elves who betrayed their motherland are interred here. According to their beliefs, traitors are buried in secret chambers with a body of literature that compiles their nefarious deeds and treacheries (DC 17 Religion).
Anna’s footprints and handling of the tomes are easy to notice (DC 12 Perception). When the characters arrive, the sarcophagi lids move aside to release three elvish ghasts. One of them is marked with a recent longsword slash; Anna attacked it but later fled back to area 4 to avoid the undead altogether. In her rushed exit, she left a tricorne hat with golden flapping on the stone shelf.
5. Soul-Consuming Ewers
Three golden vases await on stone plinths. A barely-audible whisper comes from them. A dead rat lies by the central vase; its eyes the color of emerald.
The vases are cursed with a soul-consuming charm. Non-elves that enter the chamber become charmed and feel the urge to peer into any of the vases (DC 12 Wisdom). Creatures that do this have their souls pried out from their bodies and die. Anna came here on her way to area 10 and almost lost her life. She had the wits to retrieve her pet rat Baggers from her purse and present it to the vase. She was free to go after the rat was dead…
6. A Trap for the Greedy
A decorated, stone chest can barely be glimpsed by the end of an otherwise empty, dark hallway.
The chest is empty. This area is a trap for greedy, shameless tomb-robbers. There are three pressure plates along the hallway (see map). 80 pounds of weight cause them to trigger and open into a 60-foot-tall shaft that leads into area 10’s south cells. Creatures that fall take 8d6 piercing damage (DC 13 Dexterity). Each pressure plate triggers individually. The pitfall traps reset at dawn.
7. Shrine to the God of Blades
The statue of a mighty, armor-clad warrior dominates the room. Its plate brandishes a sun-shaped sigil.
Scholars identify the sigil and the effigy as a representation of Allohm, the God of Blades. The obscure, elvish deity is the saint of warriors and swordplay. From the records in area 2, many of those buried in this tomb were renowned warriors, hence the inclusion of this shrine.
There are two adjoining chambers, the south one contains a coffin and an assortment of worthless trinkets. The dungeon’s master-key rests there on one table.
The north chamber contains an empty, stone coffin. The two stone tiles in front of it are part of a deadly pitfall trap (see map). 120 pounds of weight trigger it and drop any creatures into the acid in area 8 (DC 13 Dexterity).
8. Chamber of Suffering
The small room contains a 10-foot-deep, acid pool surrounded by sharp iron spikes. Creatures that fall from the pitfall trap in area 7 take 4d6 poison damage per round submerged in the corrosive substance. The spikes around the pool can be bypassed by walking carefully through them (DC 16 Dexterity, 4d6 piercing damage).
9. Crypts of the Faithful
A winding hallway riveted with 5-foot-deep alcoves twists back and forth. Intricate niche shelves hold the earthly remains of countless elf warriors of yore.
The crypt contains ten niche shelves. Each of them bears the remains of 3d6 elvish warriors who perished hundreds of years ago. The spirits of those interred here do not suffer the trespassing of non-elf creatures. They consider the characters’ intrusion a terrible insult.
Eight specters awake from their slumber and attack the characters as they traverse the winding hallway. Anna Bouldings came here and defeated a specter. Her tracks can be discerned on the floor’s thin dust layer (DC 14 Survival). She reached the furthermost niches, prayed, and left an amulet as a sign of respect. She hoped to appease the beleaguered undead with her piousness but fled when more apparitions kept coming for her.
10. Mausoleum’s Nave
The dungeon’s largest chamber is a multipurpose location. This area lacks a ceiling; it is directly above area 3. Creatures that miss the floating platforms or are hit by a scorpion bolt above may fall here. Creatures that fall into the stone floor take 6d6 bludgeoning damage. Creatures that fall into the acid pools take 4d6 poison damage per round submerged in the corrosive substance.
When a large gathering of elf pilgrims comes to pay their respect for the ancient warriors interred in the mausoleum, the acid pools are covered and the chamber is repurposed as a church of sorts. Rotting praying tomes and fable books are scattered over the tabernacle.
11. A Challenge from the Grave
An ephemeral, elvish warrior stands ready for battle. His mantle and armor are vaporous and evanescent.
The elvish warrior awaits a worthy challenger after numerous short skirmishes with Anna Bouldings. The warrior speaks with a spectral, raspy voice in Elvish:
Are you valiant and worthy to stand and fight us for your intrusions? Or are you cowardly like that rogue woman who so pesters our well-deserved rest?
The transient guardian (wraith) summons forth 6 shadows to this fight. Defeating these discarnate phantasms returns all other undead in the dungeon to their slumber.
12. The Daring Daughter
An impromptu camp lies at the end of this long hallway with six stone coffers. A young lass sits reading.
Anna Bouldings has slept here for a few nights. She tried to convince the elvish guardian in area 11 several times that she comes in peace and means no disrespect. The wraith, however, does not accept her logic. The daring adventurer reads a book stolen from area 2. She is not amused to see the characters when she learns that it was her father who sent them to her rescue.
Adventure Conclusion
The characters reach the end of this adventure. They must face the consequences of their deeds.
Anna is a daring rogue and would-be adventurer (her stats are left to the GM’s discretion), she is indifferent to being escorted back to her father’s manor but does remark that she was in no need of saving and that her father only wants her home so he can marry her off. Lord Bouldings is glad to see her, though. He pays the bounty.
However, before reaching the manor, Anna offers to join the party. She claims she has the map of an ancient, treasure-filled, dwarven ruin. She could use some help exploring it. Alas, that is an adventure for another day…


