
No, don’t go there! She was mad! That place is a death sentence for reasonable people. Why are adventurers so eager to die for a few coins?
Halivert Villager
Delve Level 7 (7,650 XP)
1 fire elemental
1 shield guardian
6 ghasts
6 zombies
4 shadows
Setup
Luck is a subjective term. Brave knights would rarely say their title and knighthood were earned by luck. A wizard would refuse to say that luck has anything to do with their understanding of the arcane. Some call it the favor of the gods. Others say one’s destiny is already written; that no event can be labeled as a coincidence or a consequence of luck. And yet, people still say ‘good luck’.
This adventure brings the characters to the Tomb of Clovers. The resting place of the Cloverfoots from Halivert Town, a thriving halfling community. The most popular member of their family was Milda, a treasure-seeker. She traveled with strong adventurers. Her party called her “Lucky Milda”. She earned the moniker after surviving deadly traps, injuries, and cheating death once or twice during their adventures. They used to stay in Halivert for a couple of days before hitting the road once more. Milda’s place was their base of operations.
But the day came for Milda and her friends to settle and stop adventuring, or at least for her. And from that day until her death, Milda worked on the Tomb of Clovers. A trial of sorts for all brave heroes who want to cheat death like her. Those worthy shall receive her blessing.
History Check
DC 14: Halivert Town is home to many renowned halfling families. The Cloverfoots lost some of their influence after Milda’s passing, 20 years ago. She was the face of their family. Today, none of them are prominent or worthy of recognition in any area of importance.
DC 17: Milda Cloverfoot built the Tomb of Clovers for her and her family. It is said that the eccentric woman’s spirit enjoys playing cunning games even after death. Alas, her magical reward is reserved for those who overcome the tests. The stories speak about a ‘gift of luck’.
The characters hear the following instructions in many ways if they ask the people in Halivert about the tomb:
“In the outskirts of Halivert Town, where the road forks into two, draw a straight line between them and go forward until you find the tomb. You cannot miss it.”
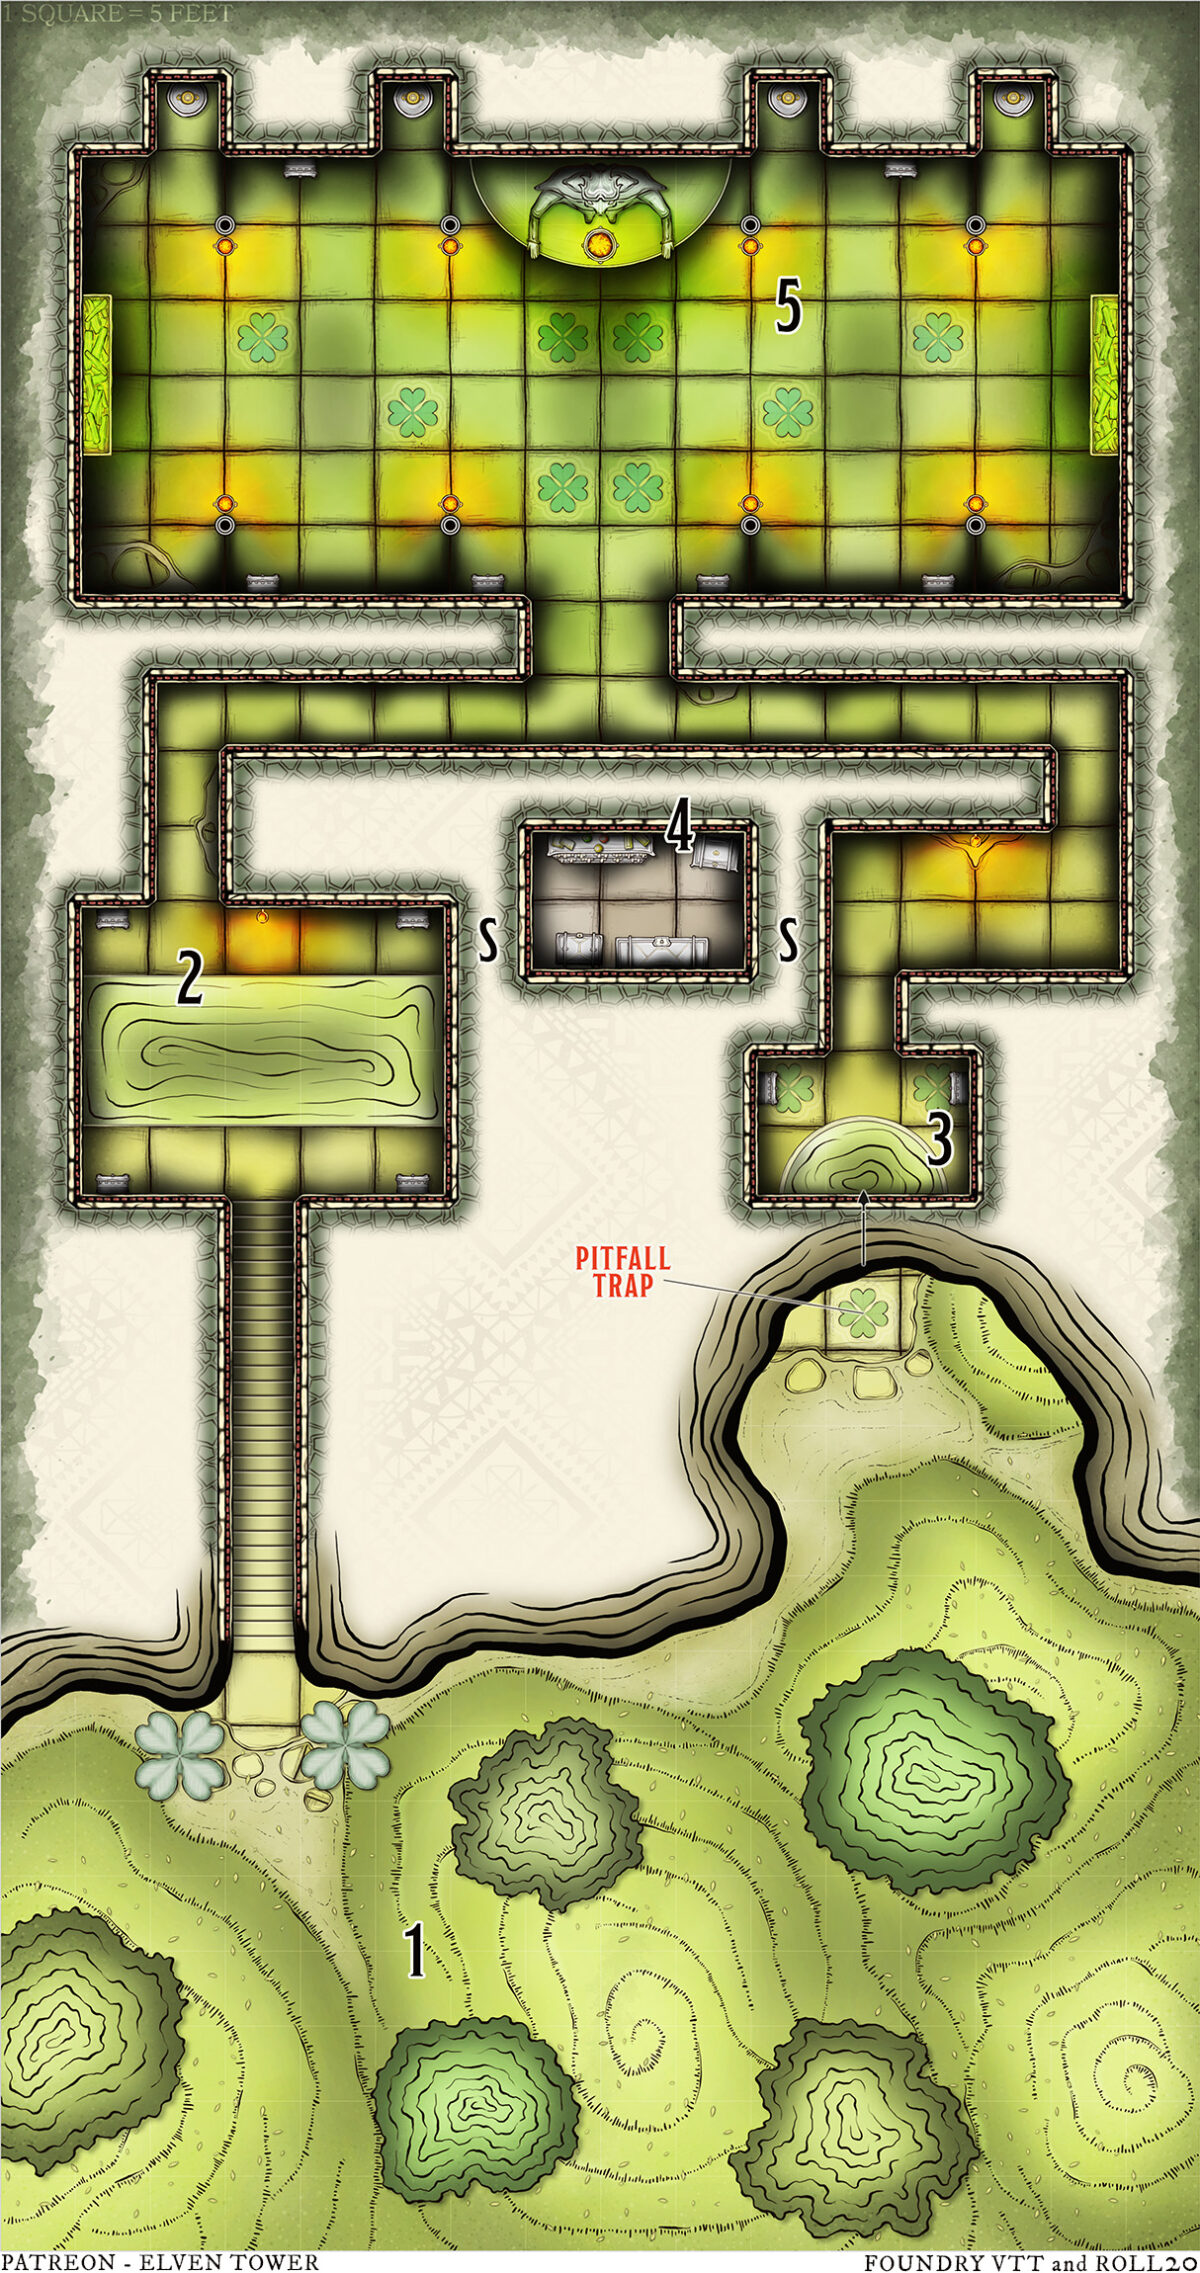
1. Tomb’s Surroundings
The natural view of the mountain skirts is broken by two green limestone sculptures. Two four-leaf clovers flank the entrance to the Tomb of Clovers.
The characters reach the entrance flanked by the two clover statues. Passing between the clovers triggers a magical vision. Creatures see how they would die, were they to enter the tomb with no luck. This vision has made many adventurers think twice and turn back. In the end, the effect is just an illusion with no divining power.
Trap. A stone tile 40 feet from the tomb’s entrance features a clover-shaped mosaic. If the characters do not notice the hidden pressure-sensitive plate (DC 17 Perception) and step on it, they trigger a pitfall trap. Creatures fall 30 feet and land in an oil pond (area 3).
2. Pool of Oil
This chamber is dominated by a rectangular pool of a thick, greasy, substance. The wrinkles on it move slowly. Standing stone sarcophagi hug each corner.
The characters must jump 10 feet to avoid the pool (DC 20 Athletics). Failing this check causes the character to fall into the oil (see below). When one of them either manages to cross or fall, the four ghasts waiting in the sarcophagi emerge and attack the newcomers.
Oil. Creatures submerged in the 10-feet-deep pool must make great efforts to move (DC 13 Athletics). In addition, they move at one-quarter of their speed.
3. The Oil Pond
Falling creatures may avoid getting dipped in the oil (DC 15 Dexterity). Two ghasts attack any creature that comes or falls. Living creatures that step on the clover mosaics trigger an explosion. Creatures within a 10-foot radius take 3d6 fire damage. The flames engulf any oil-doused creature (see area 5). The pond bursts into flames including anyone in it, if the explosion traps are triggered.
4. Secret Vault
Dust and webs cover everything but all locks appear to be in optimal condition. Conversely, the tomes and scrolls on the north wall shelf remain impeccable.
The characters can find access to this secret vault in areas 2 or 3 if they notice any of the two pushable bricks hidden there (DC 16 Investigation). However, all the enemies in area 5 hunt the characters in an uncontrollable rampage if the Cloverfoots family treasure is stolen.
5. Trail of Clovers
This large chamber is illuminated by its many braziers. Six stone sarcophagi hug the walls while four gold-plated goblets rest on the north alcoves.
When the characters cross the threshold of this chamber, the ghost of Milda Cloverfoot speaks to them:
“Having fun? How’s the oil darlings? Know that all the stories about me are true. I once survived a red dragon’s breath. I cheated death more than once. And I shall grant you my blessing, but only if you prove to me that you can beat the odds. Show me that luck is within you!”
The statue that oversees the area moves. The shield guardian fights along with six zombies that emerge from the stone enclosures. In the second round of combat, Milda’s laugh echoes in the chamber; the golden goblets release one fire elemental and four shadows.
Clovers (center). The four clovers before the statue trigger explosions like the one described in area 3. Any oil-doused creature is engulfed in the flames.
Clovers (sides). The four remaining clover tiles are oil traps. The ceiling opens and drops enough oil to soak a Medium creature when someone steps on the plates.
Burning to Death. Creatures covered in oil are engulfed in flames when they get in touch with fire. This causes 3d6 fire damage each round until the flames are extinguished. Two creatures besides the one affected can take an Action to smother the flames, provided they have the materials to do so. Resistance to fire damage does not prevent a creature from being burned to death.
Tactics
The ghasts in areas 2 and 3 take advantage of paralyzed creatures to push them into the oil. The zombies in area 5 are simple foot soldiers. Their task is to corner the heroes and make them step into the traps. The shadows target low-Strength creatures to incapacitate them if possible. The fire elemental is the most dangerous creature here. Any attack from it engulfs creatures in flames if they were dipped in oil (see above). The shield guardian is the tank of this encounter. It uses its body and strength to push enemies toward the many traps.
Features of the Area
Lights. Scones with continual flame spells illuminate the tomb. They fade after one minute if removed.
Magic. Milda’s trials are a result of many spells and rituals in the tomb. All enemies described reform every 30 days. This allows for more people to be blessed here.
Treasure. There are 12,000 gp worth of coins, silverware, and exotic fabrics. The undead Cloverfoot, even after being defeated, shall hunt whoever steals from them.
The Gift of Luck. Milda grants a gift to those who overcome her test. The characters obtain the Lucky halfling trait but it can only be used once a day. For halflings, their Lucky trait improves. They can re-roll a die if they roll a 1 or a 2. They must use the new roll.
Interested in our catalog of full adventures? Check out these awesome goodies here.

