
‘Tis an artifact of great sentimental value. Get it for me. Your reward shall be no problem.
Hiz’ta Shilsesa
Background Lore
Treasure-seekers and bounty hunters spend their whole lives listening to gossip and rumors around the world. That is how most adventures start. This faint tittle-tattle ignites a spark of curiosity in the hearts of heroes. They grab their gear and follow these verbal trails to find the truth. There are no guarantees. Only the most courageous (or most foolish) get the reward.
The Talk of the Town
A strong rumor hit the ears of the people in Rocky Hills Village a few weeks ago. Since then, the ancient mausoleum that some explorers found has been in everyone’s mouth at every social gathering. Talks of an ancient rich civilization, a group of snakefolk pilgrims, and even the remains of an evil cult are common. However, all versions have something in common. A chamber with treasure guarded by dragons or something of the like.
Everyone wants a piece of the treasure but very few have the guts to enter the place; the explorers who found it claim they heard screams and grunts beyond the antechamber. They did not dare delve any further. A couple of adventuring parties left with lots of confidence some days after the discovery. None of them ever came back.
The Truth
The mausoleum belonged to an ancient civilization of snakefolk. They venerated dragons. Ruby-encrusted, golden dragon statues loom over the most important chamber in the underground complex. For reasons unknown, the snakefolk left these lands and left their mausoleum hidden. Eventually, the passage of time and rock slides allowed for the explorers to find the entrance.
The Golden Dragons
The underground chamber with the dragon statues is Oszu Shilsesa and Thatshu S’vany’s resting place. They were two important snakefolk magicians who met the end of their days before their kin left these lands. Their reputation made them worthy of being interred surrounded by five golden dragon guardians. Before their deaths, however, they made sure that no treasure-seekers would ever trespass their security measures and put their unworthy hands on their hard-earned treasure.
Adventure Hook
The characters hear rumors about the place the explorers found when they arrive at Rocky Hills Village. After the characters listen to all the crazy stories about the newly-found place, a woman named Hiz’ta Shilsesa contacts them. She’s a snakefolk who claims to be a distant descendant of the people who built the mausoleum. No one in town believes her, though. She offers 3,500 gp if they can retrieve an object called the Dragon Tear. The characters are free to believe the woman and work for her or go search the place by themselves.
Features of the Mausoleum
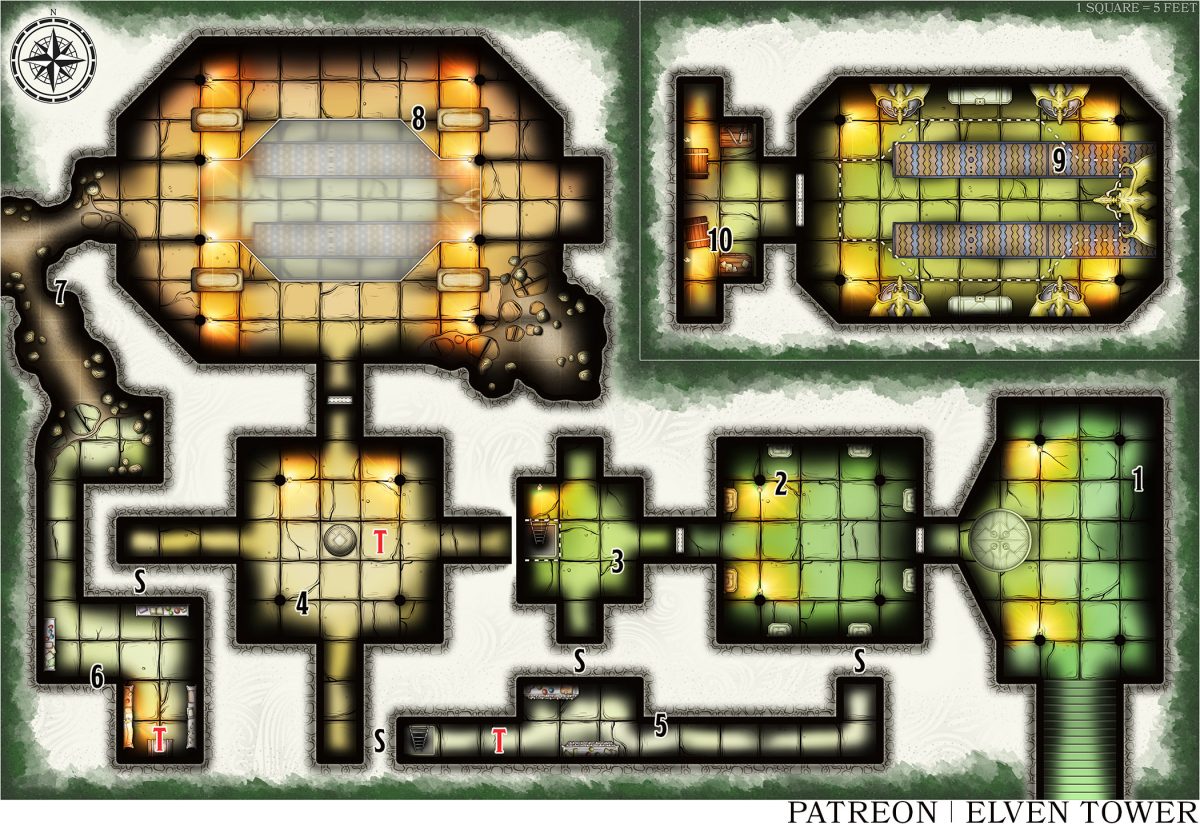
The following features correspond to all the areas of the ancient snakefolk mausoleum; areas 1 through 10.
Light. Except for areas 5 and 7, all other rooms feature magical sconces. Their continual flame spells fade out in 1 minute if they are removed from their places.
Secret Passageways. The mausoleum has several hidden corridors which can be revealed by pushing bricks on the walls or activating levers (DC 17 Investigation).
1. Entrance
After a 200-feet-deep flight of stairs, a 2-inch, rune-engraved, stone disk lies before a door.
The characters must travel a couple of days through the mountains to reach the opening the explorers described.
Draconic Runes. The stone disk’s inscription reads: “Oszu and Thatshu welcome you to the Dragonscale Snakefolk Mausoleum. Only those who share our blood can bathe in the Trail of Dragon’s glory. Enter, my brethren, prove yourselves worthy! Nevertheless, if pillaging hides among your vile intentions, leave at once. Merciless draconic fury shall deal with wretched intruders.”
2. The Eight Guardians
Eight ornate sarcophagi rest against the walls of this chamber with four rune-inscribed columns.
Oszu and Thatshu’s magic turned their comrades buried here into eternal guardians. Two wights and six ghasts with snakefolk features fight until slain.
Treasure. The sarcophagi contain a total of 769 gp worth of small silverware, piles of coins, and jewelry.
3. The Descent
This small room features alcoves to the north and south. A 3-foot-wide orifice leads to an iron hand-ladder that descends to a lower level.
The paintings of dragons that adorn the walls of this room are washed out and faded by the passage of time. The two alcoves feature top-to-bottom artwork pieces. The one in the south hides a secret passage behind it.
4. Underground Hall
A stone disk rests by the center of this area. It glows faintly. An ominous aura of uneasiness fills the air.
The ladders in areas 3 and 5 descend 50 feet into this place. The moment a living creature sets foot in this area, the spirits of the guardians are summoned. Two invisible stalkers attack the characters by surprise. They mean for the characters to trigger the trap. They chase the intruders if they leave and fight until slain.
Trap. When a character steps on the pressure-sensitive tile, a lighting bolt spell is shot from the end of the west corridor to the east ladder to area 3, hitting everything in its path. The trap resets after 1 minute.
5. Hidden Corridor
Two stone bookshelves packed to the brim with papers stand by the walls. A 3-foot-wide orifice leads to a hand-ladder at the end of this corridor.
The pressure-sensitive tile 10 feet east of the ladder triggers a three-axe device attached to the ceiling which swings all blades. Any creature standing there takes 3d12 slashing damage (DC 16 Dexterity / half).
Treasure. The books and scrolls on these shelves are not organized and in disarray but a decent search made by a good librarian or an avid reader turns up some valuable documents (DC 17 Investigation). There are five random level 2 and 3 wizard spell scrolls.
6. Secret Studio
A detect magic spell reveals an ancient arcane aura that protects this area from the passage of time. A curious character learns valuable information by searching the room (DC 17 Investigation). There is a map of the mausoleum and an explanation of the Chamber of Dragons. Oszu Shilsesa and Thatshu S’vany are mentioned too.
Fake Chest. Explosive runes protect the contents of this chest. The explosion deals 6d6 fire damage to all creatures in a 30 feet radius (DC 16 Dexterity / half). There are 300 pp and three potions of greater healing.
7. Caves and Tunnels
Rocks and debris from recent cave-ins created these tunnels. Footprints of multi-legged creatures are discernible on the dusty, packed, soil ground.
An experienced ranger notices the marks on the floor belong to rust monsters (DC 15 Nature). If the characters delve into these tunnels, they meet a pack of six. The beasts shun the mausoleum because of the light and the undead. They do not chase the characters inside.
8. Great Hall
This hall contains four sarcophagi that rest by the corners of a strangely-shaped opening. The mausoleum’s deepest chamber lies 50 feet below.
This chamber has been subject to seismic activity but most of it remains strong and stable. When a living creature enters this area, the lids of all sarcophagi open.
Last Guardians. Four scaled wights protect this area. The undead warriors do their best to stop the intruders. They chase the characters if they flee and fight until slain.
Treasure. The characters find a total of 2,316 gp and a +1 silver dagger within the sarcophagi.
9. Chamber of Dragons
Four golden dragons on stone pedestals stand by the north and south of this chamber. A larger, more imposing draconid statue lies by the east wall.
The characters must face Oszu and Thatshu’s spirits (wraiths) and pass the Trial of Dragons if they want the treasure. The four dragon statues (gargoyles) and the larger one (shield guardian) come to life and attack the characters until slain. The spirits of the mages do not interfere if a snakefolk is among the characters’ party.
10. Treasure Chamber
The chests contain 500 pp, 10,256 gp, a +1 longsword, five random level 4 and 5 wizard spell scrolls, and the Dragon Tear. An arcane spellcaster knows it can be used to create golems like the dragon statues (DC 20 Arcana).
Development
The characters reach the end of this adventure and face the consequences of their deeds.
Friend or Foe?
If the characters agree to deliver the Dragon Tear to Hiz’ta Shelsisa, she pays the agreed-upon amount and lets them keep the rest of the treasure. She refuses to say what the gem is for. If the characters keep the artifact, the woman shall move heaven and earth to haunt them and retrieve what is hers by right. The life of an adventurer is hard. Every choice carries a hidden risk…
Interested in our catalog of full adventures? Check out these awesome goodies here.

