Shrouded in mystery, the Jade Scepter remains the most sought-out artifact by mages and collectors. It was once wielded by Lyriana, whom all feared…
Adage of the Archmage
In ages past, the mythical Jade Scepter was forged by the enigmatic Archmage Lyriana, known for her mastery over nature and arcane secrets. This scepter, a magnificent artifact encrusted with jade and entwined with gold, was said to possess the power to control the very essence of life itself. It was lost to time after Lyriana’s mysterious disappearance but rumored to rest in a tomb hidden deep within the heart of the Eldermoss Forest.
The crypt, once a sacred druid site, is now shrouded in dark legends and feared by the locals. It is told that the crypt was protected not only by intricate traps but also by timeless guardians; spirits and creatures bound to Archmage Lyriana’s will. Many an adventurer has perished trying to retrieve the riches that lie in the tomb; few even learned that the Jade Scepter lay within reach.
Adventure Hook
- Work for Hire. The adventurers are approached by an old sage, Orin, who researches the whereabouts of the Jade Scepter. He believes that he has finally found it but is too old to explore the tomb himself. Orin seeks brave souls to retrieve the artifact, promising his life-savings in return. The sage warns that the tomb’s secrets are not to be taken lightly and that many have sought the fabled scepter but none have returned (1,600 gp, 7 XP).
Level 6 Adventure
- Danger. Risky. Check for a Random Encounter every 2 crawling rounds and after loud noises (4-in-6 chance).
- Light. Some areas feature braziers with light spells. The undead and eternal guardians are dark-adapted.
| RANDOM ENCOUNTERS d6 | Details |
| 1 | A spectral hand emerges from a wall, offering a scroll bound in shadows (Cursed, random Tier 1 spell scroll cast with disadv.). |
| 2 | Stone statues of six ancient warriors (skeletons) animate to challenge the intruders, testing their combat prowess and resolve. |
| 3 | A ghostly figure haunts the dungeon, offering knowledge of how to open the gate to area 7 in exchange for solving a mind-bending riddle (GM’s choice). If three wrong answers are given, the ghost becomes irate and attacks the party. |
| 4 | A fine thread causes a barrage of poisoned needles to shoot from the wall when pulled. Targets take 2d6 damage (DC 16 DEX). |
| 5 | An arcane wave pulses from area 7. It extinguishes all active spell effects and neutralizes magic items for 1 crawling round. |
| 6 | A wraith materializes before the characters. It believes it is Archmage Lyriana; a consequence of arcane corruption. The wraith challenges adventurers to a deadly fight. The undead vows to slay those who seek to claim the Jade Scepter. |
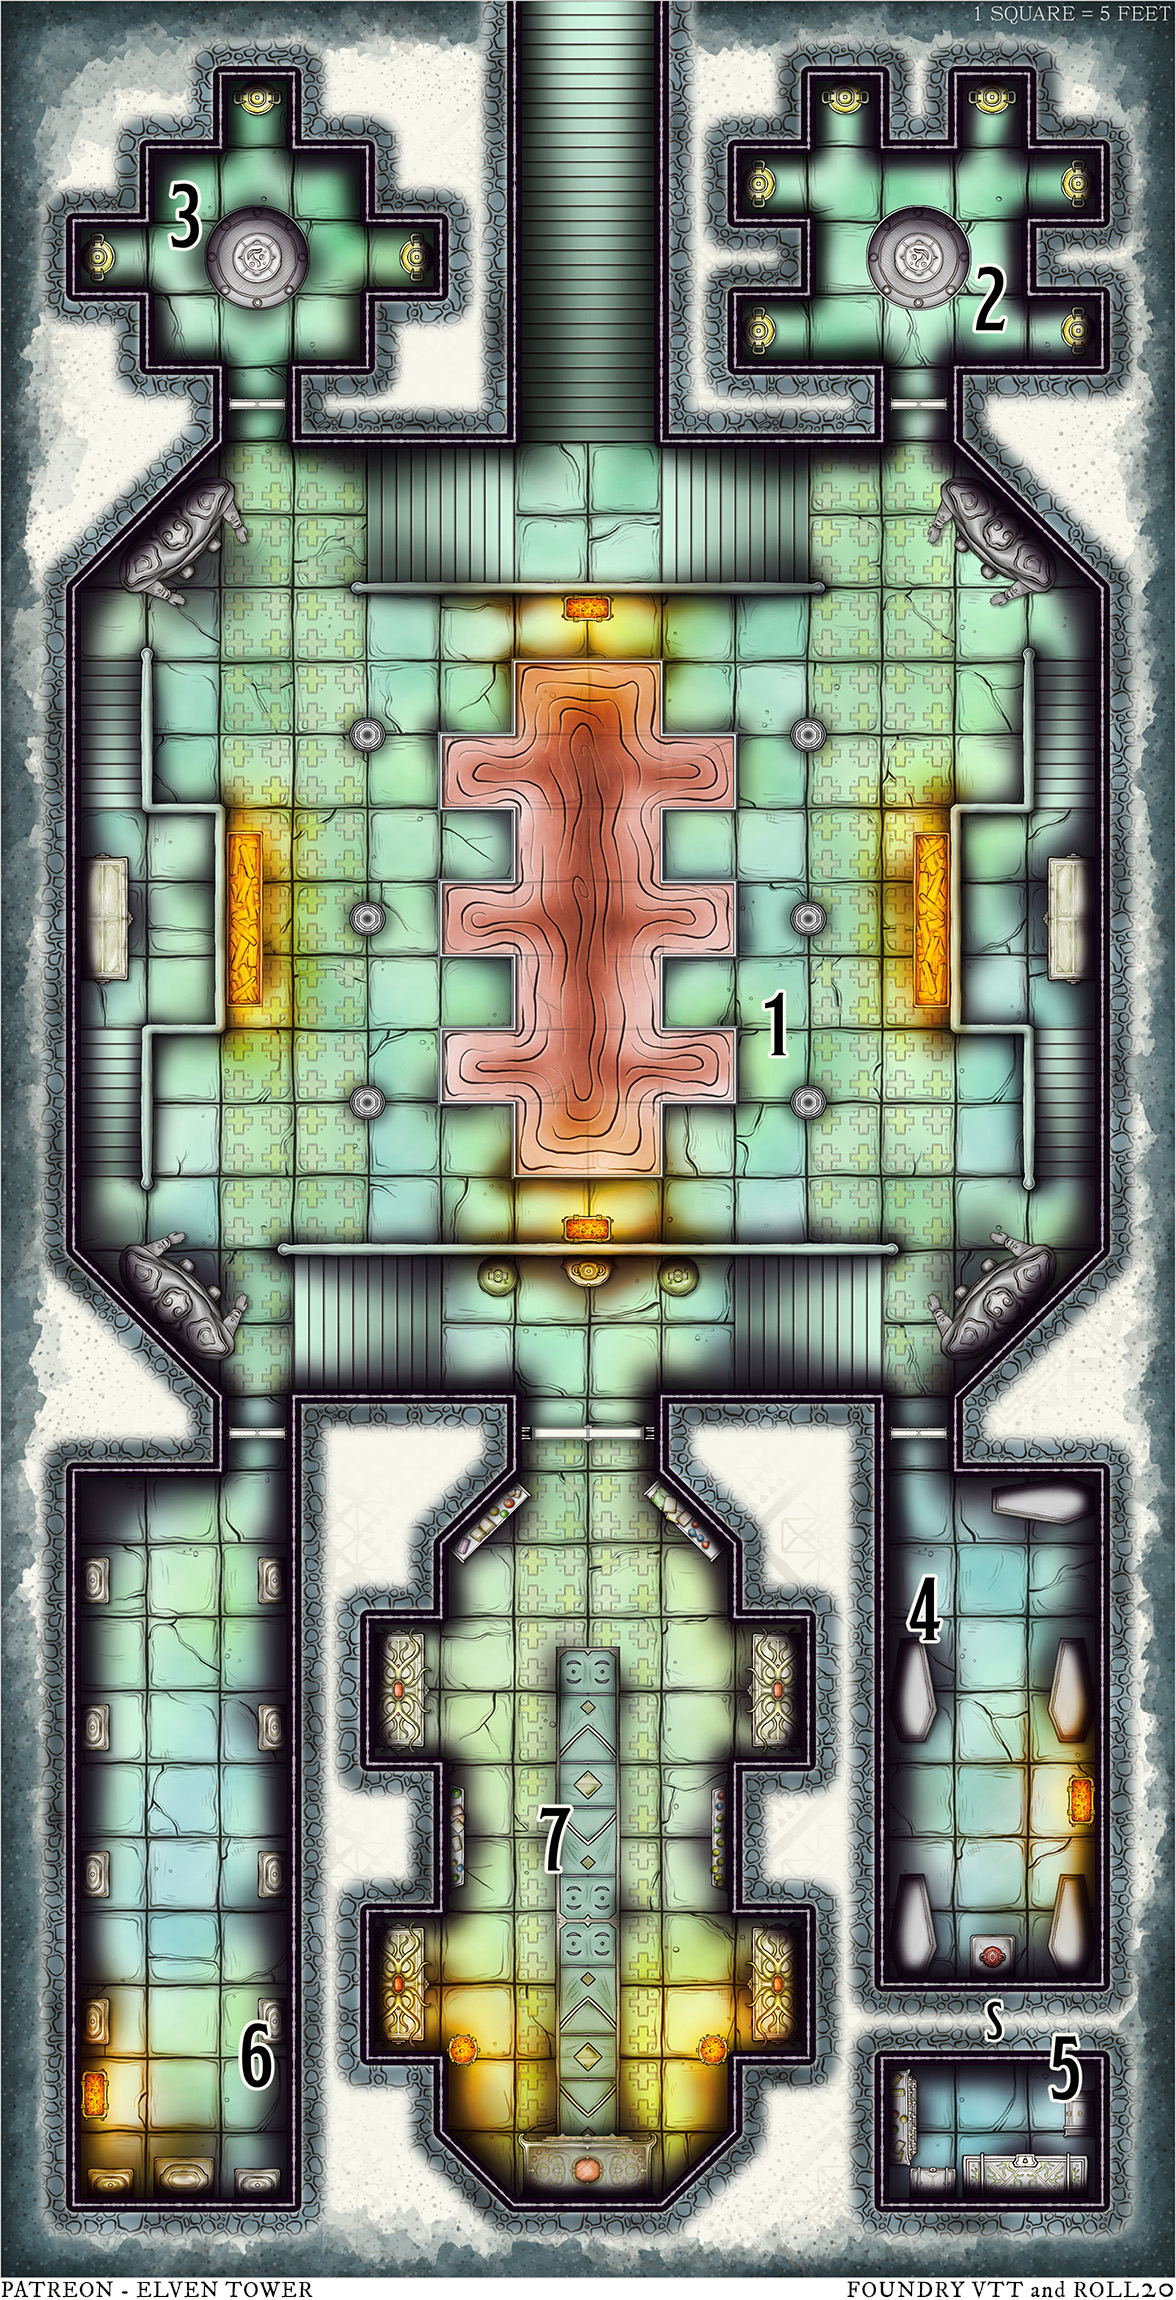
1. Hall of the Ancients
The characters must embark on a 5-day journey to the depths of Eldermoss Forest. The forested region crawls with untold natural dangers (GM’s choice). Sage Orin’s directions lead the characters to a dungeon entrance between the trunks of two colossal sequoia trees.
A vast hall, corners graced by towering 30-foot guardian effigies. An oddly-shaped pool of crimson liquid, shimmering eerily, dominates the chamber’s heart.
- The Effigies. The statues depict armor-clad combatants with their arms raised as if in prayer. A scholar recognizes them as representations of Ord (DC 14 INT). Two of them (stone golems) step forward and attack the characters. They use their Slow ability on melee foes.
- The Pond. Filled with acid, the pond is 10 feet deep. The acid has lost some of its original potency. Creatures that fall in it take 1d4 damage per round of exposure.
- Treasure (2 XP). Scattered in the acid pond are seven mithral shards (20 gp each). The golems’ obsidian eyes (four in total) can be removed with tools (10 gp each).
3. The Archmage’s Shade
This chamber is similar to area 2 but with fewer funerary niches. No shadows spawn from the gilded urns. In their place, an ethereal, ghastly manifestation emerges from the cracked floor and addresses the characters. The ghost introduces herself as Archmage Lyriana. She claims that, eons ago, an adversary cursed her into her wretched, undead shape. However, the strange apparition claims to know how to end her current predicament.
- Lies. The ghost asks the characters to bring the Jade Scepter to her so that she can return to life and recover her powers. She promises untold riches. But all she says are lies; she is not Lyriana. She only wants the artifact to defeat the party and break free from this dungeon.
3. East Columbarium
Dimly-lit chamber, compact yet solemn. Alcoves line the walls, each cradling ancient funerary niches. A silent homage to long-forgotten souls and bygone eras.
- The Circle. The rune-scribed, granite circle, is etched with spell runes meant to send souls off to their eternal rest. The rune magic is faint and almost extinguished.
- The Niches. Each urn-like niche contains the ashes of a dozen individuals. Tampering with any niche causes six shadows to materialize and attack the living.
4. East Crypt
The chamber walls are lined with five unmarked, stone sarcophagi. A solitary clay vase, adorned with cryptic etchings, keeps a proud vigil by the far wall.
- Each of the sarcophagi contains the crumbling remains of a human. There is no way to identify those interred here as there are no markings.
- Divine Flames. When a living creature comes within 15 feet of the clay vase, the runes on its surface glow. It casts flame strike against a random character. The vase repeats this spell once per round. It can be stopped with a dispel magic spell or by destroying it (20 HP).
- Secret Door. A button hidden under the clay vase causes the secret passage to area 5 to be revealed.
5. Secret Vault
This treasure chamber contains three stone coffers and a stone bookshelf. A thick dust layer covers everything.
- Treasure (7 XP). Collectively, the room contains 300 gp, 28,400 sp, two potions of healing, one potion of vitality, a +2 longsword, and four random Wizard spell scrolls.
6. West Crypt
Shadow-draped room, encircled by eleven upright sarcophagi hugging the tall walls. The lids are slightly ajar, ancient whispers can be heard from within.
- Prayer. An altar to Ord, the Secret-Keeper is embedded on the south wall. A spellcaster must make an offering to the deity to be allowed access to area 7. It is the only way to enter the Hall of the Jade Scepter.
- Guardians. When a character comes within 10 feet of the Altar of Ord, all enclosures open to release eleven imp devils bound to this dungeon. The sneaky, flying devils are treacherous and fight to the death.
7. Hall of the Jade Scepter
An opulent chamber dominated by an ornate coffer at its far side. It is flanked by four sarcophagi with intricately decorated lids, each bearing gold inlays.
The gate to this chamber is made of an adamantine alloy that cannot be destroyed. It can only be opened by praying to Ord, the Secret-Keeper (see Prayer in area 6).
- The Last Trial. Four undead reavers, tasked with protecting the scepter, emerge to fight. The guardians reform at dawn and are immune to morale checks.
- The Scepter (10 XP). The coffer contains the Jade Scepter (Staff of Ord), 1,300 gp, a shield of the lion, and a ring of feather falling. Sage Orin claims ownership of the scepter and pays the characters the promised reward. What happens with this powerful artifact and how it is used for good or evil is an adventure for another day…
Interested in our catalog of full adventures? Check out these awesome goodies here.