All of my wealth! All of it condensed into a few pounds of shining rocks. If I cannot keep them then none shall ever lay their filthy hands on them.
Count Harland
Delve Level 5 (20,150XP)
1 iron golem
3 mummies
14 shadows
3 swarms of poisonous snakes
6 zombies
Setup
Greed serves men. Greed is the fuel that bolsters their valor and pushes many of them to indescribable acts of violence. All for gold, territories, and sometimes immaterial concepts like reputation and status. Alas, if there is one obstacle that no man can surpass, despite their dedication and power, is the looming presence of death.
Death shall come for all men and such inescapable truth turns a man’s greed on its head. An old rural saying says “Worry not for your possessions and property. One day you shall leave with nothing but a pound of dirt”. But avaricious individuals cannot cope with the fact that their hard-earned material possessions shall one day belong to someone else. So, they hide their treasure in safe keeps and vaults so that no one can get it. They may one day perish and part to the undying lands but their treasure shall not belong to someone else. Some of them grow so attached to their fortune and wealth that they become cursed upon death. They do not part and remain in the world. They become immortal ghosts that guard their treasure, lest someone attempts to steal it.
Count Harland’s Diamonds
A wealthy man in life, Count Harland controlled the largest estate in the kingdom, next to the king. The man amassed a large collection of diamonds and many diamond-encrusted objects and clothes. Such an aggregate of wealth gave the count unlimited power in life and access to all manner of luxuries. Near his demise from a common disease, the count arranged for his body and treasure hoard to be moved to the family mausoleum. By his orders, protective enchantments were placed so that no one managed to retrieve his beloved diamonds. Ultimately, it is all an elaborate hoax because the diamond hoard is not located within Count Harland’s mausoleum.
Circles of Teleportation
The mausoleum is located hundreds of feet below the earth. It can only be accessed with a circle of teleportation spell. The rune sequence to access this magic circle is a well-coveted secret that few individuals have access to. In addition, the real location of Count Harland’s diamonds can only be accessed with teleportation magic. The rune sequence to find the hidden location is within Count Harland’s stone coffin. It is the only written recording of it and no one except Count Harland ever had access to it. The hidden vault is located deeper underground in an undisclosed and inaccessible location.
Adventure Hook
As with Harland, the characters are propelled by greed only. The collection of diamonds and its monetary value are the sole motivators for this quest. The characters obtain the rune sequence to teleport to area 1 as treasure from a past mission. Count Harland’s name is on the parchment. It is known by all that the late count was famous for his gigantic wealth. It is also known that no one ever found the count’s treasure. The sickly man died after making sure his hoard was well hidden.
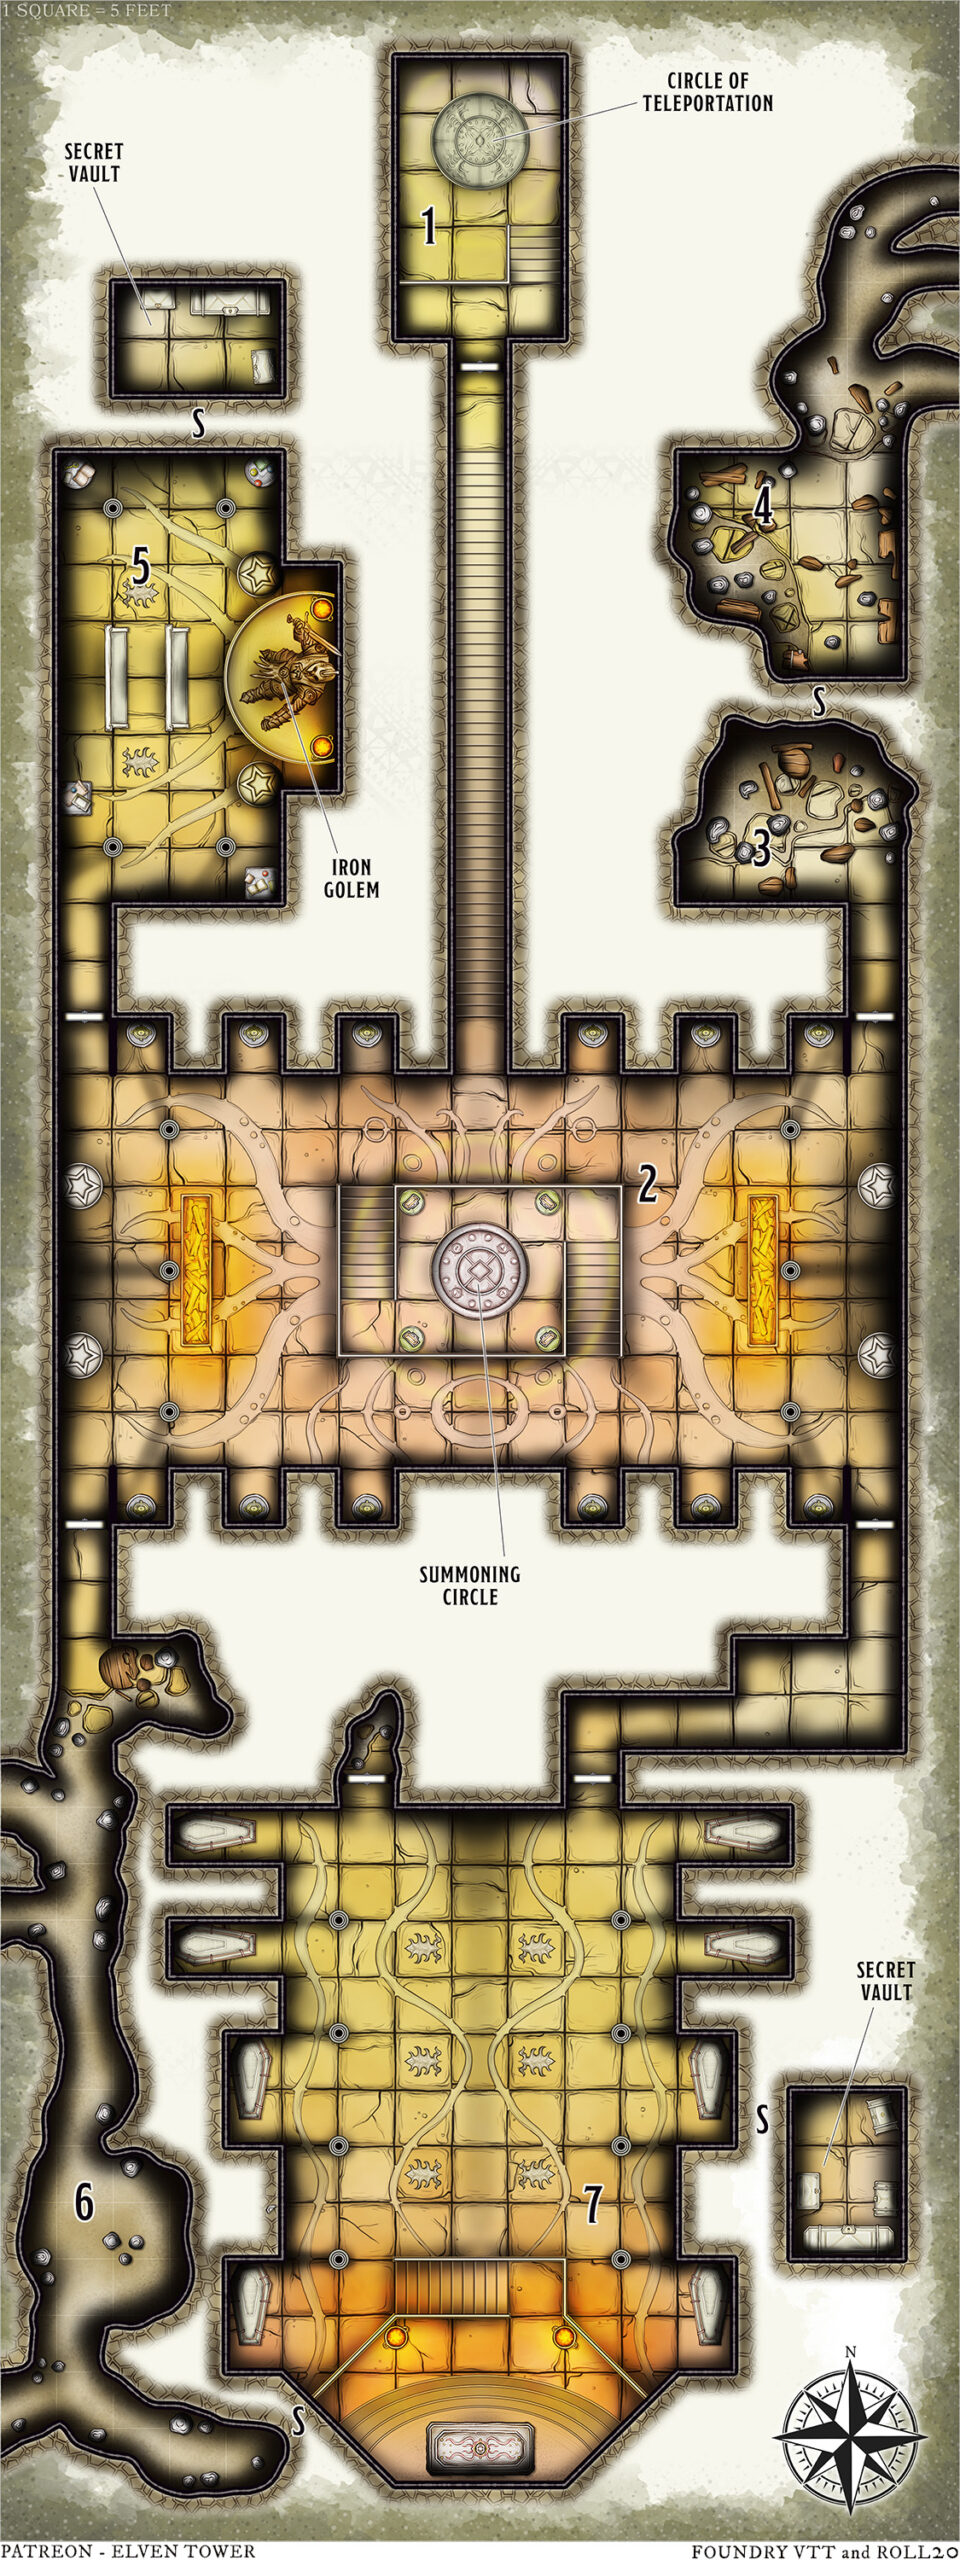
1. Teleportation Room
The magical journey into the mausoleum assails the characters with visions of a wealthy man enjoying a life of debauchery and decadent celebrations. The sight of a sick man on his deathbed vanishes to reveal the teleportation room. Two oil paintings hang from the east and west walls. The first one depicts Count Harland riding a warhorse, the other one is a portrait of the wealthy man.
2. Chamber of Looming Shadows
Black, quasi-fluid smoke floats near the chamber’s ceiling. A magic circle on a 10-foot-tall section glows with transient magic. A detect magic spell reveals a strong aura of conjuration. Four statues of armored knights with raised blades adorn the east and west walls.
Approaching within 5 feet of the summoning circle causes blobs of the black material on the ceiling to float down and coalesce into fourteen shadows. The incorporeal undead do not pursue creatures out of the chamber.
3. Dilapidated Room
The north wall of this room is collapsed and ruined. The once grander chamber now holds a mound of debris, natural rocks, and dry reptile droppings.
The chamber once doubled its current size and was a mirrored version of area 5. The fragments of the altar are barely recognizable. Nothing in the room betrays its original use. The narrow path along the debris leads to area 4 (see Features of the Dungeon). A nature expert identifies the reptile droppings as those of a breed of blind snakes that inhabits dark caves (see area 4).
4. The Underworld Path
Whatever furniture was in the room decayed or was broken long ago. The dark chamber and the tunnels to the northeast are all the nests of a large colony of blind snakes. The reptiles are initially scared of trespassers; they flee northward. After a few minutes, more come from the depths and the snakes grow bold and aggressive. Three swarms of poisonous snakes rush ahead from the depths and attack the characters.
The tunnels lead to an underground network of caverns that leads down into the veins of the earth. Most tunnels are too narrow for a Medium creature to traverse.
5. The Iron Protector
An eerie, chapel-like chamber with stone pews and rune-carved pillars houses a 12-foot-tall iron statue of the late Count Harald wielding a longsword. Two diamonds are wedged in the statue’s eye-sockets.
When the characters arrive at this chamber, a bright light shines from the statue’s eyes as it raises its sword. A low-pitched voice comes from inside the statue and says:
Greedy vermin! Leave this place at once, lest I skin each one of you. You shall never possess my diamonds. Leave now with your sorry, worthless lives!
The characters have a minute to retreat safely. If they remain in the room, attack the statue, or find the northern vault (see map), the iron golem attacks. The mighty protector cannot leave the room due to its size.
Treasure. A character can spend 10 minutes retrieving the diamonds from the statue’s head after defeating it in combat. Each is worth 500 gp. The northern vault contains 2,000 gp, a bag of holding, and a floor-plan of the dungeon. The documents reveal that the diamonds’ true location is found on the count’s coffin (see area 7).
6. Natural Caverns
Seismic activity bore these caverns that connect areas 2 and 7. The characters may surprise Count Harald’s undead abomination in area 7 if they approach from here.
7. Count Harald’s Tomb
The high, vaulted chamber contains nine stone coffins. Two rows of stone pillars flank the room and lead to a tall dais with a single, decorated enclosure.
If the characters enter the room from the north (from area 2), the southernmost coffin lid moves to the side. Count Harland (mummy) emerges from it to issue a final warning to the would-be tomb-robbers. If the characters persist, the mummy roars and uses its Dreadful Glare ability. There are two mummies and six zombies in the coffins. The mummies and two of the zombies emerge in round 1 while the other four do so in round 3.
Approaching the southernmost coffin from area 6 allows the characters a moment of peace as the mummies remain momentarily dormant. One character can take advantage of this to lift the lid and gain a free attack against any of the three mummies. After that, the battle resumes as described above. All of the undead fight until slain, Count Harland’s greed blinds them thoroughly.
Treasure. The hidden vault contains 1,300 gp, 4,560 sp, a +1 battleaxe, and a periapt of health. The count’s coffin hides a collection of fake diamonds (300 gp for all).
Development
The characters reach the end of this adventure. They must face the consequences of their deeds.
Upon inspecting the count’s stone coffin, the characters find it full of diamonds. However, under closer inspection, all of them are revealed to be zircons. Along is a scroll that contains the rune sequence to teleport to Count Harald’s real vault and a warning that it is even more protected than this family mausoleum.
Count Harald is not vanquished. His immortal spirit of greed-incarnate shall seek the characters for their insult and petty robbery. That is an adventure for another day…
Features of the Dungeon
Light. The dungeon features sconces with continual flame spells on them. If removed, the magic fades.
Smells and Sounds. A stench of death from area 7 permeates the dungeon. It grows stronger the closer to that area. The zombies in area 7 utter low-pitched moans and grunts that can be heard from as far as 30 feet.
Secret Doors. An observant character finds hidden buttons on fake bricks or loose sections of fallen debris that can be moved. Upon inspection, they reveal narrow passages to hidden areas (DC 16 Investigation).
Magical Aura. A detect magic spell reveals the aura of necromancy in area 7. This foul aura can be perceived from any chamber within Count Harald’s mausoleum.
Interested in our catalog of full adventures? Check out these awesome goodies here.