Everything we have was rightfully earned; paid in blood. We’ll keep it with us forever. And anyone who wants it shall pay the blood price like we did!
Dylan Faythe’s Diary
Delve Level 6 (8,700 XP)
2 wights
4 shadows
4 ghast
6 veterans
1 wraith
Setup
There is an old, popular saying that goes like this: “Some people are so very poor, that the only thing they have is money”. And it is true. Some filthy-rich individuals ignore what to do or where to spend their ridiculous amount of wealth. It often ends badly; mortal men easily fall into temptation and the power money bestows on them turns them into the worst versions of themselves.
On the other hand, we have the commonfolk, who know how it feels to earn food or a daily wage. But there is another kind in between. Those who work hard to become what they are, but must keep working for the rest of their lives or they might lose it all. These people tend to be careful, over-thinkers, but mostly selfish.
Adventure Hook
The heroes learn about The Path of Pain. This is the name that the people of Goldenspear gave to the Faythes’ tomb. The story says that many of the Faythe family were adventurers. During their journeys, they acquired great fortune and came in possession of a plethora of magic items, scrolls, and other valuable artifacts.
The Faythes do not worry about their heirlooms and treasure being lost; they transformed the place into a dungeon with deadly traps and immortal guardians. Their objective is to make would-be robbers experience the same hardships as them when they acquired the items. They believe that if someone can bypass their magical defense mechanisms or defeat the guardians, they most certainly deserve to keep what was stored there.
History Check
DC 17: The many Faythes buried in the crypt achieved great things in life. Their resting place is known as The Path of Pain. The treasure is there for the taking, but it is so dangerous that no one has retrieved it, yet…
Reaching the Crypt
The characters must go to Goldenspear to enter the crypt. The members of the Faythe family there always prompt adventurers and mercenaries who wish to test their luck at their crypt. The settlement has a magic circle that leads to area 1, and the Faythe are happy to help. However, the heroes are free to find another way to teleport here. Alternatives are up to the GM’s discretion.
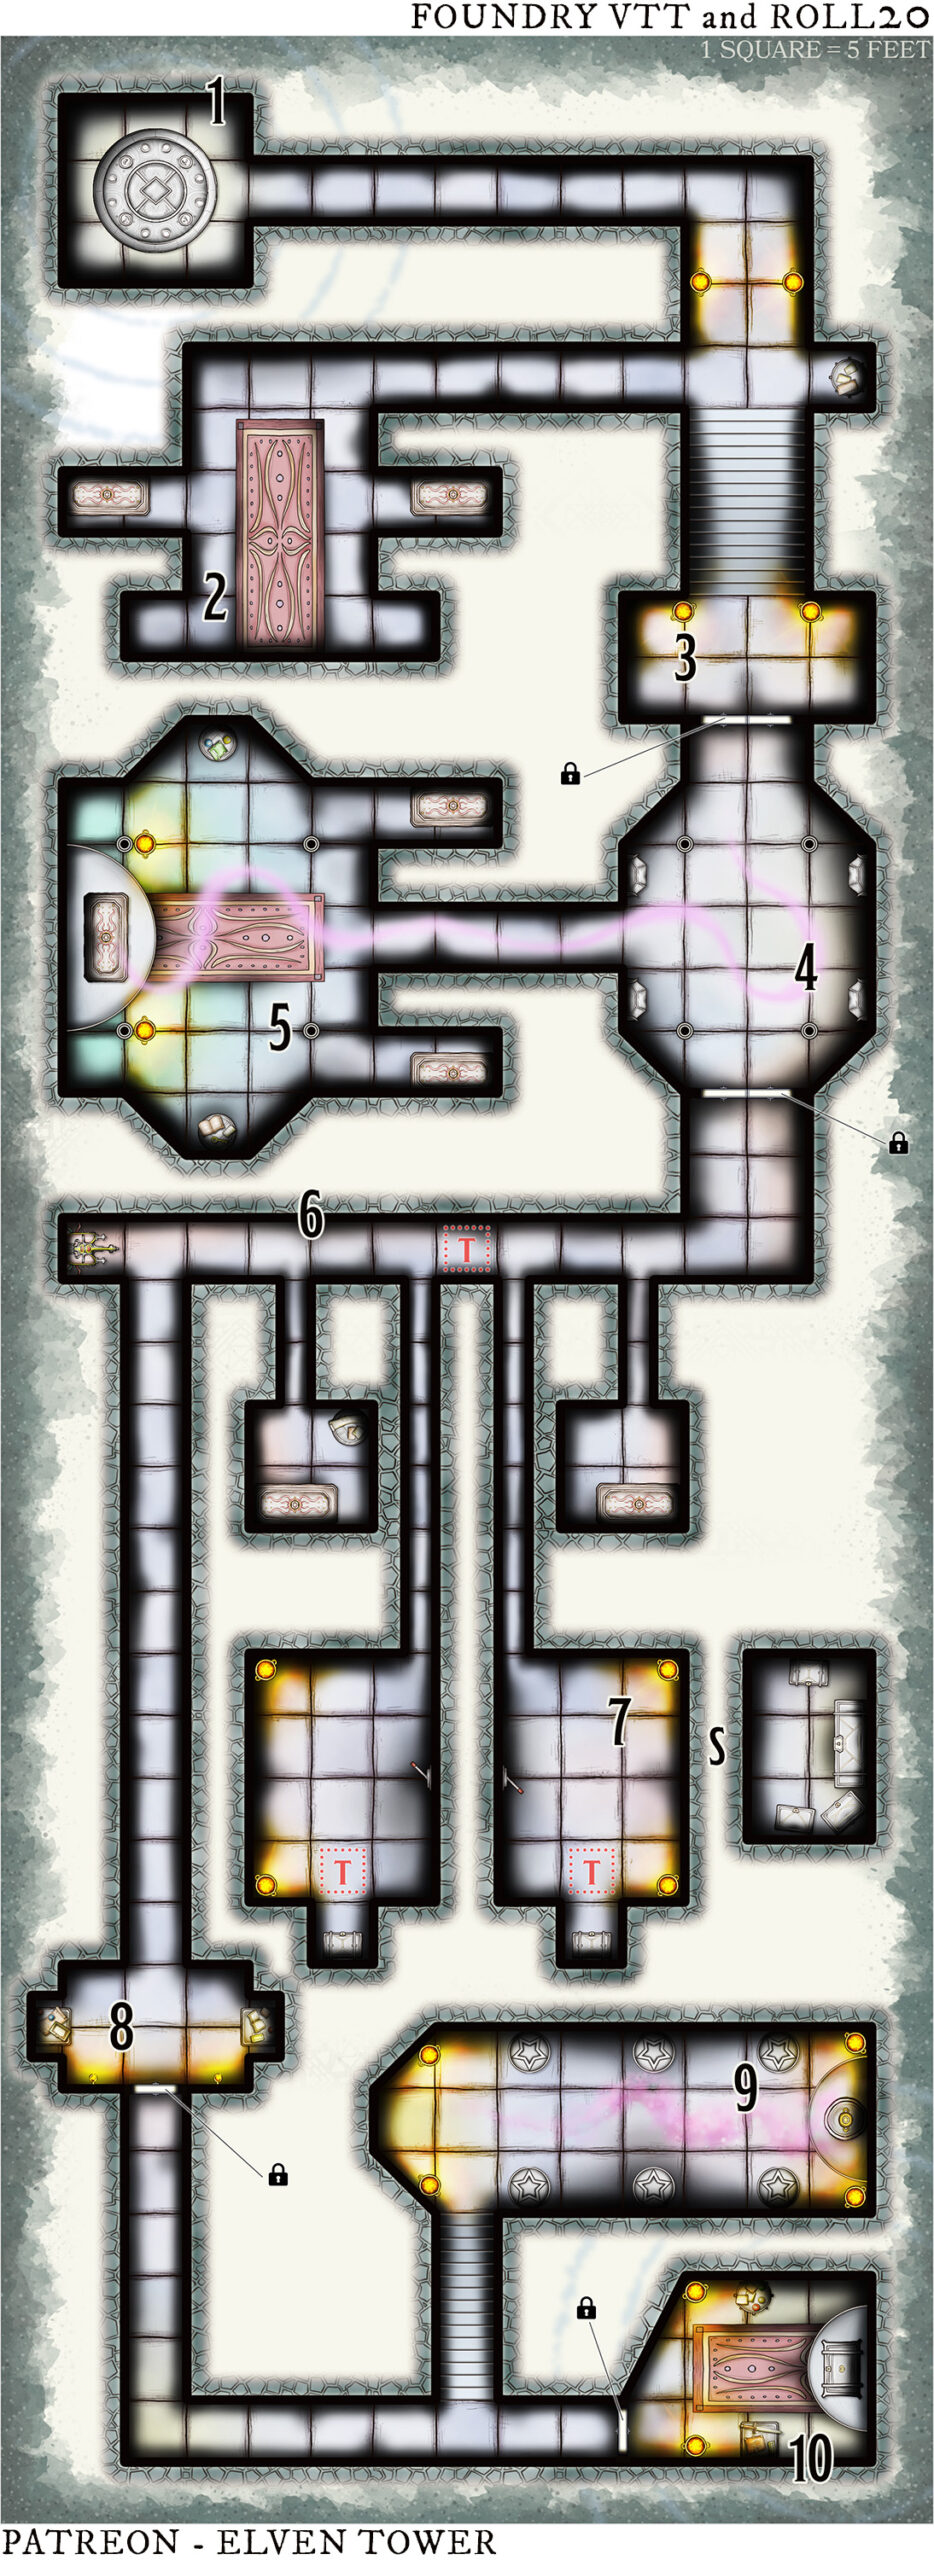
1. Entrance Portal
The walls display vanished images of wealthy-looking individuals wearing fancy robes and jewels.
When the characters appear in this area, they hear a voice echoing through the entire place. It says: “Welcome, and good luck. Go on, achieve what no one could”.
This is Dylan Faythe’s voice, magically programmed to welcome newcomers. A small table with papers rests on an alcove before a set of stairs (to area 3). The papers show the names of the 20 people buried in the crypt.
2. The Faythe Twins
A beautiful symmetrical rug dominates the chamber. Two identical sarcophagi rest in shallow alcoves on each side. The heavy lids start to slowly shift…
The two enemies here are wights with maxed hit points. The Faythe twins emerge from their enclosures when the heroes enter the chamber. They fight until slain trying to corner their opponents against the walls.
3. Locked Gate
This gate is magically locked and will only open after the enemies in area 2 are defeated. Dylan’s voice says: “The twins have been bested before. This is but one of many dangerous obstacles between you and our treasure.”
4. Standing Sarcophagi
A strange pink mist hovers in this area. It finds its way through the sarcophagi’s cracks and lids.
A swift current of cold air shuts the gate to area 3 when the characters reach this place. The sarcophagi contain four shadows. They wait until the characters confront the undead in area 5. The gate to area 6 is locked; it opens after all enemies in areas 4 and 5 are defeated.
5. Dylan’s Faythe
The thick, pink mist originates from an ornate, rune-carved sarcophagus on a dais, close to the west wall. Dylan’s voice says: “There is no shame in failure. We did not always succeed on our adventures. But we did know when to flee… Live to fight another day. We, the Faythes, never believed in having a hero’s death. What for?”
Dylan’s spirit (wraith), two ghasts, and the four shadows from area 4 attack the characters mercilessly.
6. A Dolorous Path
“It’s not over…”, the voice says when the characters arrive here. If they fail to notice the pressure-sensitive plate (DC 17 Perception), the device at the end shoots a lightning bolt spell. Creatures in the corridor take 6d6 lightning damage (DC 15 Dex / half). The two ghasts in the sarcophagi attack when the trap is triggered.
7. Twin Chambers
The chests in both chambers feature a poison dart trap. Creatures that touch either take 4d6 poison damage and become poisoned for one hour (DC 14 Con).
Secret Vault. Pushing a brick on the east wall causes a section of the wall to slide inward (DC 16 Investigation).
8. Small Archive
The documents contain information about the crypt’s construction and a map. The door has a regular lock that even common hands can bypass (DC 14 Thieves’ Tools).
9. A Test of Will
The pink mist in this chamber flies and finds its way between the joints of the six full sets of armor.
The characters witness the sets of armor come to life thanks to the magic mist. Six construct veterans fight until slain. If the heroes destroy the mist-producing urn, the armors stop moving and become inert.
10. An Act of Faythe
The locked door only opens after the enemies in area 9 are defeated. “I can’t believe it. A worthy group, at last. Take the treasure. You’ve earned it”. Dylan’s voice says.
Features of the Area
Lights. Magical torches on iron sconces and floor braziers provide bright light throughout the tomb. Their continual flame spells fade in 1 minute if removed.
Magic. The spells in the crypt allow all enemies to reform every 12 hours. The treasure does not reappear.
Treasure. Area 7 contains a +1 longsword, and 2,000 gp worth of coins and silks. Area 10 contains two magic weapons, 10 spell scrolls, and two magical artifacts. The GM must choose items that fit the current campaign.


