DON’T FORGET TO VISIT OUR MAP INDEX AND OUR PATREON FUNDING PAGE
Background Lore
The Broken Hilt Adventurers’ Guild is the place to start for up an coming adventurers and mercenaries. The guild has so many active members that together form a considerable force. If they could act as a single unit they would be a terrific shock unit in times of war and troubles. That is nonsense, however. The guild is a disorganized faction that employs all kinds of people who would never follow orders or give their life for a city unpaid. Such is the nature of adventurers.
The guild receives jobs and bounties and then offers these mission to active members. High-raking individuals within the organization have the privilege of access to high pay bounties. As contracts are less profitable, they are handed down to newer members. A new member could go days or weeks without an available contract. But that is the nature of the organization, new members must go through hard times to gain experience and become more valuable members.
The guild as a reputation to uphold. Most contracts accepted by the guild’s members are carried out, bounties are collected. Guild members dying on the job or underperforming only stain the power status of the guild. To prevent such issues, the leader of the guild came up with a way to ensure new members would meet a minimum standard of performance. The leader is Commander Devon Jilli. He devised a trail course with many challenges for aspiring members. If a person wishes to be a part of the guild, they must successfully finish the trial to demonstrate their strengths.
DM Info
What follows is a description of the adventurers’ guild trial course. It is designed for level 3 characters. The DM is free to replace or adapt any information here to accommodate homebrew settings or different factions. The lore above about the Broken Hilt Guild can be replaced with a different faction or name. The use of a guild to give out contracts and bounties is a good way to keep odd jobs and short missions coming towards the PC’s way. This style of play is particularly useful for episodic gameplay where each game session is meant to play out a single job.
Area Descriptions
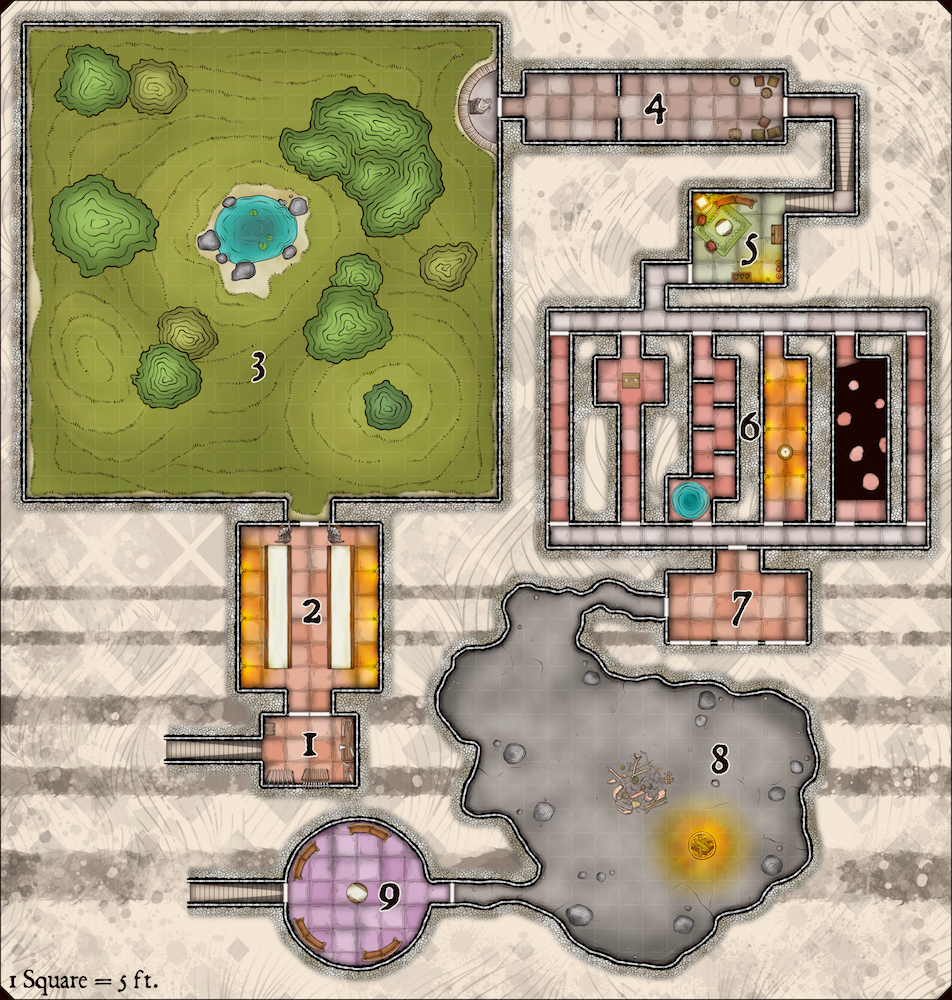
- Choose Your Weapon
After announcing their desire to join the guild. The adventurers are lead to an underground facility to prove their worth. The room features weapon racks, tables, and chests with all kinds of weaponry. Adventurers are forbidden from using their guild during the trial. They can only use weapons and tools from this room. The only exceptions are spell implements, components, and spellbooks. After adventurers choose their equipment they can enter Area 2. The guild’s trialmaster informs them that the door will be locked after they go and the only way to exit is by traversing the whole structure.
- Dining Hall Guardians
The door behind the adventurers clicks as the trialmaster locks it. If any adventurer were to bypass or pick this door to exit back to Area 1, the person is disqualified and removed from the premises. They will not be accepted again.
The room features two large tables down the middle of the room, six torches on the walls, and two soldier statues at the end of the chamber. The statues start moving towards the adventurers once they reach the middle of the room. They appear life-like and attack without mercy. Use the gargoyle stats for these creatures. The door on the north wall is locked and must be destroyed or bypasses somehow.
- The Wolves and the Statue
A large underground chamber appears to be a forest scene at night. The ceiling features tiny spots of light that look similar to stars and provide dim light. A pack of 4 wolves and 1 dire wolf roam the area and do not take long before attacking the party.
- Split the Party
A large rectangular area with almost divided by a wall near the middle point. There are some crates and barrels on the far end of the chamber. When half of the party crosses the middle wall section, a barred portcullis falls and separates the party. A necromancy trap activates and materializes 6 zombies on the east side of the chamber. Half the party must contend with the zombies while any members on the west side of the room must find a way to traverse the portcullis. A successful DC 17 Dexterity (Thieves Tools) check allows a character to bypass the lock and lift the bars. Otherwise, a successful DC 20 Strength (Athletics) check allows a character to lift the portcullis with sheer strength.
- Tea and Cookies
This room poses no challenge. It is a place to rest and catch your breath before going forward with the trial course. Despite it, adventurers are regarded as better the less time they stay in the room resting. If they stay too long here, they may come across a second group of applicants running through the trial course hours later.
- Choose your strength
This area features six different doors. The doors are labeled from east to west: “Strength, Dexterity, Constitution, Wisdom, Intelligence, and Charisma”. Each adventurer must choose whichever ability they consider their strength and continue.
Strength. This 40-feet-long corridor features a large red panel on the wall near the south door. Pushing the panel works like a button that opens the door. A successful DC 16 Strength (Athletics) check allows a character to push the panel far enough to trigger the door to open.
Dexterity. The room features a bottomless pit and a series of narrow platforms separated by 5-7 feet. A successful DC 16 Dexterity (Acrobatics) check allows a character to jump deftly from platform to platform to reach the south end. The door is unlocked.
Constitution. The door on the south wall is locked. The only way to unlock it is by drinking the contents of a crystal vial in the middle table. The vial is magical, if a person drinks or pours the liquid it refills magically. The liquid is blue and odorless. It is poisonous. When a character drinks from the vial, they must make a successful DC 16 Constitution saving throw to avoid falling unconscious for 2d6 hours. The door unlocks even if the character is unconscious.
Wisdom. The hallway is divided into sections that form a zigzagging pattern to the south. The floor is covered with lava and burning embers but that is only an illusion. Characters interacting with the scene in any way must make a successful DC 16 Wisdom saving throw to realize that there is no lava and they can just walk down the hallway to the open door. A character who fails the save must find a different way to traverse the room, the floor is difficult terrain and touching it inflicts 2d6 fire damage per round.
Intelligence. A small table with a scale and five iron weights of roughly the same size on it. There is a folded letter with instructions to the riddle on the table. A character must order on the table from heaviest to lightest the five iron weights but they are only allowed to measure on the scale seven times. The player may try to explain how to solve this riddle or make a successful DC 16 Intelligence check.
Charisma. The charisma room poses no challenge. The person can walk to the end of the room and find an unlocked door.
- The Shape of Wealth
Upon entering this chamber. An illusory fey creature in the shape of a fair lady appears in the middle of the room. The nature of the apparition makes it clear it is only an illusion. The fey lady explains that behind each of the three doors to the south, the adventurers may find riches, wealth, love, or whatever their hearts most desire. Then she opens the doors one by one, affecting up to three adventurers. The doors lead to nowhere, they are just placeholders for a clever illusion spell. Up to three adventurers must make a successful DC 16 Intelligence saving throw to avoid falling for this trap. On a fail, the effect works like a phantasmal force spell, but instead of showing something the target fears, they are shown something they desire. The target treats the illusion as real but may repeat the save after thirty minutes.
- A Dragon, You Said?
The large cave appears to be mostly empty, except for rocks, stalagmites, a large brazier and a mound of discarded metal and machinery near the center of the room. When an adventurer approaches within 20 feet of the rubble, it starts to move and assemble into a complicated arrangement of pipes, gears, and steam engines. The creature resembles a large dragon in shape, but it is weaker than it looks, designed more to scare visitors rather than harm them. Use the stats of a Young White Dragon for this challenge but modify the Cold Breath ability so that it uses hot steam.
- Meet the Leader
In this chamber, the leader of the Broken Hilt Adventurer’s Guild awaits any approaching aspirants. Commander Devon Jilli is handed a parchment with notes on the party’s developments in the course trail for him to assess. He may also interview the party and ask any pertinent questions. After this, he makes a call about the would-be members and welcomes them into the guild or rejects them.
General Features
These are the general features of the Broken Hilt Adventurers’ Guild trial course. It is located under the guild’s headquarters. All aspiring members must go through the trial and make it to the end to be accepted into the guild.
Terrain. The course features different terrain features throughout. Stone tiles in most areas are in good condition but show signs of use and erosion. The grassy fields in Area 3 appear to be well kept. The cave floor in Area 8 is uneven and rough. Any square totally or partially occupied by an object or piece of furniture is considered difficult terrain for tactical movement.
Doors. The course features think reinforced wooden doors with good quality locks. They are all locked unless otherwise stated in the area description. An adventurer can lockpick a door with a successful DC 18 Dexterity (Thieves Tools) check.
Light. A magical unseen source of dim light keeps the complex from total darkness. Areas 2, 5, 6, and 8 feature lit torches or braziers and normal lighting conditions.