
The king has commanded me to find a solution without leaving my duties at court. You must delve into the dungeon and find the way toward balance.
Lord Gaulding, Court Wizard
Across hundreds of years, when the kingdom of Ardennia was at the zenith of its power, there existed a cabal of spellcasters unparalleled in their mastery of the arcane arts. These mages served as the most trusted advisors and counselors to the dynasty of kings, wielding their magic to safeguard the realm and guide its destiny. Upon their deaths, they were interred in a crypt known as ‘The Hall of Forlorn Spells,’ an emblem of the wizards’ loyal service.
The underground hall, carved into the side of the Ardenn Plateau, is an architectural marvel adorned with intricate runes and mosaics. The entrance is guarded by statues of the four most prominent mages in the court’s history: Lord Vallaster, Lady Adilla, Lord Palleque, and Lady Vetross; they flank the dungeon’s entrance. In the depths of this place, there is a columbarium where the remains of dozens of lesser-known mages are interred; their urns inscribed with the wizards’ names.
Ravaged by Time
However, as centuries passed, the Hall of Forlorn Spells fell into disrepair and the eventual failure of crucial magical wards. Over time, the spells that protected the tomb began to weaken, and the residual arcane energies sealed within the mages’ bodies started to emerge from their bindings. This disturbance awakened the magics within the scrolls, tomes, and artifacts interred alongside the spellcasters, giving birth to a menagerie of elemental entities. These creatures, born from the raw elemental forces, roam the halls and chambers, driven by the chaotic nature of their creation. Some of them even exited the tomb and attacked nearby settlements.
Adventure Hook
Elements Unleashed. The elementals, and sometimes undead monsters that emerge from the Hall of Forlorn Spells have attacked nearby hamlets and put the reputation of the court wizards at risk. Lord Gaulding, the current court wizard, summons the characters to the castle after hearing of their past exploits. He offers a hefty reward for delving into the tomb and reaching the library. An arcane incantation to renew the magical wards in the tomb is there. They must cast it (2,000 gp, 6 XP).
Level 7 Adventure
- Danger. Risky. Check for a Random Encounter every 2 crawling rounds and after loud noises (4-in-6 chance).
- Light. Some areas feature braziers with permanent light spells. The denizens are all dark-adapted.
- Arcane Chaos. When casting a spell, a random spell of the same tier is cast instead. The caster may still choose the target(s) of the new spell (DC 13 INT check).
| RANDOM ENCOUNTERS d6 | Details |
| 1 | A sudden burst of elemental energy (fire, lightning, or ice) bursts from a broken seal. 2d6 damage, DC 14 DEX check for half. |
| 2 | Scrolls spring to life, flitting about the room. If a character catches or touches any of them, a random, Wizard, Tier 1-3 spell is cast targeting one of the characters. The scroll then burns down into gray ashes and falls to the ground. |
| 3 | The Sphere of Annihilation, once guarded in the sanctum (area 11), glides along, moving in a random direction. |
| 4 | A pack of ten shadows that escaped from the columbarium (area 7), emerges from the walls and attacks the party. |
| 5 | Time shifts and flows differently here, causing time to move forward at an accelerated pace. (Roll 1d10). On a 1-3, six hours pass. On a 4-7, 1d4 days pass. On an 8 or 9, 1 year passes. On a 10, a decade elapses by the time the heroes leave the dungeon. |
| 6 | Six thugs arrive at the dungeon looking for easy treasure. They may aid or hinder the characters (Reaction check). |
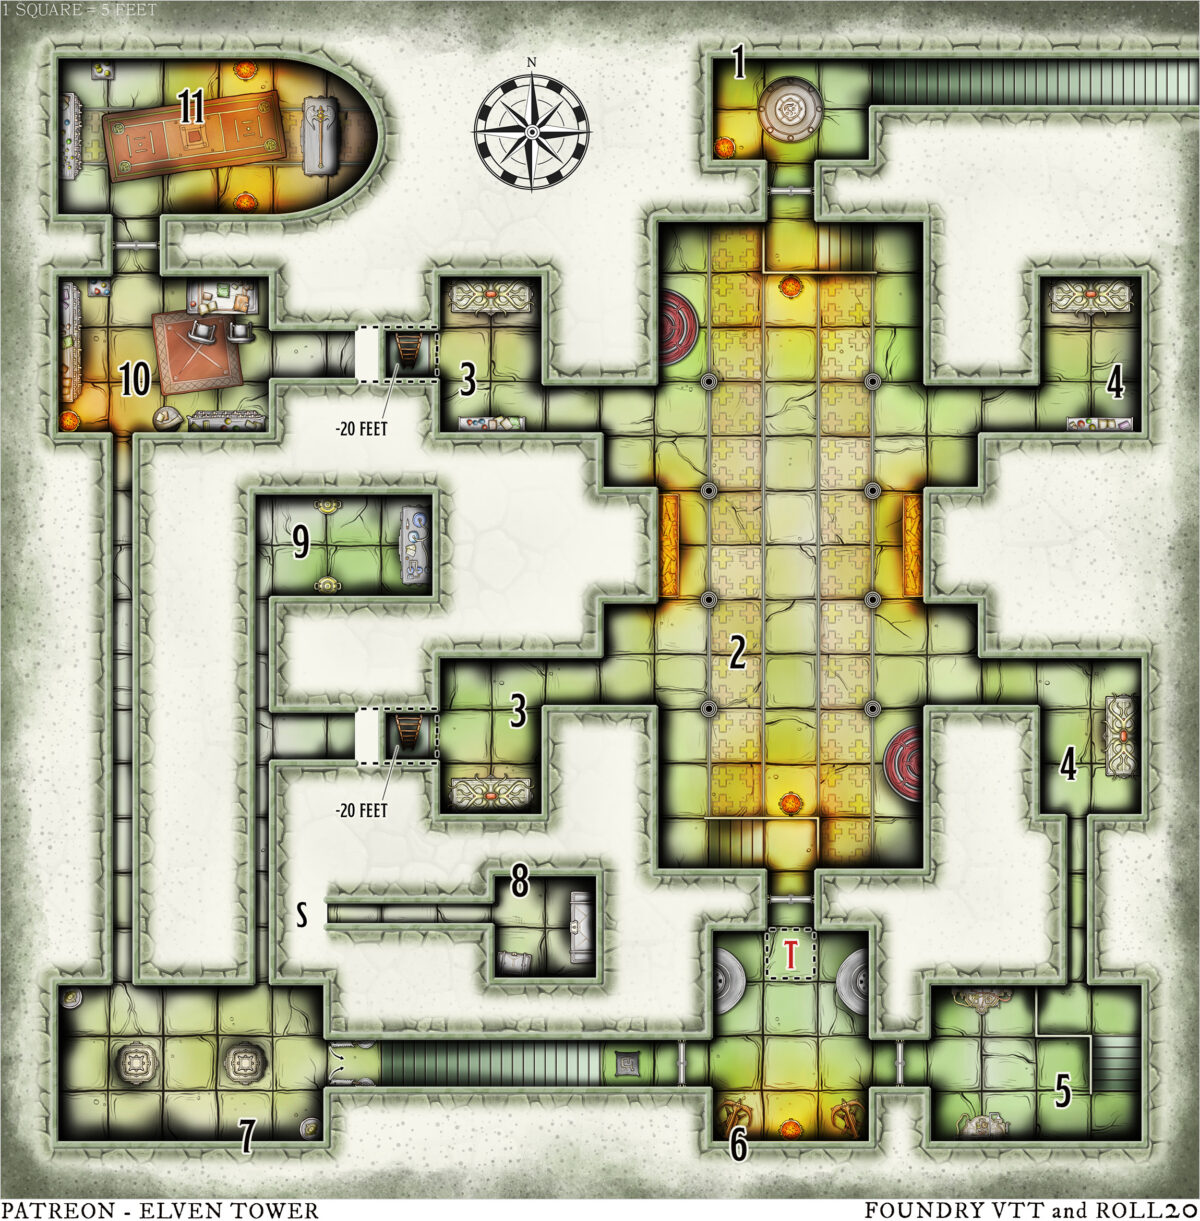
1. Entrance Hall
The small chamber contains a teleportation circle, a burning brazier, and an engraved, stone door that bears the court wizards’ sigil. Lord Gaulding provides the rune sequence to teleport here and even offers to cast the teleport spell if the characters do not have access to it.
- Journey. If the characters refuse to teleport here, they must travel north from Ardennia for 1 day to reach the Ardenn Plateau. On the way, there is a 3-in-6 chance that they encounter a lesser air elemental and a lesser fire elemental roaming aimlessly. Their path of destruction leads directly to the statues by the hall’s entrance.
2. Grand Hall
A vast chamber stretches ahead, its floor adorned with intricate cross-shaped mosaics. The walls, etched with detailed engravings of myriad mages, harbor ancient secrets to those who gaze closely.
This central hub is connected with several other areas (see map). The domed ceiling is 40 feet tall at its highest point. It features intricate, symmetrical mosaics.
- Elemental Chaos. A greater earth elemental hides underneath the flooring at the chamber’s center. It emerges to attack when creatures come within 10 feet.
- The holy water in the fonts has been tainted by the presence of undead beings nearby. The water is acrid and carries a stench of rot and decay. A priest can use the bless spell to restore the fonts’ water.
- The walls bear intricate bas-reliefs of the most prominent court wizards in the past five centuries. Four of them are displayed in epic grandeur, with runes recounting their famous exploits and their signature spells. Once such spell, polymorph, is etched on the walls. A wizard who copies the detailed runes into his spellbook may learn this spell. They must spend 1d8 hours performing this task (DC 14 INT check).
3. Western Tombs
An ornate, stone sarcophagus dominates the room. A ladder leads down a pitch-dark opening next to it.
Each of the rooms labeled area 3 contains the resting place of one of the four famous court wizards. Their names are engraved on a brass plaque on the enclosure base: Lord Vallaster, and Lady Adilla.
- Fire Column Trap. Climbing the stairs triggers this trap when stepping on the fifth rung from the top (DC 20 WIS to notice). A fire pillar emerges from the bottom, burning everything in the shaft. The targets take 4d6 fire (DC 16 DEX). The trap resets after 1 minute but the ladder is consumed. This trap can be disabled in area 5.
4. Eastern Tombs
This area is a mirrored version of area 3 except that there are no shafts into the lower level here and that the engraved brass plaques on the enclosure bases read the names Lord Palleque, and Lady Vetross.
- Evil Spirits. The remains of both wizards have been tainted. An aggressive wraith emerges from each.
5. Machinery Room
Two sets of complex clockwork and hydraulic machines extend from the stone walls of this chamber. They function with a quiet whisper as gears and belts turn.
- Machines. A character can turn the machines off (DC 14 DEX). The north one deactivates the traps in area 3. The south one deactivates the traps in areas 6 and 7.
6. Room of Traps
The trigger plate next to the north door (see map) triggers the spinning disks and the automated crossbows. Creatures that move through the tiles with the disks take 3d6 damage (DC 13 DEX). The crossbows shoot a bolt every two rounds (ATK +4, 1d8 damage). These traps can be disabled by operating the machinery in area 5.
7. Columbarium
The ashen remains of countless wizards who dedicated their lives to the kingdom are interred here. Unfortunately, many of them have found a way back to the world of the living in the form of despicable, incorporeal undead.
- Guardians. 2d4 shadows emerge from the niches when living creatures come within 5 feet. A lesser air elemental comes from one of the narrow, north passages on round 3. It attacks the party and the undead alike.
- Slide Trap. A pressure-plate at the top of the stairs that lead to area 6 (see map) causes the steps to angle and form a chute 20 seconds after activation. Creatures on the stairs slide to the bottom where two blades swing to deal 3d6 damage (DC 14 DEX to jump out of the way).
8. Secret Vault
Pushing a brick-button in the narrow passage that connects areas 7 and 9 reveals the presence of this chamber.
- Treasure (8 XP). The stone chests contain 10,000 gp, 27,600 sp, two potions of healing, one potion of vitality, nine spell scrolls with random Wizard spells (any tier), a +2 longsword, and a helm of mind reading.
9. Alchemy Laboratory
This chamber contains a set of alchemy apparatuses and implements of the greatest quality. They are all clean and empty. The most potent potions can be crafted with this equipment. Or it can be all sold for 1,000 gp (2 XP).
10. The Library
The bookcases are filled with a collection of literary and arcane works loved by all spellcasters that were buried in the crypt. Among them is a tome in Draconic named Arcanum Incantem. It details the incantation needed to restore the crypt to its untainted state. Any spellcaster can perform it (DC 14 INT check or age 1d4 years).
11. Arcane Sanctum
The door to this chamber is magically locked and cannot be breached. Restoring the crypt with the ritual in area 10 causes the door to open. Within, the ghosts (level-6 Wizards) of the four mages interred in areas 3 and 4 await. The four mages’ magic items are stored here. As a way to thank the characters, the ghosts allow them to take a single one. The items are: greataxe of the horde, hat of intellect, wand of unlife, and staff of Ord (3 XP).
- Slayers. The characters may take all four items if they destroy the four ghosts. The cursed characters shall be haunted by the beleaguered ghosts thereafter.
Interested in our catalog of full adventures? Check out these awesome goodies here.

