
They are nothing but shameless brigands. Bring them so they face the king’s justice and you shall be rewarded according to your valiant deeds!
Concerned Bailiff
Setup
Few concepts are as dangerous as the weight and influence that a charismatic leader can have on other individuals and the world that surrounds them. In addition to that, historians cannot fail to note that even the most random of events may often become the backbone of myths and legends. When opportunity collides with the right person, the chain of events that unfolds is not easy to predict. Such is the story of a petty criminal that rose to prominence after surviving two duels to the death.
Birth of a Faction
Afew years ago, a prominent criminal named Askren got into an altercation that ended up with a bloody duel to the death. Askren was successful in defending his life but lost his left hand to a grievous wound. It was soon replaced by a hook that endured for a year until Askren got into another duel. Then, he blocked a deadly blow with the hook before lethally wounding his foe. The hook was broken but the underworld took notice of the criminal who refused to be killed. Askren is a naturally charismatic individual. He soon recruited several scoundrels and started raiding caravans and traveling merchants. They call themselves ‘The Broken Hooks’ and found a place to hide in an underground compound under a large hollow tree. The structure is an elvish crypt; the spirits that reside therein are angered by the brigands’ presence but can do little about it. The Broken Hooks have repurposed the areas that are not haunted by the irate apparitions.
For the past few weeks, the Broken Hooks have robbed numerous caravans and stolen the goods of traveling merchants on the King’s Road. It has come to a point where the crown has sent envoys to solve the situation.
Adventure Hook
Sir Bernard Hausse, the crown’s bailiff, has been sent down the King’s Road to solve the recurrent attacks. He is authorized to offer a reward of 1,000 sp to mercenaries or sellswords for tracking down the Broken Hooks back to their lair, arresting them, and bringing them to face the king’s justice. The only clue they are given is the last location where the band of brigands attacked.
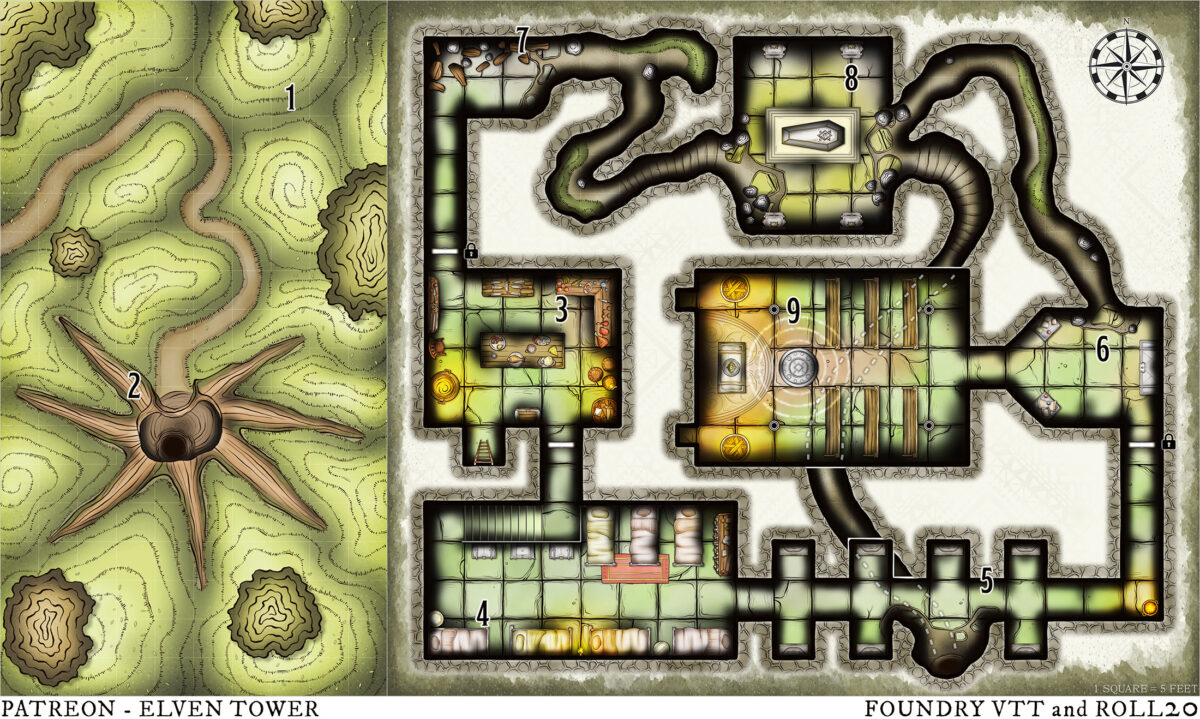
Features of the Lair
Tier 1 Adventure
Light. There are braziers and sconces in the crypt. They are changed or refueled regularly by the brigands.
Locks. All doors are made of limestone slabs with high-quality locking devices (Burglary check). The ones on the doors leading to areas 6 and 7 are locked.
Chamber Ceilings. All areas have 20-foot-tall, arched ceilings decorated with intricate, geometric patterns.
Elf Ghosts. The undead spirits and creatures in areas 7 and 8 attack any living creature that trespasses on their territory. If defeated, they respawn at dawn.
1. Surrounding Grounds
The characters are escorted down the King’s Road to the last attack’s location. A careful examination of the area reveals the brigand’s footprints. Following the tracks leads into the forest; a two-hour walk to reach the lair (Nature check). Failure means the characters get lost on the way and are attacked by a pack of 1d6 wolves.
2. The Hollowed Tree
A hollowed-out tree trunk stands in the middle of a forest grove. A column of gray smoke rises from behind the dead tree but it is certainly not burning.
A metal ladder leads down a shaft inside the hollow tree to area 3. If the characters inspect the smoke, it all comes from an exhaust pipe behind the tree. It releases smoke from the kitchen and some light sources. If the characters obstruct this pipe, smoke accumulates in the crypt and all brigands exit in a matter of minutes. There is a 4-in-10 chance that four guards patrol the area.
3. Kitchen and Larder
The crypt’s only entrance leads to the larder. It contains a burning cauldron and several preparation tables. A grand meal is held daily for the fifteen members of the Broken Hooks. There are four people (guards) working here when the characters arrive. At first, they assume the characters are brigands returning from patrol but when they see their true identity, two of them attempt to run south to reach area 9 and alert Askren. The rest of the cooks stay and attempt to repel the characters.
4. The Barracks
The chamber contains seven double bunk beds, a bookshelf, and several stone coffers. If the characters did not encounter the four guards in area 2, they are found here, resting after patrol duty. Two of them sleep.
Treasure. The coffers contain 270 sp, 640 cp, a set of breastplate armor portraying the band’s sigil, and a collection of stolen goods worth 15,000 sp that is expected to be returned to Sir Bernard Hausse, the crown’s bailiff.
5. Dormant Tombs
Ornate, funerary plinths flank this long hallway like spectral guardians. A rune glows on each of them.
Askren’s second-in-command, a priest named Garcken, inscribed these runes to keep the irate spirits at bay. If the runes are erased or changed, a shadow emerges from each funerary enclosure to haunt living creatures. With these tombs contained, the Broken Hooks can easily access their gathering room in area 9. One plinth is missing, a dark hole taking its place. It leads to a tunnel that climbs north and connects to area 8.
6. Room of Offerings
By elvish tradition, visitors to the chapel would leave something of sentimental value here as an offering (Divine Lore check). The brigands ignore this but they left all offerings in place to avoid further angering the spirits. The objects are all trinkets of no monetary value.
7. Dilapidated Chamber
Little remains of this area as it was subject to a cave-in. The splintered furniture and rotten pages on the floor indicate this may have been a sort of archive. A swarm of spiders emerges from the north wall and attacks. The brigands are aware of the dangerous vermin and avoid it.
8. Tomb of the Elvish Knight
A lavish sarcophagus flanked by four standing enclosures stands on a raised dais in the chamber’s center.
The brigands avoid this place as the undead here are stronger and more aggressive. Each standing sarcophagus contains a ghoul. The central one contains the remains of a renowned elvish knight (wight). These abominate entities know no mercy and fight until slain.
Treasure. Inside the sarcophagus, there are four rings with rubies (200 sp each) and a potion of heroism.
9. Altar of Gatherings
A group of individuals stands in covenant in this chapel-like chamber. The leader of the Broken Hooks raises his gaze. A spark of hatred shines in his eyes.
Askren (bandit captain), Garcken (priest), and five brigands (guards) face the characters. Askren orders his men to fight in the name of the Broken Hooks. They fight as if their lives depended on it but surrender if Askren is defeated. The characters decide whether to slay them here or arrest them and bring them to justice.
Interested in our catalog of full adventures? Check out these awesome goodies here.

