
Behold the power of the stingray. Our true savior and god. Join us, or die. Filthy unbeliever!
Father Kyle Mason
Background Lore
Religious organizations and communities often have a great influence and power. Under a thick veil of faith, it is sometimes the clergy who rules empires and strong cities. But like other things in the world, the massive, thousand-year-old religions have opposites.
Local congregations of temporary faiths come to be more often than not. Their weak resources, power, and connections make them prone to having short lifespans, though. Their followers lose focus, their leader lacks courage, or their enemies and detractors end their intentions. Regardless of their values and traditions, these smaller, younger faiths must overcome all kinds of obstacles if they are to survive and grow.
Just Another Church
In the outskirts of Saint Leopold, within an old mausoleum, lies one of the local churches. The dead interred here belong to a forgotten royal bloodline. After the Great War, these lands and territories were occupied by the conquerors. The mausoleum was abandoned for years but one day the clergy re-purposed it as a church.
The Stingray’s Call
Father Kyle Mason is in charge here. Most of the areas with sarcophagi and columbariums are off boundaries; he wanted to respect the dead as much as possible. Father Mason performs all ceremonies in the church’s nave. He is a well-respected man that has done his job dutifully for almost two decades. One day, however, he had the strangest of dreams. He floated in the middle of the open sea and swam desperately to find solid ground. Just when he was about to drown, a giant stingray came from below to carry him to safety in its massive back.
A New Religion
At first, Father Mason did not know what to make of the unusual dream. He continued his life as normal but the dreams became more vivid and intense each night. Father Mason started to notice changes in him. Realizing his new potential, Father Mason listened to the otherworldly voice of the stingray in his dreams. For three months, the corrupted man has been amassing followers. He brainwashes innocent people and drives them mad with visions like the ones he saw in his dreams.
Adventure Hook
Dozens of innocents are missing. They have disappeared in the span of three months. Saint Leopold’s authorities did some research and it seems most of the people were near the church in the outskirts. They believed Father Mason could have answers but a squad of six guards did not make it back from his church. The city offers 2,000 gp to independent mercenaries to solve this.
Features of the Church
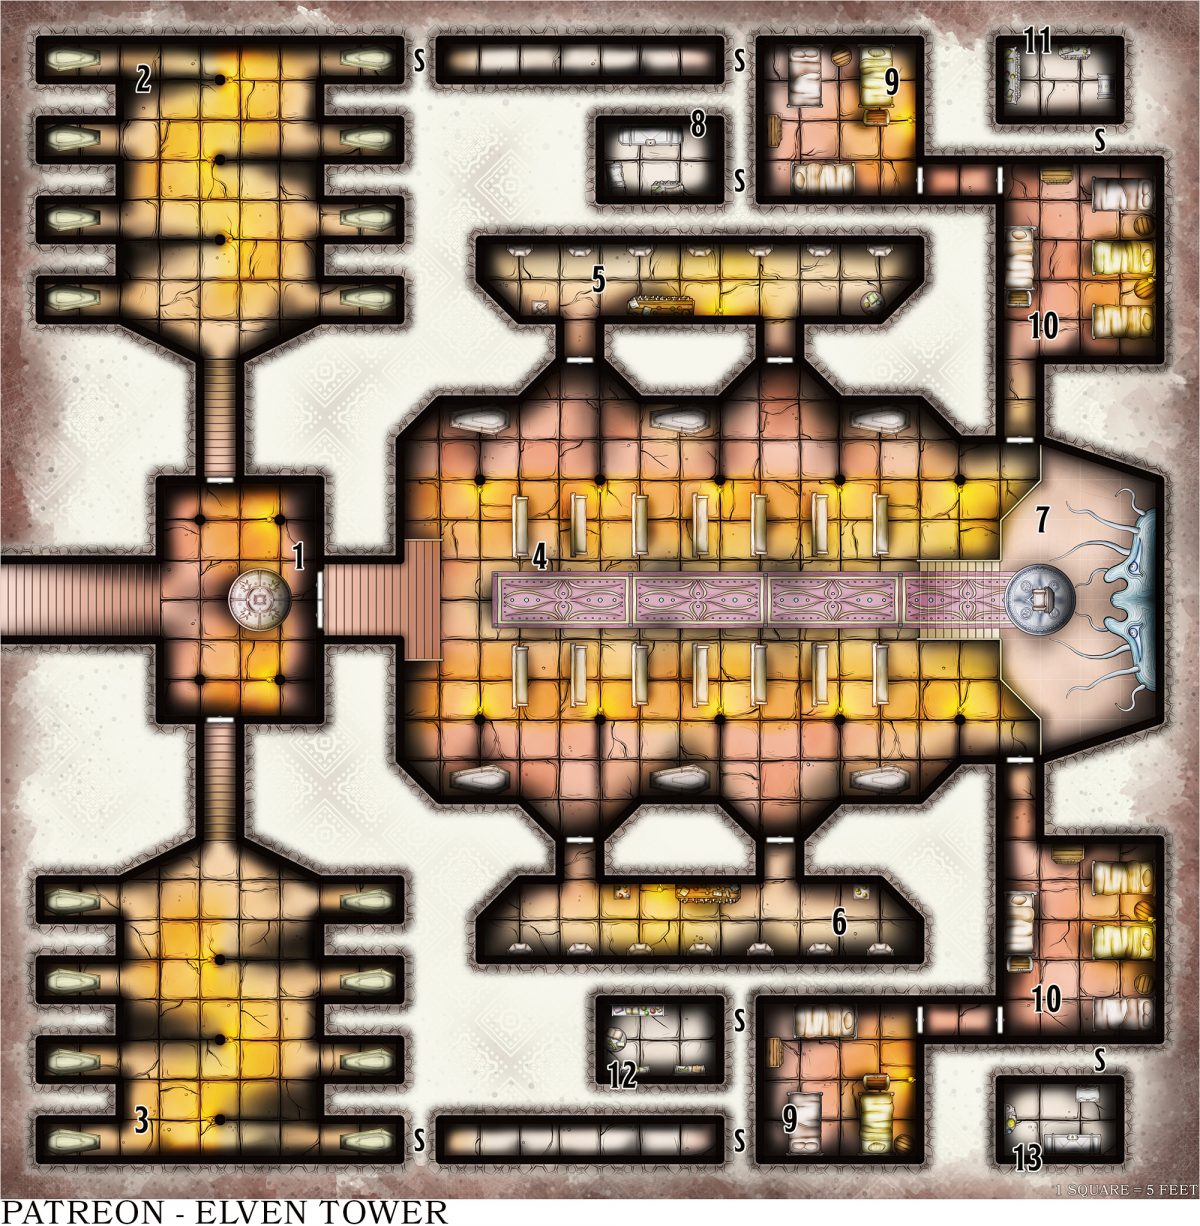
The following features correspond to all the areas of the Church of the Stingray; areas 1 through 13.
Light. Many areas in the mausoleum feature sconces with continual flame spells. Removing the sconces from the walls causes the magic to fade out in 1 minute.
Decoration. Every single piece of religious art, sculpture, and even the sarcophagi have been defiled. Writhing blue tentacles were painted on most of them.
Visions. Creatures who don’t belong to the stingray religion suffer from horrible visions every 10 minutes. They take 2d6 psychic damage (DC 14 Intelligence / half).
1. Entrance
The mausoleum’s stairs descend 50 feet into this decrepit landing with four pillars and a stone circle.
The north and south doors are closed. They feature medium-quality locks (DC 16 Thieves’ Tools). Forcing the doors by sheer force or destroying them also works.
Blockade. The church’s nave is unreachable, sealed with powerful magic. It is immune to dispel magic. To remove it, the characters must defeat the guardians and destroy Father Mason’s magic gems in areas 2 and 3.
2. Resting Chamber North
The bodies and souls in this chamber have been defiled. The corrupted dead rise; some of them do so in the shape of obscure, monstrous stingrays.
Father Mason’s magic and the otherworldly presence of the stingray god made guardians of the dead here. When the characters enter this area, the sarcophagi open. Three ghasts, and five corrupted stingrays attack.
Corrupted Stingray. Use the stats of a darkmantle but with 40 HP, and +1 to attacks, damage, and DC.
3. Resting Chamber South
Use the read-aloud description for area 2.
This chamber is identical to its north opposite. When the characters reach this area, two ghasts, two shadows and four corrupted stingrays attack them.
Magic Seal. When the characters defeat the enemies in areas 2 and 3, small shining gems drop from their bodies. When destroyed, the magic blockade in area 1 vanishes, and the doors to the church nave open.
4. Church Nave
The long hall has two rows of stone benches. They face a single seat above a 10-foot-tall dais. The eyes of a giant stingray effigy glow, its body traverses the west wall. It is made of stone but its tentacles and appendages wiggle slowly, enrapturing beholders.
When the characters reach this area, they hear Father Mason’s voice: “You cannot stop what has already begun! The stingray God is merciful, you may choose to join us and your lives shall be spared”. There are eight cultists, five cult fanatics, and three corrupted stingrays with Father Mason. If a battle starts, Father Mason hides behind the seat. All allies protect him at all costs, although he can defend himself if harmed (see below).
Stingray Idol. Each round, the idol targets an enemy creature and augments the intensity of the visions. They take 4d6 psychic damage (DC 14 Intelligence / half).
Transformation. If the characters succeed in harming Father Mason, the stingray idol strikes him with a tentacle, bestowing monstrous powers in him. In the split of a second, Father Mason’s back opens and a giant, blue, corrupted stinger comes out (cloaker). It attacks at once!
5. Chamber of Ashes North
There are seven stone containers in this chamber. The bones and ashes of many people rest in here.
The dead here were also victims of the stingray’s influence. Five skeletons and two corrupted stingers come out of their resting places and attack the characters.
Reinforcements. If the main battle against Father Mason in area 4 takes more than 6 entire rounds, the creatures here emerge from this area and join the fight.
Treasure. If the characters search the area, they find four potions of healing and a spell scroll of cure light wounds on the wooden shelf (DC 16 Investigation).
6. Chamber of Ashes South
Use the read-aloud description for area 5.
The dead here were also victims of the stingray’s influence. Five zombies and two corrupted stingers come out of their resting places and attack the characters.
Reinforcements. If the main battle against Father Mason in area 4 takes more than 8 entire rounds, the creatures here emerge from this area and join the fight.
Treasure. If the characters search the area, they find two potions of greater healing and a spell scroll of revivify on the wooden shelf (DC 16 Investigation).
7. Stingray’s Idol.
The characters can interact with the stone stingray after defeating all enemies in the area. Touching the idol bare-handed deals 4d6 psychic damage, no save.
The ancient stingray communicates with the characters when they stand before it. What they do with it or the decisions they take is up to them (see Development).
8. Hidden Vault.
There are faint scratch marks on the stone flooring (DC 16 Investigation). One of the beds blocks a hole.
Treasure. The cultists hid valuable belongings here. There are 500 gp worth of silverware and coinage.
9. Secondary Quarters
These rooms have a couple of single beds with smelly, stained sheets and some wooden chests.
One cult fanatic and three cultists talk in this area. They surrender if Father Mason has already been defeated. Otherwise, the stingray’s influence makes them fight the characters until slain. There is a leather bag with 200 gp hidden under a mattress (DC 14 Investigation).
10. Main Quarters
The room contains four single beds with stained linens. Everything in the damp chamber looks lived-in.
Two cult fanatics and two cultists talk in this area. They surrender if Father Mason has already been defeated. Otherwise, the stingray’s influence makes them fight the characters until slain. There is a musical box (350 gp) in one of the wooden chests (DC 14 Investigation). Everything else stored is worthless to any adventurer.
11. North Vault
A pushable brick on the wall reveals this area (DC 16 Investigation). A whole section of the wall slides aside.
Treasure. Father Kyle Mason has amassed a small fortune here: leather bags packed with coins (1,500 gp), fancy silverware (1,000 gp), high-quality clothes, and linens (1,250 gp). It all pertained to most of the cultists, who were taught to abandon all material belongings. This shall fund future operations of the church.
12. Hidden Office
When activated, a lever behind the wooden shelf makes a section of the wall slide aside (DC 16 Investigation). Father Mason keeps a log of the cult’s members here. Searching the desks in the area reveals five random level 1 and 2 divine spell scrolls (DC 14 Investigation).
13. South Vault
If the characters push a small button below one of the chests (DC 16 Investigation), this area is revealed.
Treasure. There are 300 gp worth of religious paraphernalia; fancy incenses, wine, silverware, etc.
Development
The characters reach the end of this adventure and face the consequences of their deeds.
The Cult is Defeated
The characters do not flee from the horde of monsters and defeat them all, including the monstrosity Father Mason became at the end. The authorities at Saint Leopold pay the heroes the agreed-upon amount and have a feast in their honor. Later, the church is closed forever. Piles of large rocks are moved to block its entrance.
Dire Consequences
The characters must retreat or die in combat. The enemies outnumber them. Father Mason, turned into a monster, emerges from the mausoleum followed by a tiny army of undead servants, cultists, and monsters. If the characters do not intervene, Saint Leopold ceases to exist. If they flee, they need to regroup and rethink this. However, that is an adventure for another time…
Interested in our catalog of full adventures? Check out these awesome goodies here.

