Background Lore
Heritage and ancestry are both valued and cherished by royal families. History and legacy are what the oldest members of noble bloodlines seek to protect. After all, a singular individual cannot ever overshadow the accomplishments of their whole family tree that goes back for generations. Another example of this protective sentiment is the royal crypts under most castles. Blue-bloods bury their dead together, with those who share their last name. It is a tradition in some cultures to entomb them with their most beloved belongings. They do so because they are different from others, and even in death, aristocrats shouldn’t mingle with peasants and commoners and should retain their status and wealth in the afterworld.
In the city of Dragonia, Mondragon’s family is not exempt from this royal behavior. Under their castle, a dozen sarcophagi and a columbarium with Mondragon family members rest in the crypt. They take care of their own, and they see that their family name is not stained by dishonor or shame. However, the subsequent turn of events showed that pride and ire often eclipse shame and dishonor.
Dragonia was raided by a massive army of orcs. They came out of nowhere. They were prepared to take the city that day or die trying. The assault was so swift and so sudden that the city couldn’t hold. The orcs unleashed their rage on everyone and everything. They set everything on fire and in a matter of minutes the whole city turned into a burning hell. The four remaining Mondragon family members made their last stand in the family crypts but the orcs would find them eventually. The cornered aristocrats resorted to the one thing they hoped they would never do.
After writing a last entry in the family journal (see area 8) explaining what happened, they all said the incantation to activate a magical glyph on the floor (see area 2) that affects the whole crypt and has many effects. Necromantic magic called upon the departed family members, giving them the force to fight again, and those who said the magic words to activate the glyph would also obtain an immortal life as an incorporeal guardian of the place. The ritual also created a magical barrier at the beginning of the stairs. The orcs couldn’t do anything to enter and left it alone. They stayed in the city ruins and claimed it theirs.
All Mondragon family members accepted and agreed to these terms when they reached adulthood. All of them learned the incantation to activate the glyph. They understood that if the circumstances required it, their transcendence in history was the priority, not their mortal lives. But at least this way, the Mondragon would impede anyone from entering this one place and it would still be protected. And they succeeded. Their history would still live on and their last name shall be remembered. Even in a thousand years, history books shall describe how the Mondragon family did the unthinkable just to have a chance to subsist in the records of libraries and history lessons. And they did right. Otherwise, the orcs would have killed them and destroyed and burned everything in the crypts, just like they did with the rest of the city.
The orcs left the land a couple of years after due to internal conflicts among their clans. A hundred years after, the land has a new ruler. After a few military confrontations and some diplomatic agreements, the Havertz are the ones in power now. The capital, where King Havertz lives, is not far from Dragonia, the ‘ruined city’, as they now call it. King Havertz knows about this abandoned and ruined territory. He means to rebuild it and start a new settlement but he never finds the time or resources to do so.
Samuel Sterling, a renowned explorer, is looking forward to the restoration of the city. He wants to head the project and he is sure his reputation shall precede him when they make the teams. However, it has been a year already and the project to restore the city is, as today, still pending. It is said that the remains of Dragonia are haunted by spirits and evil forces. Some say this is why King Havertz doesn’t want to proceed with the reconstruction. Others say it is simply too costly, and there are more important matters to invest gold on. Whatever it was, Samuel didn’t want to wait anymore and went to the site alone, regardless of the rumors.
The ruins are a ghastly cemetery. No one lives there. He approached the crypt and ran into the magical barrier. He examined it and tried to cross it somehow without any success. Just when he was about to leave, one of the Mondragon spirits charged toward the barrier to attack Samuel. The blow was in vain thanks to the invisible force dividing both rooms, but it was enough to scare the explorer. He got on his horse and did not look back. On the way back, he thought that with this intelligence, he could make a case with the King. He requested an audience with the King and his advisor as soon as he returned.
His request was granted a month later and, once there, Samuel explained that he was more than certain that Dragonia has a royal crypt under the ruins of the castle and that there are many valuables in there. He said that he doesn’t need an army nor to bother any of the members of the guard. He just needs funds to hire some muscle to fight the guardians of the crypt. The gold spent on the sellswords would be more than tripled with the stash at the crypt. He closed his argument saying that since Dragonia was inside King Havertz territory, the treasure belonged to His Majesty. He would only ask for a commission on the bounty.
Samuel’s argument was so convincing that the King’s advisor prompted His Majesty to accept. Samuel was authorized to offer 75 gold pieces to each of the adventurers he hires. There was only one condition. They are to leave on two carriages. The purpose is to carry all valuables back and to be escorted. A team of five disguised king’s guards shall accompany Samuel and the hired sellswords. They identify themselves as simple cohorts, historians, and the like. This is in case the adventurers think about getting away with any of the treasures found in the crypt and resist arrest. Everything in the crypts shall be reported and brought back to the castle.
NPCs
Samuel Sterling
Chaotic neutral human (age 39)
Samuel looks a bit younger than he is. He is swift and slim. He wears a green vest and thick spectacles. He also carries a large leather bag with lots of tools and trinkets for cartography, exploration, and camping.
Personality Trait. “Treat every day as a new adventure.”
Ideal. “Opportunities are there; you just have to take them!”
Bond. “This job shall increase my reputation in such a way that I will be part of the king’s court.”
Flaw. “Personal hygiene is not one of my strong points.”
Area Descriptions
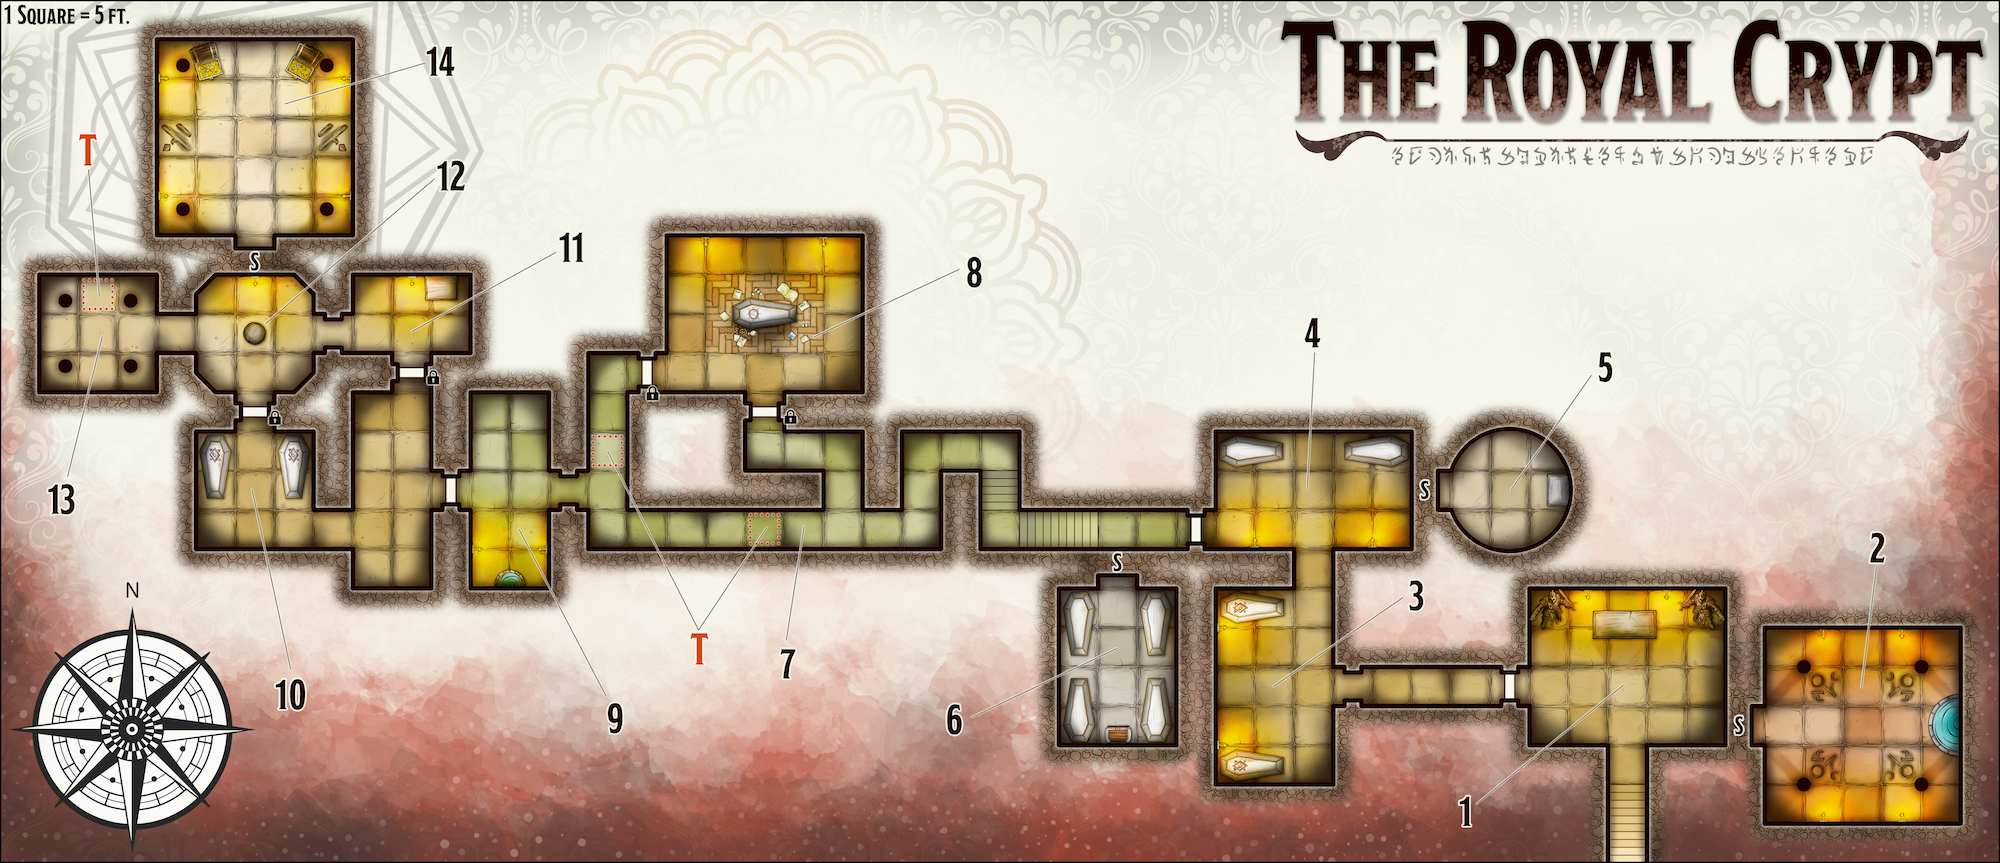
The following descriptions of areas 1 through 14 correspond to the underground crypt in Dragonia.
Terrain. The stone tiles of the crypt are in good condition. Only the corners of the rooms show little signs of wear.
Doors. All doors are slabs of stone on steel rails that slide sideways. There are handles carved in the stone to facilitate their sliding. Doors marked with a padlock icon (see map) are locked. A successful DC 19 Strength (Athletics) check allows a character to force the mechanism and open any of the doors. A character using thieves’ tools can unlock any of the doors with a successful DC 17 Dexterity check.
Light. Sconces with magical fire illuminate most of the crypt chambers. The continual flame magic on the sconces fades away after 5 minutes if the sconce is removed.
Smells and Sounds. Since the activation of the glyph, the undead came out of their tombs and filled the place with their stench. Their grunts and growls also echo in the long underground complex.
Sarcophagi. All the sarcophagi have decorations. The border of the lids, the emblems on their surfaces, and other aesthetic details can be removed. They are well-conserved, fine strips of gold and silver. The sigils on top of some of the sarcophagi are also a representation of that individual’s reputation in life. The sigils can be removed as well. Mondragon family found peace and pleasure in such crafts. The collective value of all sarcophagi precious metals and stones is 250 gold pieces.
Invisible Wall. There is a magical barrier blocking the way to the stairs (area 1). The wall is one inch thick. It is similar to a wall of force spell, but not as powerful. The wall in the crypt doesn’t extend into the Ethereal Plane. Additionally, a dispel magic spell can deactivate the barrier as well for 1 hour.
Alternative Entrance. In case the adventurers don’t have the means to dispel the invisible barrier, a passive Perception score of 14 or higher reveals a section of the sidewalls of the stairs that looks weak. A group of four or five people can work for six hours to remove enough boulders and blocks of stone to clear a path. Any creature who participated actively in removing rocks must make a successful DC 11 Constitution saving throw or acquire one level of exhaustion. This does not affect the invisible barrier and it stays in place.
1. Entrance Landing
After a 30-feet-long flight of stairs, there is a room with two identical, mirrored statues with a large pedestal between them. An otherworldly scream of a woman pierces the ears of those who enter as a welcoming salutation. One ghost, one shadow, and two spirits emerge from the ceiling, floor, and walls to meet the intruders.
Secret Door. A passive Perception score of 15 or higher reveals that one of the stone blocks on the east wall has a spot to place a hand and pull. This causes a whole section of the wall to move sideways and reveal a secret path to area 2.
2. Ritual Chamber
Four pillars are aligned with four magical runes on the floor. This is the place where the last Mondragon pronounced the incantation that set their fates. There is a fountain by the eastern wall of the room. The water used to be holy and have healing properties, but the undead have desecrated it. A detect magic spell reveals a faint evocation magic aura. Any creature that drinks from the fountain must make a successful DC 14 Constitution saving throw or become poisoned for one hour.
3. Copper Sarcophagi
The Mondragon family divided their sarcophagi into sections with the names of stones and metals. The hierarchy is based on the importance of that particular person and their position in the family. The two sarcophagi in this chamber have a copper emblem on them. Two ghouls attack anyone when they open the door to get here.
4. Flint Sarcophagi
The sarcophagi here have a gray tint and their covers are decorated with flint. Members of the Mondragon family buried here were not very important, or never did something remarkable. The walls of this room bear a columbarium on them: about twenty niches with stone lids contain small ornate copper urns with the ashes of other Mondragon relatives. There are two ghouls ready to devour any living thing hiding inside the sarcophagi. They emerge from their boxes and join the fight when they hear noise in area 3.
Secret Door. A character with a passive Perception score of 15 or higher notices a difference in the eastern sconce in the room. Pulling the sconce causes a whole section of the wall to move sideways and reveal a secret path to area 5.
5. Secret Shrine
This circular chamber is empty but for the small stone pedestal in it. A passive Perception score of 16 or higher reveals the top part of the pedestal is, in fact, a lid. A successful DC 14 Strength check allows a character to lift it and put it aside.
Treasure. Inside the stone chest, there is a leather bag with 100 gold pieces. A nice, varnished, wooden box with one ivory chess set inside worth 125 gold pieces. And a small container with 2 potions of healing.
6. Stone Sarcophagi
This section of the crypt is kept hidden for a purpose. The people buried here are members of the Mondragon family that shamed them in some way, or that had an embarrassing death. The niches on the walls don’t have ornate copper vessels like the ones in area 4. The ashes here rest in ugly clay urns. The sarcophagi here have nothing special, they are made of stone. Another sign of disdain from the rest of the family is that the ritual from area 2 didn’t affect this room. Unremarkable, decayed corpses fill the sarcophagi here.
There is a chest south of the room. A passive Perception score of 16 or higher reveals the chest is a trap. A character using thieves’ tools can deactivate the trap with a successful DC 14 Dexterity check.
Treasure. Inside the chest, there are only old clothes, rags, and worthless tools and kitchenware. This was another way to express their scorn toward these shameful members of the family. They were buried with nothing to carry to the afterlife.
7. Trapped Hallway
There are two pressure-sensitive plates in this long hallway (see map). A passive Perception score of 16 or higher reveals their presence. A character using thieves’ tools can disable either plate with a successful DC 15 Dexterity check.
The southernmost pressure-sensitive plate triggers a crossbow bolts trap. 10 bolts shoot from opposite walls. Any creature that steps on the plate must succeed on a DC 15 Dexterity saving throw or take 12 (4d6) piercing damage.
The second one is a 10-feet-deep pitfall trap. Any creature that steps on the pressure-sensitive plate must succeed on a DC 15 Dexterity saving throw or take 12 (4d6) bludgeoning damage and be knocked prone. To step out of the pit a character must succeed on a DC 13 Strength (Athletics) check.
Secret Door. 10 feet west of area 4, a passive Perception score of 15 or higher reveals a loose stone brick on the wall. Pressing such brick slides a whole section of the wall and reveals a secret location (area 6).
8. Gold Sarcophagus
Both entrances to this chamber are locked. This is the most important chamber in the crypt. The Mondragon founder of the city that once stood in this part of the land is buried here. The sarcophagus is placed in the middle of the room while books, jewels, and notes are scattered all around it on the floor. A mummy and two shadows defend this resting place the moment someone enters.
Treasure. A successful DC 14 Intelligence (Investigation) check reveals the book on the floor is, in fact, the Mondragon’s Journal. It describes important aspects of what happened during their reign. The book also explains why the sarcophagi are decorated differently, and who are the individuals buried in each of the tombs. A successful DC 20 Intelligence (Investigation) check when reading the journal reveals the command word for area 14 is ‘Pickle’.
The last entry describes the events of their last day alive. The book is worth 30 gp when sold to an antiquarian or to an important library.
9. Holy Fountain
This holy fountain is similar to the one in area 2. It lost its beneficial magical properties due to the presence of the undead. A detect magic spell reveals a faint evocation magic aura. Any creature that drinks from the fountain must make a successful DC 14 Constitution saving throw or become poisoned for one hour.
10. Silver Sarcophagi
Fine strips of silver decorate the lids of these sarcophagi. Two ghouls wait inside their boxes as if sleeping. If any of the sarcophagi lids is moved, both undead emerge and attack.
11. Foyer
This room is empty but for a small stone crate. It contains embalming and other materials needed for preserving bodies and eliminating bad smells. There is nothing of value in it.
12. Praying Chamber
The journal found in area 8 describes how the Mondragon family gathered here and performed a burial ceremony every time a member of their family died. They buried the deceased in their rightful place in the crypt and prayed here, standing in a circle around the spheroid altar in the center.
Secret Door. A passive Perception score of 16 or higher reveals the north wall has the shape of a door on it. Pressing the central sphere downward causes the whole section of the wall to move sideways and reveal a secret path to area 14.
13. Fake Vault
Although this chamber is full of valuable treasure, this is a fake vault. The walls in this chamber are decorated with precious metals and stones. The columns in the room are inlaid with rubies and sapphires. And the north wall has a large gold engraving on it. It depicts Mondragon’s family crest.
The stone tile in front of the golden engraving has a trap. This room is meant to deceive possible invaders and keep the real vault intact from foreign hands. A passive Perception score of 16 or higher reveals the presence of the pressure-sensitive plate (see map). A character using thieves’ tools can disarm the trap with a successful DC 14 Dexterity check. The trap activates a pendulum that swings a blade from one column to the other. Any creature on the marked area must succeed on a DC 15 Dexterity saving throw or take 12 (4d6) slashing damage.
Treasure. Taking the time to remove the precious stones from the columns and the other decorations on the walls results on a bounty with a collective value of 225 gold pieces. The gold engraving is worth 200 gold pieces, although removing it requires tools and much time.
14. Vault
This square chamber is the real vault. There are two runes on the floor that are activated when someone enters without saying the command word. An earth elemental comes forth to fight and defend its former master’s treasure. Two chests are brimming with treasure next to the north wall.
Treasure. Countless gold pieces, jewels, precious stones, and silverware shine under the sconces’ light. Crowns with jewels, bracelets, necklaces, rings, etc. The chests had all kinds of accessories that aristocrats wear. The collective value of this hoard is 12,000 gold pieces.
Development
Samuel and his men wait outside and enter once the adventurers tell them it is safe to go in. They inspect the place and make sure the royal treasures and belongings are still in place. Deceiving Samuel and the others requires a successful DC 16 Charisma (Deception) check.
If the adventurers are found guilty of lying or keeping part of the treasure, Samuel warns them he is instructed to arrest them if needed and suggests a different course of action. If a confrontation is the only outcome of the negotiations, Samuel quickly gets on his horse to return to the city and inform the King while the five men stop and arrest the adventurers. The king’s men are a gladiator, two veterans, and two acolytes.
In case the adventurers defeat them and get away with the treasure, the Havertz do not take it lightly. “Wanted” posters appear in the capital and neighbor cities and towns within a fortnight. The king instructs Samuel and his men to post an assassination bounty on the adventurers’ heads.
DM Note. This combat, in particular, can result lethal after the characters’ progression in the dungeon. The king’s men do not strike lethal blows when the adventurers drop to 0 hit points. Instead, they knock them out unconscious and arrest them. The adventurers wake up in a cell, deprived of all their belongings.