Lyla Strong’s Twin Blades
A popular name in small-town folklore, well-known stories, and mighty warrior lore is that of Lyla Strong. She was a lone wolf with a kind heart. She never defeated a demon overlord, she did not vanquish dragons, and she never learned to read or write. Instead, she dedicated her life to helping the weak and the underprivileged. And perhaps that was her strongest feature: She never bit more than she could chew. She was loved by all and died of old age. At least that is what the stories say.
The characters are in Appleton, a farmstead filled with life, hard-working people, and ripe apples. While they walk on the well-traveled main road, they hear some villagers talk about Lyla Strong. They claim their parents knew the warrior and that she spent her final years living here. “She would eat apples in two bites!” the farmfolk say.
Appleton. This lovely, small town has a population of just about 300 people. Many villagers are aware of the heroes’ presence. They are kindly asked to do odd jobs while they are in town.
Their conversation then turns to rumors about how Lyla’s swords were magical. And the farmers claim that a tomb located a few days away from Appleton is not only her final resting place but also where her twin swords were kept. The only way they can confirm if this is true is by traveling to this tomb. And so this adventure begins…
Tomb. The villagers are partially right. Lyla’s swords are in the dungeon. But the woman’s body was interred somewhere else.
Random Events (1d8)
| 1 | The characters are followed by two siblings who work as guards. The armored men are interested in Lyla’s blades, one for each. |
| 2 | Four skeletons attack heroes while they explore the tomb. They cannot be reasoned with. They wear rusty armors with faded sigils. |
| 3 | Three toughs have come to stop the characters. In their mind, the characters defile Lyla’s resting place and want them to stop. |
| 4 | After entering a room, the heroes touch some webbing. They disturb a swarm of spiders. The insects flee if reduced to half their HP. |
| 5 | A random character steps on a pressure plate and triggers a swinging axe trap. It deals 4d6 Slashing damage (DC 14 Dexterity / half). |
| 6 | A section of the wall crumbles and reveals an alcove. An ochre jelly oozes out and attacks the heroes. The ooze fights until destroyed. |
| 7 | An old man (acolyte) catches up with the group. If Lyla’s remains are in the tomb, he wishes to move them somewhere else. |
| 8 | A dart trap is triggered, and all the characters are hit; 1d4 Piercing damage (DC 13 Constitution or have the Poisoned condition for 1 hour). |
Background. The story of this forlorn place goes back hundreds of years. It was formerly a vault, used to guard the treasure of wealthy, selfish kings who would rather keep their riches hidden and away than help their people.
State. An elf named Jelwen lives here. He is obsessed with Lyla Strong’s story and his goal is to bring her back from the dead. For a long time, he has tried to locate her remains, but so far, he has only found her swords.
The Demon. Noticing his insane ambition, a demon noticed Jelwen’s desperate soul and offered him a deal. The elf sold his soul in exchange for forbidden knowledge. He is close to discovering where Lyla’s bones are.
Getting There
The characters must travel for 3 days to the edge of the woods where the forest hugs the mountain skirts (DC 14 Survival check). Failing means their journey takes 2 more days, and a pack of six wolves attempts to ambush them.
This adventuring supplement is designed for D&D5e. On out Patreon page you can get it in PDF format (see image). Notice that some of the layout elements can only be presented as intended in the PDF layout (side-margin boxes and statblocks). The downloads include hi-res images for the maps.
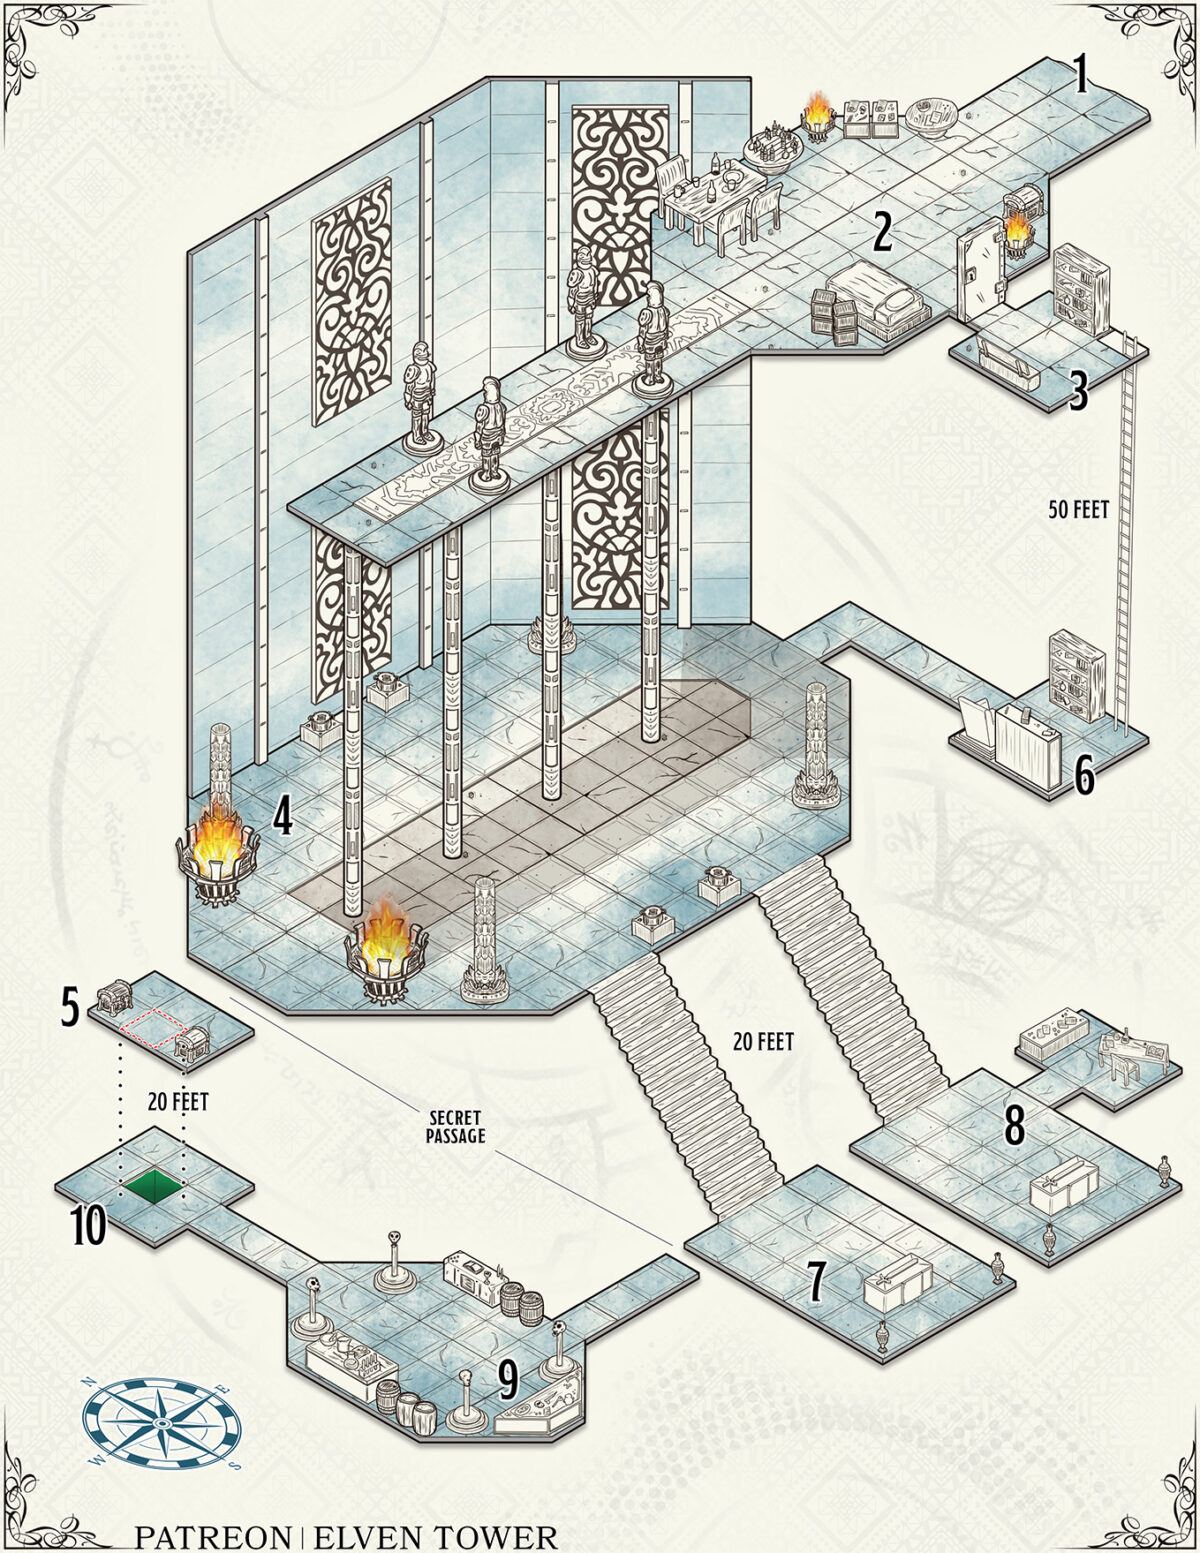
1. Hidden Entrance
Just when the heroes start losing faith about finding this place, they spot a monolith (see image on previous page). After investigating the area and the porous surface of the somewhat squared rock, they discover the dungeon’s entrance. A tunnel covered by twigs, leaves, and branches.
2. Antechamber and Elevated Corridor
This area looks like someone’s quarters; everything seems lived-in. The room features a couple of bookshelves, a table with some food, a chest with mundane belongings, and even a bed.
Beyond the room, a corridor-like platform stands 50 feet above the level below (area 4). A series of statues flank the central pathway, marked by a beautiful rug.
Braziers. Magic wards keep these lit at all times. A Detect Magic spell confirms this.
3. Safe Trapdoor
The door to this side-room features a high-quality lock (DC 20 Thieves’ Tools). The characters can opt to destroy the door entirely but doing this triggers a Random Event (see table).
Trapdoor. If the heroes bypass or destroy this lock, they can safely descend and reach area 6.
4. Main Chamber
Nothing remains of this former vault’s contents. But the columns and pillars still stand strong. The east side of this large hall has a 5-foot wide corridor that takes to area 6.
The west side, flanked by two large ever-burning braziers, features a tall statue. This is King Ulrich, who sat on the throne hundreds of years ago before the Great War (DC 20 History). The world has changed a lot; the territory he reigned and oversaw is now divided into many kingdoms.
Secret Passage. The heroes may take a Search action to inspect the statue (DC 18 Investigation). On a success, they discover a hidden lever that reveals a secret room when pulled (area 5).
Guardians. The six animated armors standing on the elevated corridor draw bows and shoot at all intruders moving below. The characters are safe if they stand outside their line of sight: leave the room or stand right below the platform.
5. False Treasure
The ornate chests contain nothing. They are not even real; they are illusions. A Detect Magic reveals this fact before anyone puts themselves in danger.
Trap. Whoever tries to open a chest falls 20 feet to the acid pond (area 10).
6. Study
A strong smell of pipe-weed permeates this area. An overfilled ashtray lies on the desk while the walls show many yellowish spots.
Jelwen the elf spends his time here reading, researching, and taking notes. With the help of the demon he sold his soul to, he enchanted the armors in area 2 to behave as guardians. He also placed the illusory chests in area 5 and the acid pond trap in area 10. Despite these security measures, Jelwen lives under the impression that no one would bother to come here.
Lore. The characters may spend 10 minutes reading the documents and diary on the desk. They learn of Jelwen and his goal to bring Lyla Strong back to life. However, they also discover the demon’s role in this situation.
7. West Vault
As if they were invaluable and precious, Jelwen dedicated these underground vaults to hold each of Lyla’s longswords. However, Lyla’s swords have nothing special. They are rusty, steel weapons.
Secret Passage. If the heroes take a Search action, they may find the hidden passageway to area 9 (DC 15 Investigation).
8. East Vault
Use the same description as in area 7. But this vault has no secret corridor adjacent to it.
9. Laboratory
The essence of dark rituals and magic permeates this chamber. So far, Jelwen has only used wild animals as fuel for his goals. But the demon and his secret agenda could change that any given day.
10. Acid Pond
Whoever falls into the pond takes 4d6 Acid damage. They can spend an action to exit the pond, taking an additional 1d6 Acid damage.
Lyla Strong
She could have changed the world if she had teamed up with other heroes with pure hearts, some say. Still, her feats and prowess changed the lives of many. A few larger towns than Appleton erected statues in her honor.
Development
If the heroes ignore the swords because they believe they are worthless, Jelwen lets them leave and does not make an appearance. But if they plan to leave with them, he waits for them in area 2. He reveals his intentions to revive Lyla Strong while the demon’s shadow floats beside him. He hopes the heroes will consider it wiser not to interfere. If they refuse, though, a battle ensues. Jelwen (mage) fights from the elevated platform while the vrock demon helps. Will they survive?
This awesome cartography piece was featured in on our Patreon page and on issue 66 of Dungeon Vault Magazine.
If you like our content, please consider checking out our Patreon page so you can get the latest content in early-access, full HD maps, and the best TTRPG content!
