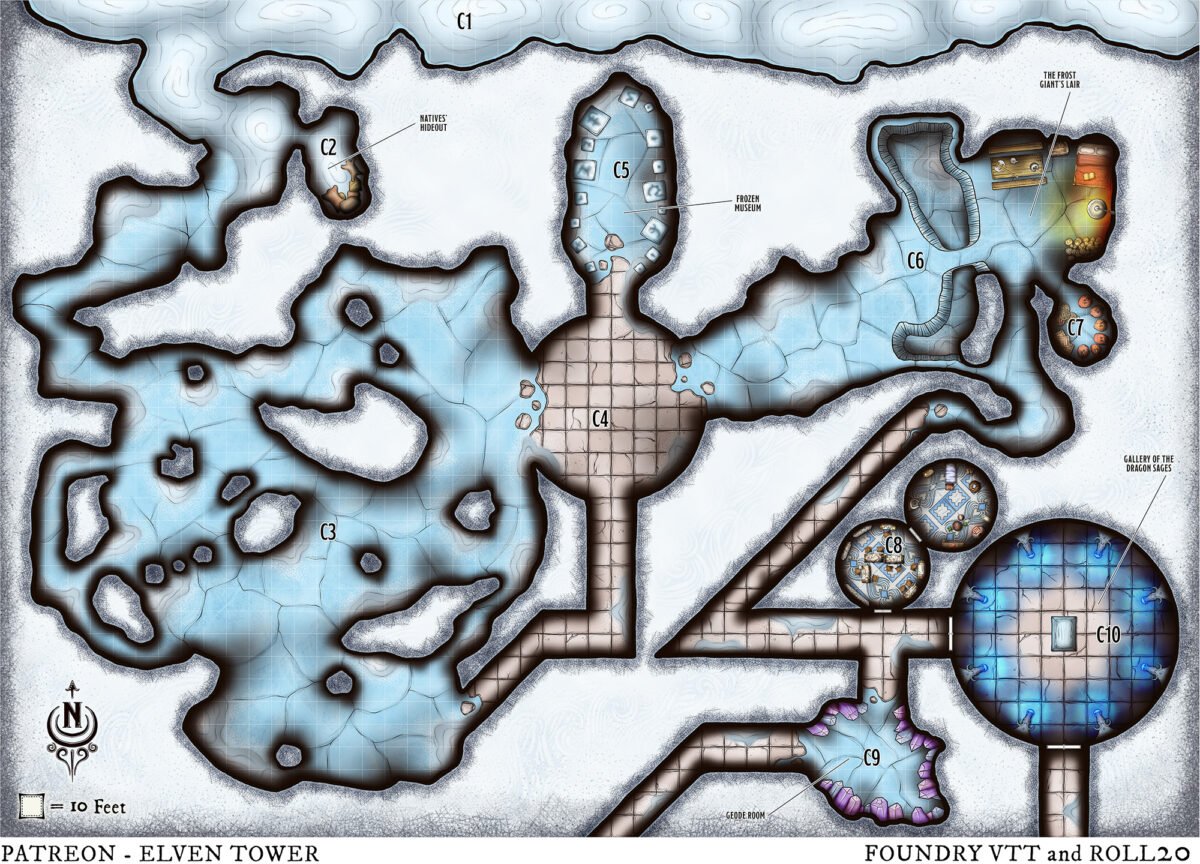
Our Silver Coin tier on Patreon grants access to this adventure and the maps within it, along with 50+ other one-shots, and our map catalog of 900+ maps. You can also purchase this adventure individually in drivethruRPG. This is a sample version of the adventure section that features map 926 Gallery of the Dragon Sages.
Ruins of the Dragon Sages Temple
“I am no mindless monster. I am a giant. And I do not deny my latest actions may have harmed others. But survival was my priority. Alas, this is not my world.”
Gormund Korr, Frost Giant
New Tidings
The findings in the yeti’s lair reveal that the recent attacks and tragedies were caused by the stressed yetis; the locals had been all wrong. After realizing his mistake, Hayden apologizes half a dozen times. The heroes come to the same conclusion.
But this does not explain the huge humanoid footprints, the materials and goods stolen, and the rumors of a seven-story-tall creature do not align with the yetis.
With renewed resolve, the group must track the huge footprints through the inclement region. The party reaches a cavern a few hours later. On the way through the frozen wasteland, check for an Arctic Encounter (p. 142-143, Shadowdark RPG).
Different Worlds
The characters ignore that astral, cosmic forces are at play. The giant arrived into this world due to the absurdly strong magic stored for ages within the Dragon Sages’s effigies and their energy orbs (see area C10). This arcane power reached a boiling point and opened a portal between worlds, creating a cosmic connection with a foreign plane of ice. Gormund Korr, the frost giant, had the misfortune of being there…
Temple Ruins
The frost giant had to improvise to survive and adapt. He explored his surroundings and brought materials, supplies, and animal pelts to build a home. He chose to stay near the mysterious chamber where he appeared (area C10), hoping to find a way to travel back to his world.
Dungeon (Risky). Check for a Random Event every 2 crawling rounds (see below).
Mission. The characters are here to stop the monster. But when they realize the giant is not here of his own accord, their goal could then become to help it go back to its home plane.
Hayden. The elf does not support the idea of helping the giant in any way. He strongly expresses this if the heroes consider a different approach.
Random Events – 1d8
|
1d8 |
Details |
|
1 |
Trap. The ground looks different and uneven (Tell). Throw a rock or similar to reveal the pit (Find). They can just avoid walking on it (Disable). If they fail to spot it, the first hero that steps on it falls, 1d6 damage. |
|
2 |
Hayden finds suspicious footprints. They are small and cannot be the giant’s. Four icicle imps stand in place, posing as statues and waiting to ambush the trespassing crawlers (DC 12 WIS to spot them). |
|
3 |
Trap. Stalactites and stalagmites all around (Tell). They look up and notice some stalactites about to fall (Find). They can shoot or throw rocks at them (Disable). If they fail to spot them, 1d8 damage. |
|
4 |
A current of freezing air traverses the dungeon. All light sources are extinguished. The air is extremely cold and can numb the travelers’ extremities (DC 12 CON). On a fail, their next check has Disadvantage. |
|
5 |
Three Level-1 Rival Crawlers catch up with the characters. Roll for Ancestry, Class, and Alignment. They are Unknown and Poor. They are in debt to the Thieves’ Guild (Secret) and desperate to make money. |
|
6 |
A polar bear is exploring the cave. The characters can attempt to hide to avoid being spotted (DC 12 DEX). If the bear notices their presence, it attacks unless they give him enough food (12 rations). |
|
7 |
The characters stumble upon the frozen bodies of a couple of unfortunate adventurers. They have backpacks and some gear with them. Roll twice on the 0-3 Treasure Table (p. 270-271, Shadowdark RPG). |
|
8 |
The characters are exploring a new room, mapping their progress, investigating the place, or traveling from one area to another when suddenly a Light Mishap occurs (p. 110, Shadowdark RPG). |
The Truth About the Giant
Gormund is not a mindless beast. He is willing to parley and explain his situation, but he will not tolerate puny, tiny humanoids telling him he is a monster or harming him. Consider the following:
Friendly. The crawlers introduce themselves and offer to talk. For this, at least one of the crawlers must speak Giant. Otherwise, they can only act Neutral or Hostile in this interaction. If the characters listen to Gormund and accept to help him return to his world, they may be able to avoid having to fight him (see Conclusion). Additionally, if the heroes agree to help Gormund, he expresses his gratitude with a couple of gifts. He gives the heroes a Winter Blade and a Skull Lute (see below). The former he had in his possession, the latter he found here and knows nothing of.
Neutral. The characters need not make contact with Gormund; they can sneak toward area C8 by hugging the south wall and try to loot the rest of the dungeon (see map). They can even leave without confronting the giant (see Conclusion). However, Hayden sees the giant as a threat that must be dealt with and insists they fight him.
Hostile. The heroes seek to eliminate Gormund Korr, the Frost Giant. He heard Hayden’s provocation, though. An ambush is still possible but they need to back off and rethink their approach.
Parley. Often, two opposite forces opt to set pride aside and talk. Usually, the fight still occurs. But talking may set clear compromises, and this softens the losses for both sides involved.
Allies. Confronting the giant up front is almost suicidal. He is too strong. Despite what Hayden thinks, befriending him and trying to help him return to his home plane is the path of least resistance.
Jerkies. Life in the tundra requires some adaptation. A common and logical practice is to take advantage of the cold weather to help food last longer. Sun-dried meats are also great for this.
Temple. This once belonged to the Dragon Sages. Unfortunately, there are no journals or logs written by their former occupants.
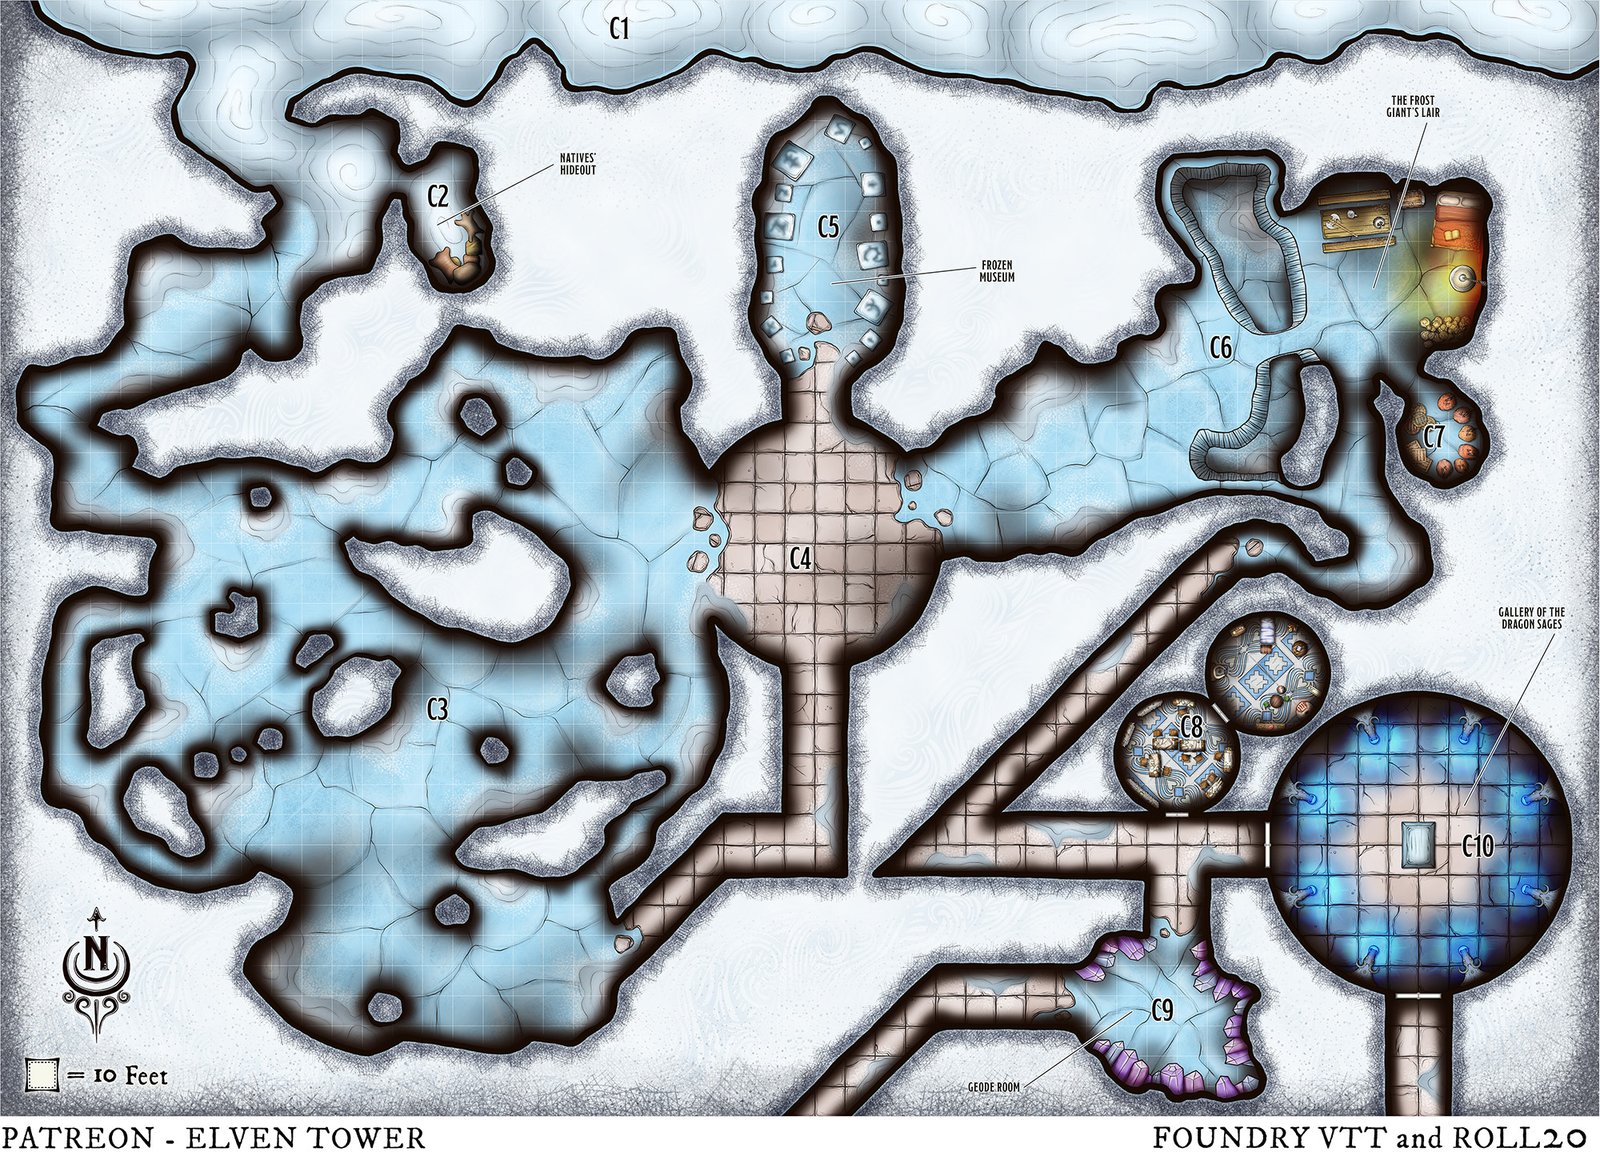
C1. Tundra
Hayden or the characters find clear, shod tracks going in and out of the icy caverns. It can be inferred that this is the right place. The cavern’s entrance tunnel is 35 feet wide and 40 feet high. Tall for a human but shy of the inflammatory rumors.
C2. Natives’ Hideout
Somebody used to live here, but there are no signs of them. If the giant got to them or if they left on their own, it cannot be known. The only things left are animal pelts and useless trinkets.
C3. Ice Caverns
A vast network of caves and tunnels. The entire floor is frozen and slippery. Crawlers must be careful and advance at a slow pace. Moving at regular speed has a 2-in-6 chance of making them slip and hit the floor, dealing 1 point of damage.
Enemies. Four icicle imps attack the crawlers. They attempt to ambush them by standing still and looking like ill-placed ice statues.
C4. Circular Antechamber
This area used to be a beautiful chamber with paintings and decorations. It is just a shadow of what it once was, but what little remains of the frescoes and artwork can still be seen.
C5. Frozen Museum
Two dozen imperfect cubes of ice contain specimens or weird creatures or at least parts of them. This used to be a laboratory of some sort. However, all test subjects are dead. The ice prisons can be thawed if the characters spend 1 day to do it but there is nothing of value.
Encounter. If the crawlers spend time investigating or thawing the frozen subjects, they eventually draw the attention of an ochre jelly.
C6. Frost Giant Lair
The giant’s improvised lair has a natural door: two icy walls close in on each other and leave a stretch opening. The characters see light coming from a cooking pot hanging from a chain through the opening when they approach this place.
Hayden. The pale-skinned elf is certain this is the right place this time. He is invaded by recklessness, he draws his bow and yells, “Come out of there, you beast! You are outnumbered!” Gormund Korr responds in Giant: “Who’s there…?”
C7. Larder
The giant has hunted and skinned bears, oxen, deer, and wolves. Several oversized morsels of meat hang here. The crawlers can obtain up to 20 rations if they spend 1 crawling round cutting the meat into smaller, more manageable portions.
C8. Forsaken Quarters
Locked door. A thief requires the proper tools to open it (DC 15 DEX). It takes 1 crawling round to explore the rooms in pristine condition. The crawlers find fancy robes, paintings, decorative vases, and a couple of precious stones. All this is worth 800 GP, and it takes up 6 gear slots (3 XP). Additionally, roll four times on the 4-6 Treasure Table (p. 272-273, Shadowdark RPG).
C9. Frozen Geode
This cavern’s purple and pink crystal walls make it look like the inside of a geode. There are round rocks half-buried here.
Treasure. The heroes need 2 crawling rounds to chisel away the round rocks; they get 2d6 geodes (1 slot each). Breaking them destroys their contents.
Geodes. A blacksmith can safely crack open the rocks. Roll 1d20 for the result of this:
- 1-10 – Pearl (40 GP).
- 11-15 – Emerald (120 GP).
- 16-19 – Ruby (200 GP).
- 20 – Kytherian Cog (300 GP).
Services. Blacksmiths have specialized tools to slice geodes open to safely extract their contents, usually a valuable gemstone. Doing this without these tools always ruins the contents. A blacksmith does not only forge weapons or armor. They create all kinds of tools and iron accessories too. They are also experts at cracking stones, ores, or other stuff open.
C10. Dragon Sages Effigies and Arcane Door
This massive circular chamber features eight dragon head effigies symmetrically lined up against the wall; all of them look at the ominous ice pedestal at the center. The arcane orbs in their mouths glow with an eerie, blue light.
Treasure. The blue orbs can be sold to the right buyer (3 gear slots and 150 GP each, 2 XP for the lot). However, taking them as loot eliminates the possibility of reactivating the portal (see below).
Balance. A delicate equilibrium must be maintained for the effigies to summon a gate between worlds successfully. Tempering or removing any of the blue orbs shuts down the magic in the room. Putting the orb back in place has no effect.
Activation. Gormund has studied the chamber for days, but he does not understand what must be done to reopen the gate from whence he came. Any spellcaster can commune with the dragon sages for 1 hour to activate the magic in the room. However, Hayden does not like this idea. See Conclusion to see how this can unfold.